The idea of a shed house sounds unconventional.
But thousands of people are converting simple shed structures into beautiful, functional homes every year. They cost a fraction of traditional construction. They build faster than any site-built house.
And with the right planning, they look and feel like proper, comfortable homes.
Whether you want a backyard studio, a guest house, a full-time tiny home, or a weekend retreat, a shed house plan is the most accessible path to affordable homeownership or extra living space.

This guide covers the entire process. Dimensions, zoning, framing, insulation, plumbing, electrical, interior finishing, and everything else that turns a shed into a home. Every question you have about shed houses is answered here.
1. What Exactly Is a Shed House?
A shed house is a residential structure built using shed construction principles. It starts with the simple, efficient framing of a traditional storage shed and transforms it into a livable space with insulation, plumbing, electricity, windows, and interior finishing.
The result is a compact, affordable home that costs dramatically less per square foot than conventional construction.
Shed houses range from tiny 120-square-foot studios to substantial 800-square-foot cottages with multiple rooms. They suit a remarkable variety of uses. Permanent tiny homes, guest accommodations, backyard offices, art studios, vacation cabins, and accessory dwelling units.

You’ll also love to learn about mobile homes with our guide.
| Shed House Use | Typical Size | Complexity | Permit Requirements |
|---|---|---|---|
| Backyard studio or office | 100–200 sq ft | Low | Often none |
| Guest accommodation | 200–400 sq ft | Moderate | Usually required |
| Full-time tiny home | 300–600 sq ft | High | Required |
| Vacation cabin | 400–800 sq ft | High | Required |
| Accessory dwelling unit | 300–800 sq ft | High | Required |

The building above shows the range this format allows. Metal siding, roll-up doors, and a covered patio on one end. It reads industrial from the outside, but the interior can be anything. That flexibility is the whole point of a shed house.
2. Check Local Zoning Laws and Building Codes First
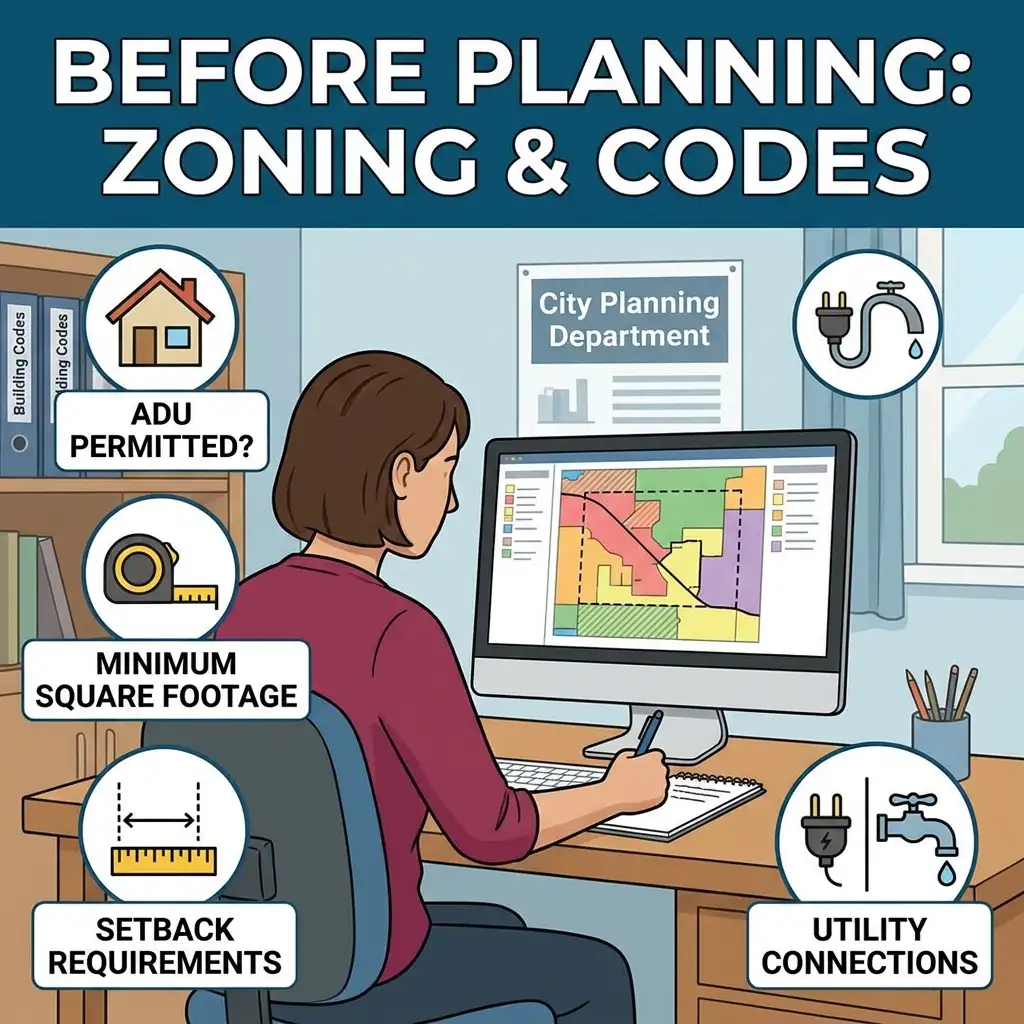
Before drawing a single line on paper, research your local zoning laws and building codes. This step is not optional. Regulations vary dramatically by location and they determine what you can build, where you can build it, how large it can be, and whether it can legally be used as a home.
The infographic above lays out the five questions you need answered before anything else. Is an ADU permitted on your lot. What is the minimum square footage for a habitable structure. What are the setback requirements from property lines and other buildings. What utility connections are required. And what zoning classification applies to your property.
Many areas classify structures under a certain square footage as accessory structures requiring no permit. Others require full residential permits for anything used as living space. Some zones prohibit habitation of shed structures entirely.
Permit first: Call your local planning or zoning department and ask all five questions from the infographic in one call. Write down the answers. This conversation costs nothing and prevents violations that can cost tens of thousands of dollars to fix.
3. Understand Standard Shed House Dimensions

Dimensions are the foundation of every planning decision. Getting them right means the space feels comfortable and furniture fits properly. Getting them wrong means a house that is either wastefully large or frustratingly cramped.
The most common and practical shed house dimensions range from 12×20 feet to 16×40 feet. A 12×24 foot shed house provides 288 square feet, enough for a studio with a sleeping loft, a kitchenette, a bathroom, and a small living area. A 16×32 foot plan provides 512 square feet, enough for a proper bedroom, a full kitchen, a bathroom, and a comfortable living room.
The infographic above makes the sizing decision visual. The 12×24 plan on the left shows a compact studio layout with a loft. The 16×32 plan on the right shows a spacious layout with a full bedroom. Two very different homes from the same basic shell.
4. Choose the Right Roof Style for Your Plan
The roof style has an enormous impact on the shed house — both visually and functionally. Different roof styles create different amounts of interior headroom, affect how well the structure sheds rain and snow, and determine how complex the construction is. Choose a roof that suits your climate, your skill level, and your interior space goals.

The gable roof on the left creates maximum headroom at the center ridge, sheds rain and snow effectively, and is simple to frame. The shed roof in the middle is a single slope, the simplest to build, and suits modern aesthetics beautifully. The gambrel roof on the right creates the most interior volume and loft space but requires more complex framing.
| Roof Style | Interior Space | Build Complexity | Best Climate | Visual Style |
|---|---|---|---|---|
| Gable roof | Good center height | Moderate | All climates | Traditional |
| Shed roof (single slope) | Varies by pitch | Simple | Mild to moderate | Modern, minimal |
| Gambrel roof | Maximum volume | Moderate-High | All climates | Barn, rustic |
| Hip roof | Moderate | Complex | High wind areas | Traditional, formal |
| Skillion | High on one side | Simple | Mild climates | Contemporary |
5. Plan the Interior Layout Before Building
he interior layout plan is the most important design document for any shed house project. Every decision, where the bathroom sits, how the kitchen flows, where the sleeping area is located, should be resolved on paper before a single board is cut.
Changes on paper are free. Changes during construction are expensive.

Draw the floor plan to scale on graph paper. Use a scale of one quarter inch equals one foot. Mark all exterior walls, door and window openings, and interior partitions. Place major fixtures like the toilet, sink, shower, stove, refrigerator, bed, and sofa as scaled cutouts you can move around until the layout feels right.
6. Design a Smart Bathroom for a Shed House
The bathroom is the most technically complex element of any shed house. It requires plumbing connections, proper ventilation, moisture-resistant materials, and thoughtful space planning. In a small shed house, the bathroom has to work harder than a standard residential bathroom in a fraction of the space.
A standard minimum bathroom for a shed house is approximately 5×7 feet, or 35 square feet. That fits a toilet, a small vanity sink, and a compact shower. A 3×3 foot corner shower unit is the most space-efficient shower option.

The bathroom above shows what is possible in a compact footprint. A wall-hung vanity floats above the floor and creates the impression of more space. The wall-hung toilet does the same. A glass shower enclosure keeps the room feeling open instead of enclosed. The wood paneling adds warmth without heaviness.
7. Plan the Kitchen Zone Efficiently
A shed house kitchen must be compact, efficient, and completely functional. Every inch of counter space, cabinet space, and appliance placement has to be intentional. A poorly planned tiny kitchen frustrates daily life. A well-planned one works beautifully regardless of its size.
The kitchen above is a textbook example of doing this right. A galley layout with two parallel counters uses the narrow floor plan efficiently. The labels point out the specific decisions that make it work.

Eighteen inches of counter space on each side of the cooking surface. That is the minimum for safe food prep. Open shelving instead of upper cabinets keeps the narrow space from feeling claustrophobic.
A mobile cart adds flexible workspace that rolls out of the way when not needed. A compact 24-inch refrigerator saves significant floor space compared to a full-size unit.
8. Incorporate a Sleeping Loft for Bonus Space
A sleeping loft is one of the most ingenious features of any shed house plan. It uses the vertical space created by a gable or gambrel roof to add a full sleeping area without consuming any of the main floor footprint.

The loft sits above the main living area, reached by a compact stair or a ship’s ladder, and transforms a small floor plan into a genuinely two-level home.
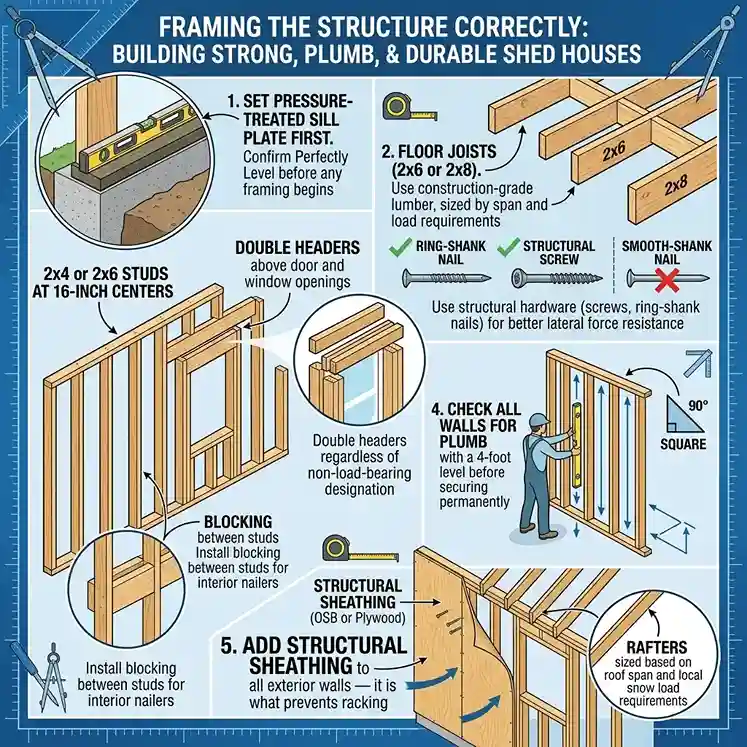
9. Frame the Structure Correctly
Proper framing is the structural foundation everything else depends on. A correctly framed shed house is strong, square, plumb, and built to last for decades. A poorly framed one develops problems that become increasingly expensive to correct over time.
10. Insulate Properly for Year-Round Comfort
Insulation transforms a shed from a seasonal structure into a comfortable year-round home. Without proper insulation, a shed house is unbearably hot in summer and bitterly cold in winter. Energy bills are enormous. The structure is genuinely unlivable for significant portions of the year.

Minimum R-19 in walls and R-30 in the ceiling or roof. Spray foam provides the highest performance per inch and air-seals at the same time. Rigid foam board is the most cost-effective. Fiberglass batts work but must be installed carefully to avoid gaps and compression.
| Insulation Type | R-Value per inch | Cost Level | Best Application |
|---|---|---|---|
| Spray foam (closed cell) | R-6 to R-7 | High | All surfaces, best air sealing |
| Rigid foam board | R-4 to R-6 | Moderate | Walls, roof, under floor |
| Fiberglass batts | R-3 to R-3.8 | Low | Standard stud cavities |
| Mineral wool batts | R-3.7 to R-4.2 | Moderate | Walls, better fire rating |
| Cellulose (blown in) | R-3.5 to R-3.8 | Low-Moderate | Ceiling cavities |
11. Install Electrical Systems Safely
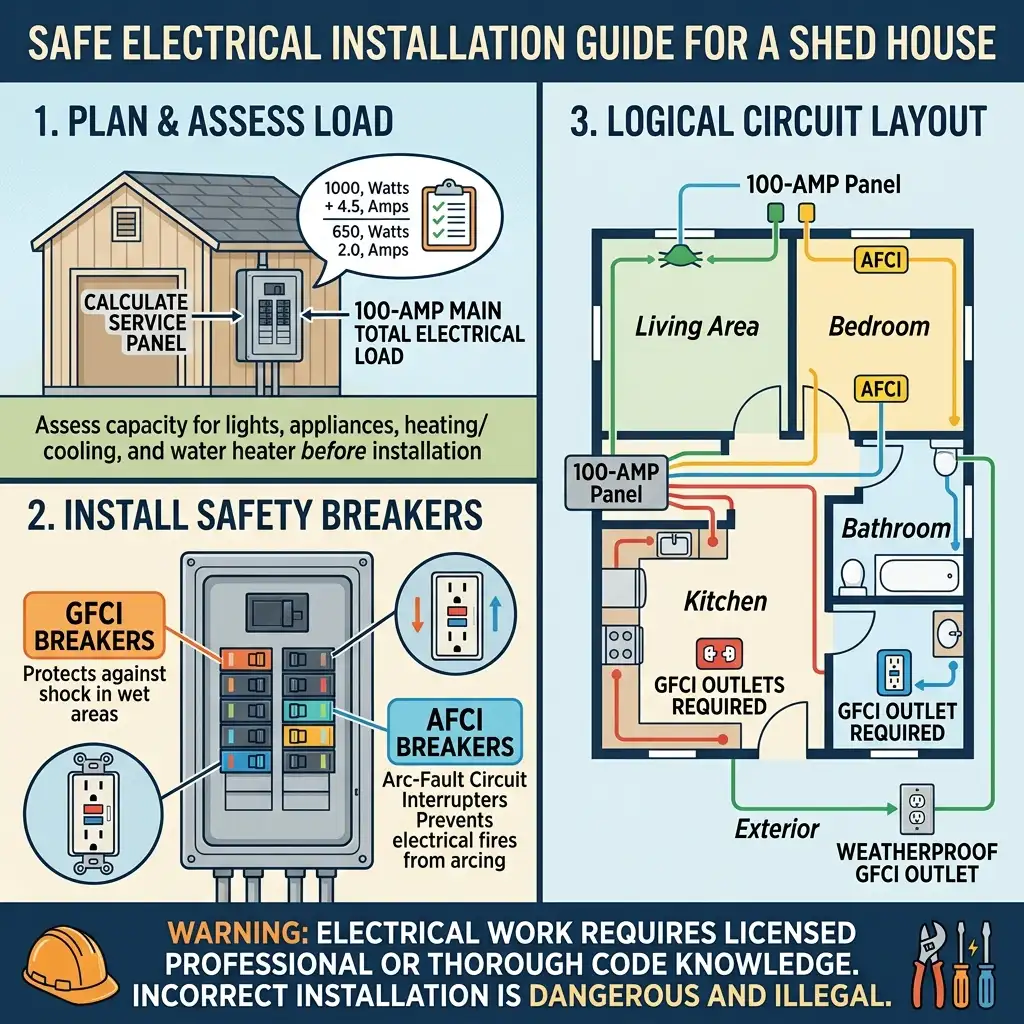
Electrical work in a shed house is the one area where you cannot afford to guess. Incorrectly installed wiring is dangerous and illegal. The infographic above breaks the entire process into three stages, and each one matters.
Stage one is load calculation. Before buying a single breaker, add up every appliance, light, and outlet you plan to install. The panel needs to handle the total. A basic shed house usually needs a 100-amp panel.
Stage two is safety breakers. GFCI breakers protect against shock in wet areas like the bathroom, kitchen, and any exterior outlet. AFCI breakers prevent electrical fires from arcing in the walls. Modern code requires both in specific locations.
Stage three is circuit layout. Group outlets logically. Kitchen on dedicated circuits. Bathroom on GFCI. Bedrooms on AFCI. The layout diagram above shows how this looks in a real plan.
12. Plumb the Shed House for Running Water

Plumbing turns a shed from a shelter into a home. Running water for drinking, cooking, and bathing is non-negotiable for full-time occupancy. Planning the layout before construction saves significant time and cost.
The infographic above shows the full system in one view. Cold water enters from the main supply. Hot water comes from a compact tankless heater. Both run through the wall cavities to each fixture. The drain lines slope downward at a minimum of one quarter inch per foot toward the main drain connection.
The single most important design decision is grouping. Keep the kitchen and bathroom on the same wall or back-to-back if possible. This shortens both the supply runs and the drain runs. It also concentrates the wall penetrations in one area, which makes insulation and air sealing simpler.
The vent stack through the roof is required for every plumbing system. It allows air into the drain lines so water flows freely instead of glugging. Skip it and every drain in the house will run slow.
13. Choose the Right Foundation for Your Shed House

The foundation supports everything above it. Get it wrong and every problem that follows, from sticking doors to cracked drywall, traces back to this step.
The infographic above shows the most common and affordable option: concrete piers. Each pier is poured in a tube form dug below the local frost line. The piers support a pressure-treated beam that carries the floor frame.
Why frost depth matters. If the pier bottom sits above the frost line, the ground under it will freeze, expand, and push the pier up. When it thaws, the pier drops. Over two or three winters, the entire foundation shifts. Digging below frost depth prevents this completely.
Three foundation types fit shed houses. Concrete piers, the option above, are the cheapest and work in almost any climate. A concrete slab is more expensive but more stable and moisture-resistant. Adjustable steel pier blocks on a gravel pad work for non-permanent structures in mild climates.
Code check: Frost depth varies dramatically by location. In the southern US, it can be 12 inches. In northern states, it can be 48 inches or more. Call your local building department and ask for the exact depth in your area before digging.
14. Design the Exterior for Curb Appeal
A shed house that looks like a temporary structure from the outside undermines everything beautiful happening inside. Thoughtful exterior design transforms a utilitarian shed into an attractive small home that fits comfortably into its neighborhood setting.

Exterior cladding choices have enormous visual impact. Horizontal lap siding in wood or fiber cement creates a traditional cottage appearance. Board and batten vertical siding creates a farmhouse or barn aesthetic. Cedar shingles create a New England cottage look.
Metal cladding in standing seam or corrugated panels creates a contemporary, industrial appearance. All exterior cladding must be appropriate for ground contact at the base and must include a proper moisture barrier beneath it.
15. Plan Window and Door Placement Carefully
Windows and doors are not just openings. They are the primary architectural elements that give a shed house its character and determine how the interior feels to live in.

The infographic above lays out five rules that most DIY builders learn the hard way.
Cross-ventilation. Place windows on multiple walls. Air enters on the windward side and exits on the opposite side. This creates natural cooling for free.
Living area light. Position the main living room windows to capture the best view and the most natural light. This is where you spend the most time.
Kitchen sink window. Above the sink, for both daylight and a view while working. Small decision, big daily impact.
Bedroom egress. This is code. The clear opening must be at least 5.7 square feet so you can escape through it in a fire. Do not shrink it for style.
West-facing heat. Avoid too many windows on the west wall. Afternoon sun creates significant heat gain in summer that no small HVAC system can fully offset.
16. Maximize Interior Space With Smart Design
Every square foot inside a shed house must earn its place. Smart interior design strategies turn a compact floor plan into a space that feels generous, comfortable, and completely livable. The difference between a cramped tiny house and a comfortable one is almost entirely a matter of design decisions rather than actual square footage.
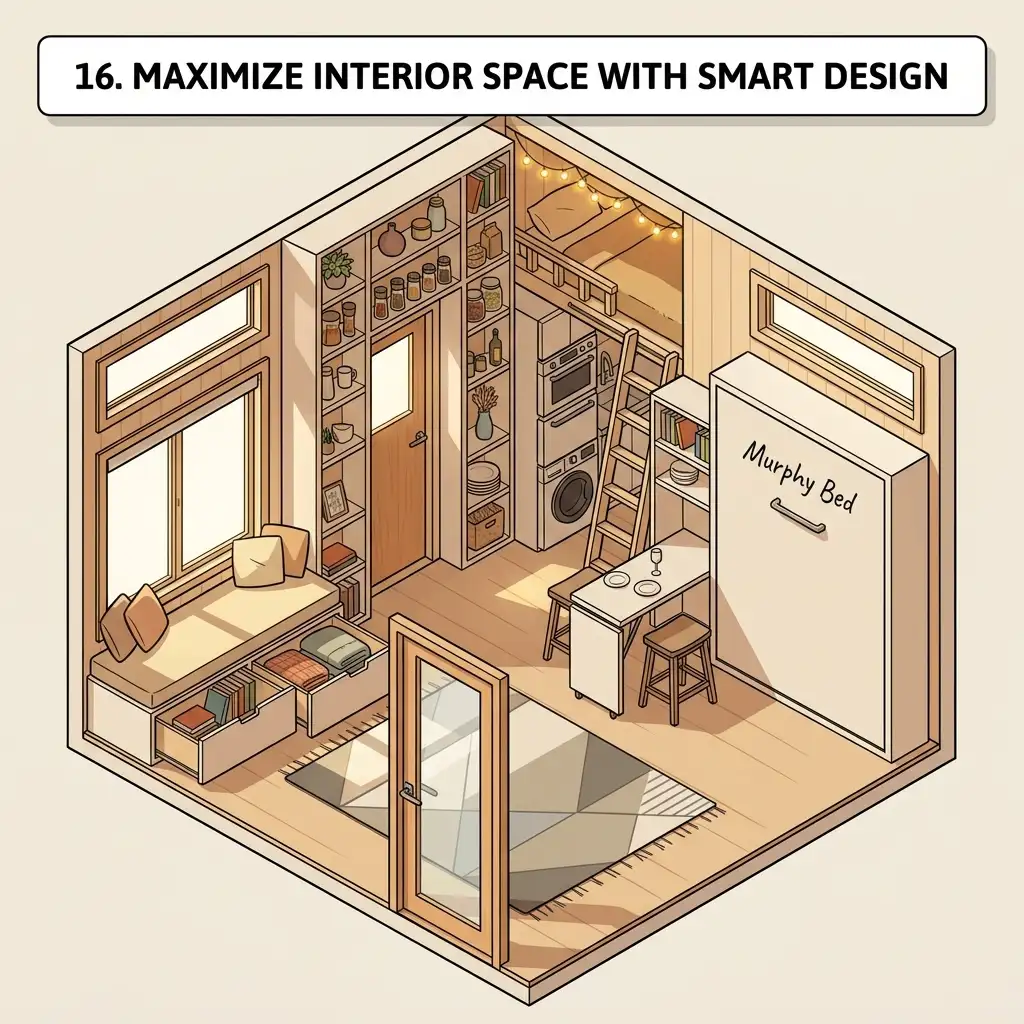
Window seat with storage. Seating plus 20 to 40 cubic feet of storage underneath. A reading nook and a place to hide blankets in one element.
Built-in shelving around the door. Turns the transitional wall into productive storage instead of dead space.
Murphy bed. Folds into the wall during the day, returning the entire bedroom floor to living space.
Loft with stairs that double as drawers. Every step gives you storage you did not have before.
Mobile dining table. Rolls out of the way when not in use. Fixed furniture in a small space is wasted space when the function is not needed.
17. Create a Comfortable Living Area
The living area is where the quality of daily life in a shed house is most experienced. It must accommodate relaxing, socializing, and in many cases working from home. In a small floor plan, every piece of living room furniture must be chosen and positioned with exceptional care.

The room above uses three strategies worth copying.
Compact sofa, not full-size. A 72 to 84 inch sofa fits a shed house living area without dominating it. A standard 90-inch sofa would crowd this space.
Lift-top coffee table. Provides surface space and hidden storage at the same time. The photo shows it open with books and a remote inside.
Furniture pulled off the walls. Counterintuitive but true. Furniture pushed toward the center of the room makes the space feel larger because it creates visual breathing room at the edges.
A single large rug anchors everything. The patterned rug defines the living zone within the open floor plan. Without it, the sofa and chairs would float.
Design decision: Skip the sectional. In a small living area, a compact sofa with two accent chairs gives you more flexibility. You can rearrange, remove a chair for more floor space, or open the room toward other zones.
18. Finish the Interior Walls and Ceiling
Interior wall and ceiling finishing transforms a raw framed structure into a home. The finishing material choices affect the atmosphere, the apparent size, and the overall quality feel of every room. Choose materials that are appropriate for the small scale of a shed house interior.

Shiplap adds texture and warmth that painted drywall cannot match. It is lighter than drywall and easier to install on a DIY project. The horizontal lines also make the ceiling feel higher in a small room.
The main options.
Shiplap. Farmhouse, warm, easy to install. About $1.50 to $3 per square foot in materials.
Drywall. Smooth, clean, accepts any paint. Heavier and messier to install but cheaper than shiplap.
Tongue-and-groove pine. Cabin feel, rustic. Light weight, quick install.
Plywood (sanded). Industrial look, very cheap, easy to paint.
19. Install Heating and Cooling for All-Season Living
A shed house without proper heating and cooling is habitable for a fraction of the year. Full-time living requires a climate control system that works in summer heat and winter cold. The compact size of a shed house actually works in your favor. Small spaces heat and cool quickly with appropriately sized systems.

Why mini-splits win for shed houses.
- No ductwork needed. Ductwork is the most expensive part of a traditional HVAC system and the hardest to fit in a small structure.
- Only one small penetration through the wall for the refrigerant line.
- Energy-efficient, quiet, and controllable from a smartphone.
- One unit handles both heating and cooling. No separate furnace and AC.
The wood stove shown in the same image is the supplemental option for colder climates. It provides beautiful visual warmth and cuts heating costs on the coldest days.
20. Plan Storage From the Beginning
Storage planning in a shed house must happen during the design phase. Not after the walls are closed. Retrofit storage is always less effective and more expensive than storage built into the original plan.

The cutaway above shows five storage locations and calculates the total volume they provide. Under-stair drawers. Knee wall cabinets. Loft cubbies. Built-in wardrobes. Kitchen pantry. Each one captures dead space that would otherwise be wasted.
The table on the right in the image is the part most people skip. Total the storage volume your plan provides and compare it to what the occupants need.
21. Choose a Shed House Plan Style That Suits You

Shed house plans come in every architectural style imaginable. The structural simplicity of shed framing is compatible with traditional, modern, rustic, and farmhouse aesthetics. Choosing a style before designing the plan ensures that every detail, from roof pitch to window style to exterior cladding, works together as a cohesive whole.
The infographic above shows four options and what defines each.
Modern Farmhouse. Board and batten siding, simple gable roof, black window frames, welcoming front porch. The most popular style right now and the easiest to source materials for.
Scandinavian-inspired. Clean lines, minimal trim, large windows, monochromatic exterior palette. Works best in mild climates where big windows do not create energy problems.
Rustic cabin. Reclaimed wood siding, exposed interior timber framing, steep gable or gambrel roof, stone or brick chimney. The heaviest on materials but the most distinctive.
Contemporary. Metal cladding, flat or low-slope roof, floor-to-ceiling glazing, minimalist material palette. The most expensive to build because flat roofs need careful waterproofing.
22. Decorate the Interior to Feel Like a Proper Home

Decoration transforms a finished construction project into a home. The design principles that apply to any interior, cohesive color palette, layered lighting, appropriate furniture scale, personal touches, apply with even greater importance in the compact interior of a shed house. Every decorating decision has an outsized impact in a small space.
The room above shows how this works. Look at what is doing the heavy lifting.
Wood beams across the ceiling. Adds warmth and architectural detail without consuming floor space. The beams make the ceiling feel intentional rather than flat.
Window seat with cushions. Provides seating, hides storage underneath, and fills a corner that would otherwise be dead space.
Gallery wall instead of one large artwork. Multiple small frames fill a wall and make the space feel personal. One large piece would dominate.
Trailing plants on the shelf above the door. Draws the eye upward and makes the ceiling feel taller.
Neutral base with one accent. Pale walls, wood tones, light grey sofa. The colors come from the plants, the pillows, and the patterned items. Not from the walls.osphere that makes a small shed house feel like the most welcoming home imaginable.
23. Build a Front Porch to Extend the Living Space

A front porch multiplies the usable living space of a shed house without adding to the conditioned floor area. It creates an outdoor room that functions as a dining area, a reading spot, a social gathering space, and a transition between inside and outside.
The porch above shows what even a modest addition delivers. Four feet deep, running the full width of the shed house front. A simple shed roof extension supported by wood posts. A railing to define the space. A porch swing, two rocking chairs, and a small side table.
Why it works. The porch is visually the largest element of the house from the street. It makes the shed house read as a proper home rather than a shed with windows. It also creates a shaded outdoor space that gets used more than the conditioned interior on pleasant days.
24. Estimate Costs and Build a Realistic Budget

Shed house costs vary enormously depending on size, material quality, finish level, and whether you build yourself or hire contractors. A realistic budget prevents the project from stalling halfway through when funds run short.
The infographic above breaks the costs into three stages and shows what each one delivers.
Basic shell (DIY). Foundation, framing, sheathing, roofing, windows, and door. For a 12×24 structure, $8,000 to $15,000 in materials.
Systems installation (DIY). Insulation, electrical, plumbing, HVAC. Adds $5,000 to $15,000.
Interior finishing (DIY). Drywall or shiplap, flooring, kitchen, bathroom, fixtures. Adds $5,000 to $20,000.
Total for a complete owner-built shed house: $18,000 to $45,000 depending on finish quality.
Professional construction approximately doubles those material costs. The professional range is $36,000 to $90,000 or more.
| Shed House Budget Category | DIY Cost Range | Professional Cost Range |
|---|---|---|
| Foundation | $500–$2,000 | $1,500–$5,000 |
| Framing and sheathing | $3,000–$6,000 | $8,000–$15,000 |
| Roofing | $1,000–$3,000 | $2,500–$6,000 |
| Windows and doors | $1,500–$4,000 | $2,000–$6,000 |
| Insulation | $800–$2,000 | $1,500–$3,500 |
| Electrical | $1,500–$3,500 | $3,000–$7,000 |
| Plumbing | $1,500–$4,000 | $3,500–$8,000 |
| Interior finishing | $3,000–$10,000 | $8,000–$20,000 |
| Total estimate | $13,800–$34,500 | $30,000–$70,500 |
25. Common Mistakes to Avoid in Shed House Planning

Learning from common shed house planning mistakes is one of the most valuable things any first-time builder can do. These mistakes appear repeatedly across build journals, forums, and builder accounts. Knowing them in advance prevents weeks of lost time and thousands of wasted dollars.
The infographic above names the three biggest ones.
Mistake one: Skipping permits and zoning verification. Building before confirming what is legal means fines, delays, and structures that cannot be legally occupied. This is the single most expensive mistake on the list because it can force you to tear down what you built.
Mistake two: Underestimating insulation. An under-insulated shed house is uncomfortable and expensive to heat and cool. Adding more insulation during construction costs very little. Adding it after the walls are closed costs thousands.
Mistake three: Poor interior layout and plumbing issues. Discovering mid-build that the plumbing cannot run where you placed the fixtures means redesigning on the fly, which is always more expensive than planning on paper.
The four principles at the bottom of the infographic prevent nearly every other mistake. Verify permits. Plan thoroughly. Insulate generously. Sequence work logically.
Do this before framing: Plan the interior layout with scaled furniture cutouts before finalizing wall positions. A layout that works on paper almost always works in reality. A layout that gets changed on-site almost always costs more than planned.
Frequently Asked Questions (FAQs)
Q1: Can I live in a shed house full time legally?
It depends entirely on your local zoning laws and building codes. Many areas permit accessory dwelling units and tiny homes on residential properties. Others restrict habitation to the primary structure only. Some areas have minimum square footage requirements for habitable structures. Always verify your specific local regulations before building any structure intended for full-time human occupation.
Q2: How long does it take to build a shed house?
A motivated owner-builder working on weekends typically completes a basic shed house shell in four to eight weekends. Interior finishing adds another eight to sixteen weekends depending on complexity. A professionally contracted build typically completes a shed house in four to twelve weeks from foundation to occupancy. The permit and approval process often adds weeks or months before construction can begin.
Q3: What is the minimum size for a livable shed house?
Most building codes require a minimum of 120 square feet for habitable space. Practically, a 12×16 foot (192 square foot) shed house is the minimum for comfortable solo occupancy with a sleeping loft, compact kitchen, bathroom, and small living area. A 12×24 foot (288 square foot) plan is more comfortable for a single person or a couple and feels genuinely spacious with a well-designed layout.
Q4: Do shed houses hold their value?
A properly built, permitted, and code-compliant shed house used as an accessory dwelling unit adds measurable value to the primary property. Unpermitted structures typically add little to no appraised value and can create liability issues during property sales. The quality of construction, the finish level, and the permitted status are the primary determinants of value.
Q5: What is the most cost-effective shed house size?
The 12×24 foot (288 square foot) plan offers the best balance of livability, cost, and construction simplicity for most owner-builders. It is large enough to feel comfortable, small enough to build quickly and affordably, and dimensionally efficient with standard lumber sizes. It can be built to a habitable standard by a motivated owner-builder for $20,000–$35,000 in total materials depending on finish quality.
Conclusion
A shed house is one of the most accessible, affordable, and genuinely exciting paths to creating a home that is entirely your own. From the foundation to the rooftop, every decision is yours.
Start with research. Zoning, codes, and local requirements come before anything else. Then plan on paper until the layout feels exactly right. Build on a solid foundation. Insulate generously. Finish thoughtfully. Decorate with intention and fill the space with things that make it genuinely yours.
A shed house built with care becomes far more than a structure. It becomes the most personal home you have ever lived in.