Your basement is probably one of the most ignored spaces in your home.
Most people use it to store old boxes, broken furniture, or things they do not want to throw away.
But finishing your basement is one of the best things you can do for your home.

According to the 2025 Cost vs. Value Report by Zonda, a finished basement gives back about 71% of its cost when you sell your home.
The National Association of Home Builders also found that only 17% of new homes built in 2024 had a basement. That means your existing basement is actually rare and very valuable.
This guide will walk you through everything you need to know.
You will find before and after examples, a step-by-step checklist, cost tables, material comparisons, and tips from real experts. Let’s get started.
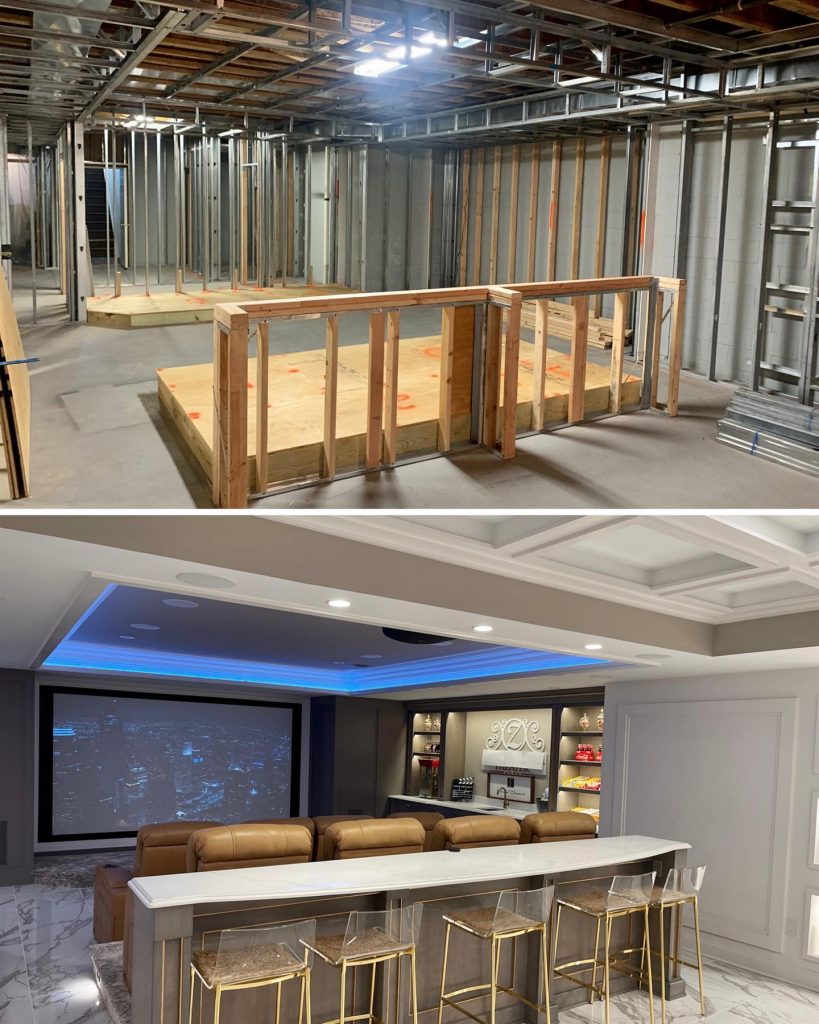
credits: @finishedbasementsnj
Nothing shows the power of a finished basement better than seeing what it looked like before.
Here are four of the most popular basement transformations with details on what changed in each one.
Storage Room to Family Entertainment Room

Before
The basement had bare concrete floors and unpainted block walls. One bare light bulb hung from the ceiling. Water stains ran along the bottom of the walls.
Boxes and old furniture were piled everywhere. There was no insulation, so the space was freezing in winter and very humid in summer.
After
The same space now has luxury vinyl plank floors that look like real wood. Recessed LED lights sit in the ceiling with dimmer controls.
The walls are drywalled and painted in a deep navy blue and white color scheme. Built-in shelves hold the TV and media equipment.
Closed-cell spray foam insulation keeps the room comfortable all year.
Pro Tip: Run electrical wire for a wall-mounted TV and surround sound speakers during the framing stage. Adding cables after the drywall is up costs two to three times more in labor.
Dark Unused Space to Home Office and Guest Suite
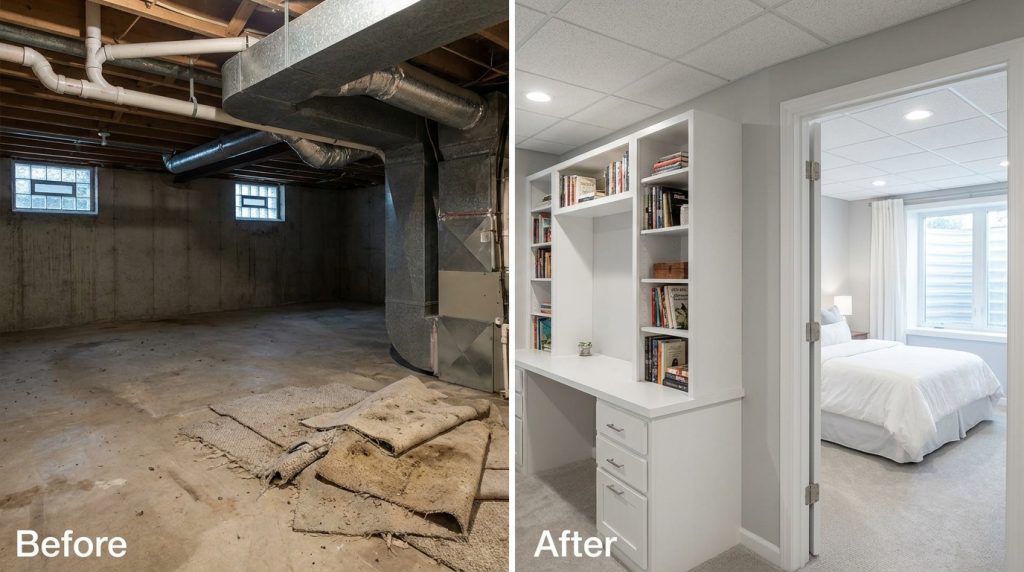
Before
The basement was one big open concrete space with no walls.
All the pipes and ductwork were exposed on the ceiling. The only light came from two small frosted glass block windows.
Old carpet pieces covered part of the floor and smelled musty.
After
The space is now divided into two rooms. One side is a home office with a built-in desk and floor-to-ceiling shelves.
The other side is a guest bedroom with a brand new egress window installed for safety and code compliance. A drop ceiling with recessed lighting tiles covers the ductwork.
A full bathroom with a walk-in shower was added along one wall.
Warning: Any bedroom in a basement must have an egress window by law. This is a safety exit in case of fire. The opening must be at least 5.7 square feet, 24 inches tall, and 20 inches wide per IRC Section R310.
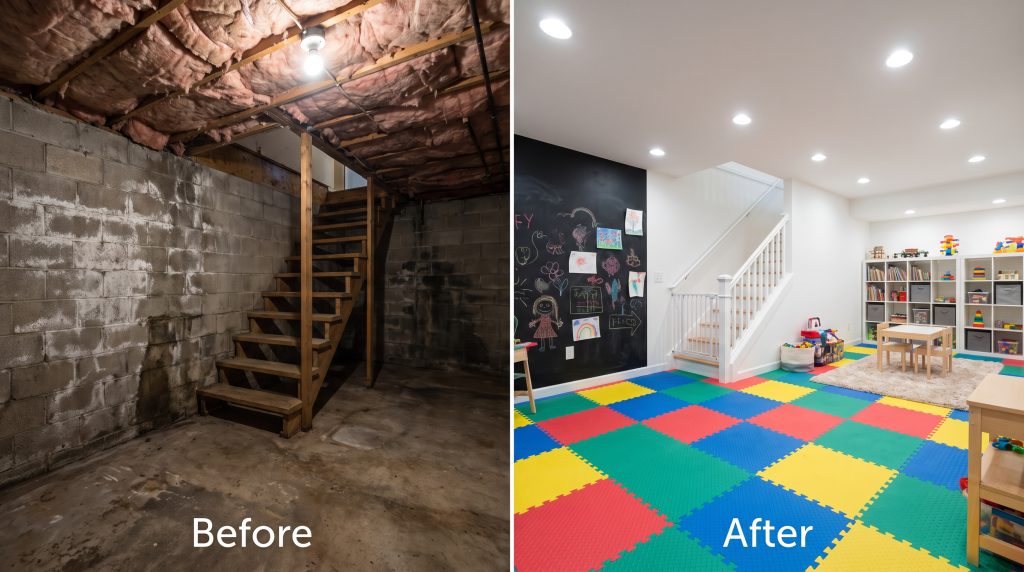
Damp Concrete Space to Bright Kids Playroom
Before
The basement had a damp smell and white powder on the walls, which is called efflorescence and is a sign of moisture.
There were no heating or cooling vents. The stairs had no handrail, which is a safety code violation. Exposed insulation hung between the floor joists above.
After
Colorful rubber tile flooring covers the entire floor.
It is safe for kids to fall on, easy to clean, and handles moisture very well.
The walls are bright white with one chalkboard accent wall the kids can draw on. A new heating vent extends the home HVAC system into the basement.
A proper handrail now runs along the stairs, meeting all safety code requirements.
See more basement playroom ideas for your kids reno area.
Raw Concrete Floor to Home Gym

Before
The basement floor was raw concrete with cracks.
The walls were unfinished block. One dim incandescent light bulb provided almost no light. The space had zero ventilation and felt stuffy and damp within minutes of being down there.
After
The concrete floor got an epoxy coating that is now shiny, durable, and easy to mop.
Rubber mat tiles sit under the heavy equipment to protect the floor and reduce noise upstairs.
A mirrored wall on one side makes the space feel bigger and helps with workout form.
Bright LED strip lights run along the ceiling. A ventilation fan pulls fresh air in and pushes humid air out.
Pro Tip: Always add a dedicated ventilation fan in a basement gym. Working out creates a lot of moisture and heat. Without airflow, the humidity builds up fast and causes mold problems inside the walls.
Section Two: Step-by-Step Checklist
Use this checklist to keep your project on track. Go through these steps in order. Skipping steps is one of the most common reasons basement projects go over budget and over time.
Phase One: Planning and Safety
Start here before you spend a single dollar on materials or labor.
- Test for radon before anything else. Radon is a colorless, odorless gas that is the second leading cause of lung cancer in the United States according to the U.S. EPA. The EPA action level is 4.0 pCi/L. A radon test kit costs about $15 to $30 at most hardware stores. If levels are high, a mitigation system costs $800 to $2,500.
- Check for moisture on all walls and floors. Look for water stains, white powder on walls, any smell of mold, or dark spots on the concrete. Fix every moisture problem before you frame a single wall. Finishing over moisture leads to mold inside the walls within a few months.
- Measure the ceiling height in the lowest spots. Most building codes require at least 7 feet of clear ceiling height for a finished living space. If your basement is shorter than this, check with your local building department before going further.
- Decide how you want to use the space. Your planned use affects what permits you need, what code requirements apply, and how you design the layout. A bedroom needs an egress window. A bathroom needs plumbing. A gym needs ventilation. Plan this first.
- Contact your local building department and apply for permits. Basement finishing requires a permit in almost every city in the United States. Permit fees typically run between $200 and $1,200 depending on your location and the size of the project.
Note: Plan review at the building department usually takes one to four weeks. Add this waiting time to your project schedule. Do not start any work before permits are approved.
Phase Two: Structural and Mechanical Work
This is the rough-in phase. Everything that goes inside your walls happens here before any drywall goes up.
- Fix all waterproofing issues first. If you found moisture during your inspection, address it before framing. Interior drainage systems, sump pumps, and exterior waterproofing are all options depending on where the water is coming from.
- Frame your walls using regular lumber for the top plate and pressure-treated lumber for the bottom plate. The bottom plate sits on concrete, which holds moisture. Pressure-treated wood resists moisture and rot far better than regular lumber.
- Rough in all electrical wiring. Outlets must be placed every 12 feet along walls. GFCI (Ground Fault Circuit Interrupter) protection is required in any wet area. AFCI (Arc Fault Circuit Interrupter) breakers are required in living spaces in most current codes.
- Rough in plumbing if you are adding a bathroom. This includes drain lines, supply pipes, and connections to the main waste stack. A licensed plumber is required for this work in most jurisdictions.
- Extend the HVAC ductwork to add supply and return air vents in the basement. A finished basement without proper heating and cooling stays uncomfortable and contributes to moisture problems year-round.
- Schedule all rough-in inspections. Building inspectors must approve your electrical, plumbing, and HVAC work before you close up the walls with drywall. Do not skip this step.
Phase Three: Insulation and Drywall
This phase seals up the walls and creates the finished surfaces you will see every day.
- Install insulation on all exterior walls. Use closed-cell spray foam or rigid foam board directly against the concrete walls. Never use fiberglass batt insulation directly against concrete. Concrete stays cool and collects moisture. Fiberglass batts against concrete almost always lead to mold growing inside the wall.
- Schedule an insulation inspection. The inspector will check that your R-values meet the energy code for your climate zone and that the vapor barrier is placed correctly.
- Hang drywall on all framed walls and the ceiling. Use moisture-resistant drywall (often called greenboard or purple board) in any bathroom or area near water. Tape, mud, and sand all the joints to a smooth finish before painting.
Phase Four: Finishing Work
This is the part where the basement starts looking like a real room.
- Paint all walls and ceilings. Choose light colors to make the basement feel bright and open. Basements have no windows on the walls in most cases, so light colors do a lot of work to keep the space from feeling dark and closed in.
- Install your flooring. Choose a moisture-tolerant option. Luxury vinyl plank, ceramic tile, and epoxy-coated concrete are all excellent choices for basements. Avoid solid hardwood and laminate in basements because they warp and swell when they absorb moisture.
- Install all trim, doors, and hardware. Add a handrail to the stairs if one is not already there. Install window coverings on the egress window.
- Install smoke detectors and carbon monoxide alarms. These are required by code in virtually all finished basements. Place CO alarms near any fuel-burning appliance like a furnace, water heater, or gas dryer.
- Schedule your final inspection. The inspector will check everything: ceiling heights, egress window size, smoke and CO detectors, stair handrails, and overall code compliance. Once the final inspection is passed, you will receive a certificate of occupancy for the space.
Section Three: Cost Breakdown and Budget Planning
The cost of finishing a basement depends on four main things: the size of the space, the level of finish you want, your location in the country, and whether you hire professionals or do some of the work yourself.
According to HomeAdvisor and current 2025 to 2026 industry data, most homeowners in the United States spend between $15,000 and $75,000 to finish a basement. The average is around $32,000. Construction costs rose 5.6% in 2026 due to inflation and material shortages, so budget for slightly higher numbers if you are planning now.
Cost by Basement Size
| Basement Size | Square Feet | Cost Range | Per Sq Ft |
| Small | 400 sq ft | $15,000 to $26,000 | $7 to $23 |
| Medium | 800 sq ft | $32,000 to $78,000 | $20 to $50 |
| Large | 1,200+ sq ft | $60,000 to $150,000+ | $40 to $100+ |
| Luxury Custom | Any size | $150+ per sq ft | $150 to $300+ |
What Makes Up the Cost of a Mid-Range Project?
For a typical mid-range basement project around $40,000, here is roughly how the money gets spent.
Labor takes the biggest share at about 45% of the total budget, which is around $18,000.
Framing and drywall together cost about $6,000. Electrical work runs about $4,800.
Flooring costs around $4,000. Insulation runs about $3,200.
Extending the HVAC system costs about $2,800. Permits and inspections take the remaining $1,200.
Note: Labor is always the biggest cost in a basement project. It represents 45 to 65% of total costs in most markets. This is why getting multiple quotes from contractors is so important.
Budget Level Breakdown
| Budget Level | Total Cost | What You Get | Best For |
| Basic | $15,000 to $25,000 | Framing, insulation, drywall, basic electrical, LVP flooring, paint. No bathroom. | Simple family room or storage upgrade |
| Mid-Range | $25,000 to $50,000 | Everything above plus half bath, recessed lighting, egress window, HVAC extension | Guest room, home office, entertainment area |
| Full-Featured | $50,000 to $80,000 | Full bathroom, wet bar, custom shelving, premium flooring, home theater prep | In-law suite, full apartment, theater room |
| Luxury | $80,000 to $200,000+ | Wine cellar, custom millwork, smart lighting, spa bathroom, high-end finishes | High-end homes, premium additions |
Will a Finished Basement Add Value to My Home?
Yes, and the data backs this up clearly. The 2025 Cost vs. Value Report by Zonda and the Journal of Light Construction found that homeowners nationally recoup about 71% of their basement finishing cost when they sell their home. That means a $50,000 finished basement adds around $35,000 to your sale price.
NerdWallet also reports that a finished basement can add as much as 10% to your home’s total market value. In most U.S. markets where average home values are above $400,000, that is a $40,000 or more increase from a single project.
Pro Tip: A finished basement with a bathroom is worth significantly more than one without. If your budget allows, even a half bath adds a lot of practical value and makes the space more attractive to future buyers.
Section Four: Materials, Design, and Popular Uses
Choosing the right materials for a basement is different from choosing materials for any other room in your home.
The underground environment is cooler, more humid, and more likely to have moisture issues. Every material choice needs to account for that reality.
Flooring: Which Option Is Right for Your Basement?
| Flooring Type | Cost Per Sq Ft | Moisture Resistance | Best For |
| Luxury Vinyl Plank | $2 to $7 | Excellent | Family rooms, bedrooms, offices |
| Ceramic Tile | $3 to $10 | Excellent | Bathrooms, gyms, utility areas |
| Epoxy Concrete | $2 to $6 | Excellent | Gyms, garages, workshops |
| Engineered Hardwood | $4 to $12 | Moderate | Dry basements only |
| Rubber Tiles | $2 to $5 | Excellent | Home gyms, playrooms |
| Carpet | $2 to $8 | Poor | Avoid in basements with any moisture |
Insulation: The Most Important Material Choice You Will Make
The insulation you choose for your basement walls is more important than almost any other material decision. The wrong insulation can lead to mold inside the walls, failed inspections, and a very expensive fix after the drywall is already up.
| Insulation Type | R-Value Per Inch | Moisture Safe? | Cost | Use On Concrete? |
| Closed-Cell Spray Foam | R-6 to R-7 | Yes, acts as vapor barrier | Highest | Yes, best choice |
| Rigid Foam Board (XPS) | R-5 per inch | Yes | Medium | Yes, great value |
| Rigid Foam Board (EPS) | R-4 per inch | Good | Low | Yes, budget option |
| Fiberglass Batts | R-3.7 per inch | No, traps moisture | Cheapest | Never against concrete |
| Mineral Wool Batts | R-3.7 to R-4.2 | Moderate | Medium | Only on framed walls |
Warning: The most common code violation found during basement insulation inspections is fiberglass batt insulation placed directly against concrete walls. Always use rigid foam board or closed-cell spray foam as the first layer against any concrete surface.
Ceiling Options: Drop Ceiling or Drywall?
A drywall ceiling looks cleaner and more finished.
It raises the resale value of the space a little more than a drop ceiling does. But once it is up, you cannot easily access the pipes, wires, and ductwork that run above it.
Any repair to those systems means cutting holes in your ceiling.
A drop ceiling, also called a suspended ceiling, uses tiles set in a metal grid. It costs less, installs faster, and lets you lift any tile to access what is above it.
Modern drop ceiling tiles look much better than the old white foam tiles from decades ago and come in many styles.
Pro Tip: If your basement has pipes or ductwork that need to be checked or serviced every few years, a drop ceiling is often the smarter long-term choice. The access it gives you is worth more than the small difference in appearance.
Lighting: The Key to Making a Basement Feel Like a Real Room
Lighting is the most important design decision you will make for a finished basement. Basements get no natural light from windows above them. Every bit of light in the room must be planned and designed on purpose.
Recessed LED lights on dimmer switches are the best choice for general lighting.
Plan for at least one recessed light every 4 to 6 feet across the ceiling.
Add under-shelf LED strips in a bar or office area. Use a floor lamp or table lamp in a seating area to create warmth. The goal is at least 50 lumens per square foot in living spaces.
Pro Tip: Put your recessed lights on two or three separate dimmer circuits. This lets you set different moods: bright for cleaning, medium for working, dim for watching movies. This one electrical planning decision costs almost nothing extra during rough-in and makes a big difference every single day.
Popular Ways to Use a Finished Basement
| Room Type | Key Features Needed | Extra Cost to Add | Best For |
| Family Entertainment Room | Recessed lighting, media wall, comfy flooring | $0 to $5,000 above base | Most families, most budgets |
| Home Gym | Epoxy floor, rubber mats, ventilation fan, mirrors | $1,000 to $4,000 above base | Active families, fitness lovers |
| Home Office | Good lighting, ethernet wiring, soundproofing | $500 to $3,000 above base | Remote workers, students |
| Guest Suite with Bedroom | Egress window, bathroom, closet | $10,000 to $25,000 above base | Families with frequent guests |
| Kids Playroom | Rubber flooring, bright colors, built-in storage | $500 to $3,000 above base | Families with young children |
| Home Theater | Acoustic insulation, projector mount, blackout lighting | $5,000 to $20,000 above base | Movie lovers, entertainment fans |
| Rental Unit or ADU | Separate entrance, full kitchen, full bath, egress | $20,000 to $50,000+ above base | Homeowners wanting rental income |
Trending Design Styles for 2025
| Style Name | Key Look | Colors | Best Room Type |
| Modern Industrial | Exposed pipes painted black, concrete floor, metal accents | Dark charcoal, white, steel | Entertainment room, bar, gym |
| Cozy Scandinavian | Light wood tones, soft textures, warm lighting | White, soft grey, natural wood | Family room, guest suite, office |
| Rustic Farmhouse | Shiplap accent wall, barn doors, open shelving | Warm white, navy, sage green | Playroom, guest room, multi-use |
| Sleek Contemporary | Built-in cabinets, smart lighting, no visible clutter | Black, white, warm grey, brass | Home theater, office, bar |
DIY vs. Hiring a Contractor: The Honest Comparison
| Factor | DIY | Hire a Contractor |
| Cost | Save 30 to 50% on labor | Labor is 45 to 65% of total cost |
| Speed | Much slower, weekends only | Faster, dedicated crew |
| Permits | Your job to know the code | Contractor handles all permits |
| Electrical | Restricted by law in many states | Licensed electrician required by code |
| Plumbing | Licensed plumber needed | Included in contractor team |
| Quality Risk | Higher risk if skills are limited | Insurance and warranty on work |
| Best DIY Tasks | Painting, flooring, trim, shelves | – |
| Never DIY | Electrical panel, gas lines, beams | – |
Note: The 2025 Houzz and Home Survey found that 9 out of 10 homeowners who finished a basement in 2024 hired a professional contractor. The permit requirements, code complexity, and licensed trade work make full DIY basement finishing very difficult for most people.
Section Five: Permits, Codes, FAQs, and Final Tips
This section covers the legal and safety side of finishing a basement. It also answers the most common questions homeowners ask before starting a project like this.
Permits and Building Code Requirements
Finishing a basement requires a permit in almost every city in the United States.
It is one of the most permit-heavy home projects because it involves framing, electrical, plumbing, heating and cooling, and insulation all at once.
Skipping permits can make your home very hard to sell later and can void your homeowner’s insurance if something goes wrong.
| Code Requirement | Minimum Standard | Source |
| Ceiling Height | Minimum 7 feet clear | IRC Section R305 |
| Egress Window (bedroom) | 5.7 sq ft opening, 24 inch tall, 20 inch wide | IRC Section R310 |
| Electrical Outlets | Every 12 feet along walls, GFCI in wet areas | National Electrical Code |
| Smoke Detectors | Required in every finished basement | IRC Section R314 |
| Carbon Monoxide Alarms | Required near fuel-burning appliances | IRC Section R315 |
| Radon Testing | EPA action level: 4.0 pCi/L | U.S. EPA |
| Wall Insulation R-Value | R-5 minimum (climate zones 3 to 4), R-10 plus (zone 5+) | IECC / IRC N1102 |
| Stair Requirements | Max 7.75 inch riser, 10 inch tread, handrail on one side | IRC Section R311.7 |
| Permit Fees | $200 to $1,200 typical range | Local building departments |
Warning: Radon is a colorless, odorless gas and is the second leading cause of lung cancer in the United States according to the U.S. EPA. Basements are the highest-risk area in any home. Always test for radon before you finish your basement. Mitigation systems cost $800 to $2,500 and are much cheaper than dealing with health problems later.
How Long Does Basement Finishing Take?
| Project Phase | Time Needed (With Contractor) | Notes |
| Planning and permit application | 1 to 2 weeks | Do not start work until permits are approved |
| Permit review by building department | 2 to 4 weeks | Cannot be rushed in most cities |
| Moisture and waterproofing work | 1 to 2 weeks | Must be fully dry before framing |
| Framing walls and soffits | 1 to 2 weeks | – |
| Electrical, plumbing, HVAC rough-in | 2 to 3 weeks | Inspections needed before drywall |
| Insulation and inspection | 1 week | Inspector must approve before drywall |
| Drywall, tape, mud, sand | 1 to 2 weeks | – |
| Paint, flooring, trim, fixtures | 1 to 2 weeks | – |
| Final inspection | 1 to 3 days | Certificate of occupancy issued after this |
| Total with contractor | 10 to 14 weeks typical | DIY takes 4 to 8 months longer |
Common Mistakes to Avoid
- The most expensive mistake homeowners make is finishing over a wet or damp basement. The American Society of Home Inspectors reports that 60% of U.S. homes have wet basement issues. Finishing over moisture creates mold inside the walls within a few months. The repair costs far more than fixing the moisture problem would have.
- The second most common mistake is starting work before permits are approved. Some homeowners think they can get the permits after the fact. Most building departments require you to open the walls so inspectors can see the work. This means tearing out finished drywall and starting over.
- The third mistake is using the wrong insulation. Many homeowners buy fiberglass batts because they are cheap and familiar. Fiberglass against concrete walls almost always leads to mold. Use rigid foam board or closed-cell spray foam on any wall that touches concrete.
- The fourth mistake is not planning lighting carefully enough. Most homeowners add fewer lights than they actually need and then live with a dark, gloomy basement. Plan for more lights than you think you need. Adding another light circuit during rough-in costs very little. Adding it after the drywall is up costs a lot.
Pro Tip: Get at least three written quotes from licensed contractors before you choose one. Prices for the same scope of work can vary by 30 to 50% between contractors in the same city. The lowest quote is not always the best choice, but getting multiple quotes gives you a clear picture of what fair pricing looks like in your area.
Frequently Asked Questions
Do I need a permit to finish my basement?
Yes. In almost every city in the United States, finishing a basement requires a permit. It is one of the most permit-intensive home projects because it involves multiple trades. Skipping permits can make your home hard to sell and can void your homeowner’s insurance. Permit fees typically run between $200 and $1,200.
How do I know if my basement is safe to finish?
Test for radon first. Then check carefully for any sign of moisture on the walls or floor. Make sure the ceiling is at least 7 feet high in the areas you want to finish. Have a structural engineer look at any large cracks in the foundation wall. Fix all moisture and structural problems before you start framing anything.
What is the average cost to finish a 1,000 square foot basement?
For a standard mid-range finish in most U.S. markets, expect to pay between $20,000 and $50,000. High-cost metro areas can push this to $60,000 or more. Adding a full bathroom adds $8,000 to $20,000 on top of the base cost. A home theater or wet bar adds $15,000 to $40,000 more.
What flooring is best for a basement that sometimes gets damp?
Luxury Vinyl Plank is the best choice. It is completely waterproof, looks like real wood, and handles temperature changes well. Ceramic tile is equally good for moisture resistance. Both can handle occasional dampness without warping, swelling, or growing mold underneath them. Avoid carpet, solid hardwood, and laminate in any basement where moisture is a concern.
Final Thoughts
A finished basement is one of the smartest investments you can make in your home.
It adds livable square footage, raises your home’s value, and gives your family a space they will actually use every single day.
The key is doing it the right way: test for radon, fix the moisture, get your permits, use the right materials, and plan your lighting better than you think you need to.
Whether your budget is $20,000 or $100,000, the difference between a great basement and a disaster comes down almost completely to how well you plan before the first piece of lumber goes up. Take your time with the planning phase. It is worth every minute.
The basement your family has been waiting for is right below your feet. All it needs is a plan and someone willing to get started.
Sources: 2025 Zonda Cost vs. Value Report | U.S. EPA (radon.gov) | NAHB and U.S. Census Bureau | American Society of Home Inspectors | HomeAdvisor | NerdWallet | International Residential Code (IRC) | National Electrical Code | Bureau of Labor Statistics OEWS May 2024 | Houzz 2025 U.S. Renovation Survey