You want a beautiful patio but the quotes from contractors are shocking. Thousands of dollars for a simple outdoor space feels impossible to justify. You keep putting the project off and another summer passes without the patio you deserve.
Here is the truth. A beautiful, functional DIY patio is completely achievable for under $1000. The right materials, a solid plan, and a weekend or two of work are all you need.

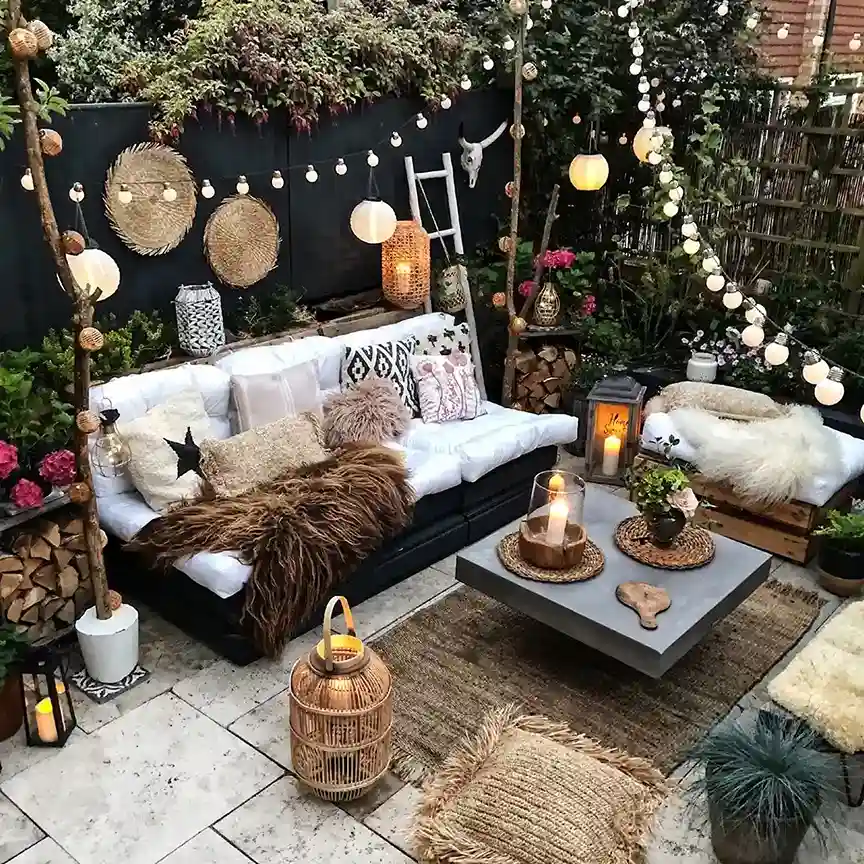
source: @stanandwally
This complete guide walks you through every step — from planning and materials to finishing touches — so you can build a patio you are genuinely proud of.
1. Plan Your Patio Before You Buy Anything
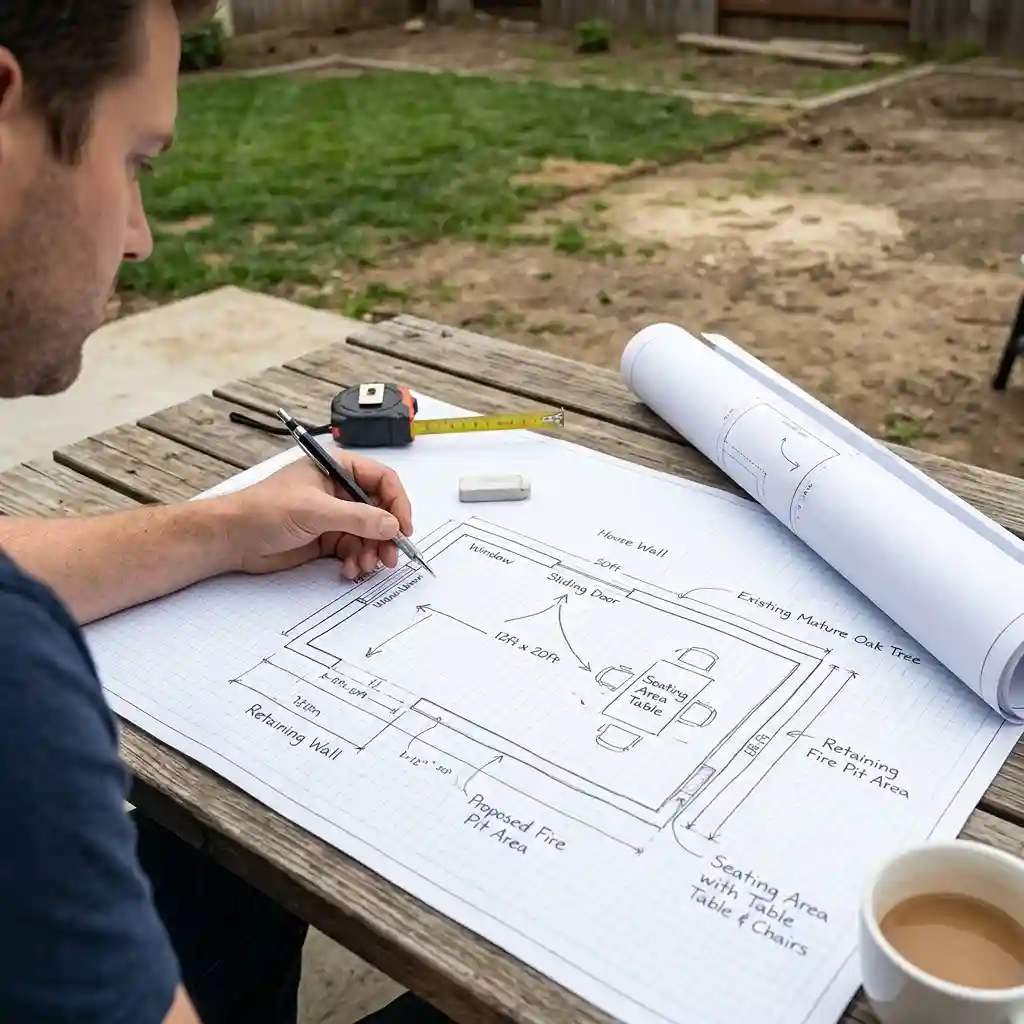
Planning is the most important step in any DIY patio project. Decisions made on paper cost nothing. Decisions changed mid-build cost time, money, and frustration. Spend time planning and the actual build goes smoothly. Skip the planning and problems multiply quickly.
source: @homefixtrends
Measure your outdoor space carefully. Draw it to scale on graph paper. Mark where doors, windows, and existing features sit. Decide on the patio shape — rectangular is the easiest and most budget-friendly. Sketch where furniture will go and how traffic will flow around the space. You can also try outdoor kitchen with patio.
source: @sonja_ols
| Planning Decision | Why It Matters | Time to Decide |
|---|---|---|
| Patio size and shape | Determines material quantities | Before buying anything |
| Material choice | Affects cost, look, and difficulty | Before buying anything |
| Furniture placement | Affects size and layout | During planning |
| Drainage direction | Prevents water pooling issues | During planning |
| Access points | Affects edge finishing | Before breaking ground |
2. Choose the Right Location
Location affects everything. A patio in the wrong spot is uncomfortable no matter how well it is built. Consider sun exposure throughout the day. A spot in full afternoon sun is unbearable in summer without shade. A spot in full shade may feel cold and damp. Morning sun with afternoon shade is the ideal combination for most climates.

source: @homefixtrends
Consider proximity to the house. A patio connected to the back door is far more convenient and more frequently used than one positioned away from the home. Think about views, privacy from neighbors, and the slope of the ground. A level or gently sloping site is far easier and cheaper to work with than a significantly sloped one.
- Morning sun, afternoon shade is the most comfortable patio position
- Within 10 feet of the back door maximizes daily use and convenience
- Avoid low-lying areas where water naturally collects after rain
- Check for underground utilities before digging by calling 811 in the USA
- A position with a pleasant view makes the patio more enjoyable every single day
source: @donice.designs
3. Understand Your Budget Breakdown
A $1000 DIY patio budget is realistic for most standard-sized projects. The key is allocating money correctly across all elements. Materials consume the largest portion. Tools can be borrowed or rented to minimize that cost. Finishing elements like furniture and lighting cost the least but make the biggest visual difference.

source: @homefixtrends
A 10×12 foot patio — a very functional size for a table, four chairs, and a small lounge area — is achievable within this budget using gravel, concrete pavers, or basic wood decking. Understanding where every dollar goes prevents overspending on materials while leaving nothing for the finishing details that make a patio feel complete.
| Budget Category | Percentage of $1000 | Approximate Amount |
|---|---|---|
| Base preparation materials | 25–30% | $250–$300 |
| Surface materials | 40–50% | $400–$500 |
| Tools and equipment | 10–15% | $100–$150 |
| Edging and borders | 5–10% | $50–$100 |
| Finishing touches | 10–15% | $100–$150 |
source: @kansascityhardscapes
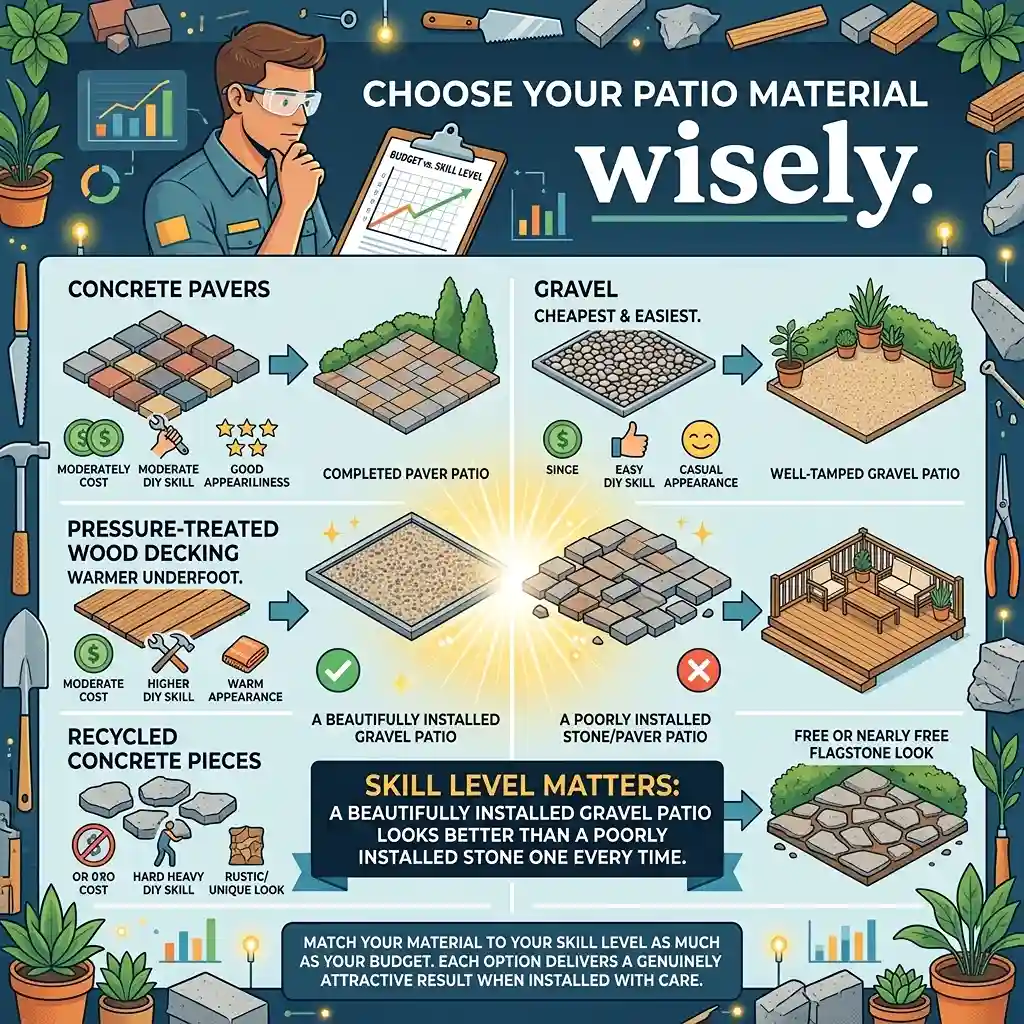
4. Choose Your Patio Material Wisely
Your material choice is the single most important budget decision. Each option has different costs, difficulty levels, and final appearances. Match your material to your skill level as much as your budget. A beautifully installed gravel patio looks better than a poorly installed stone one every time.
source: @homefixtrends
Concrete pavers are the best balance of cost, appearance, and DIY-friendliness. Gravel is the cheapest and easiest. Pressure-treated wood decking is warmer underfoot. Recycled concrete pieces create a free or nearly free flagstone-look patio. Each option delivers a genuinely attractive result when installed with care.
| Material | Cost per sq ft | DIY Difficulty | Look | Longevity |
|---|---|---|---|---|
| Pea gravel | $1–$2 | Very Easy | Casual, natural | 5–10 years |
| Concrete pavers | $3–$6 | Easy-Moderate | Polished, versatile | 20–30 years |
| Pressure-treated wood | $4–$7 | Moderate | Warm, natural | 15–20 years |
| Recycled concrete pieces | Free–$2 | Easy | Rustic, unique | 15–25 years |
| Brick pavers | $4–$8 | Moderate | Classic, traditional | 25–50 years |
5. Gather Your Tools Before Starting
Having the right tools before starting prevents frustrating mid-project trips to the hardware store. Most DIY patio tools are available to rent cheaply from home improvement stores if you do not own them. Buying basic tools that you will use repeatedly is worthwhile. Renting specialized equipment used only once makes more sense.

- Shovel and spade for excavation and gravel spreading
- Plate compactor for base compaction — rent for around $50 per day
- Rubber mallet for setting pavers without damage
- Level and string line for establishing a flat, even surface plane
- Tape measure, pencil, and safety glasses for accurate, safe work
- Wheelbarrow for moving materials efficiently around the work site
- Landscape fabric scissors and a utility knife for cutting edging materials
source: @nikishome18
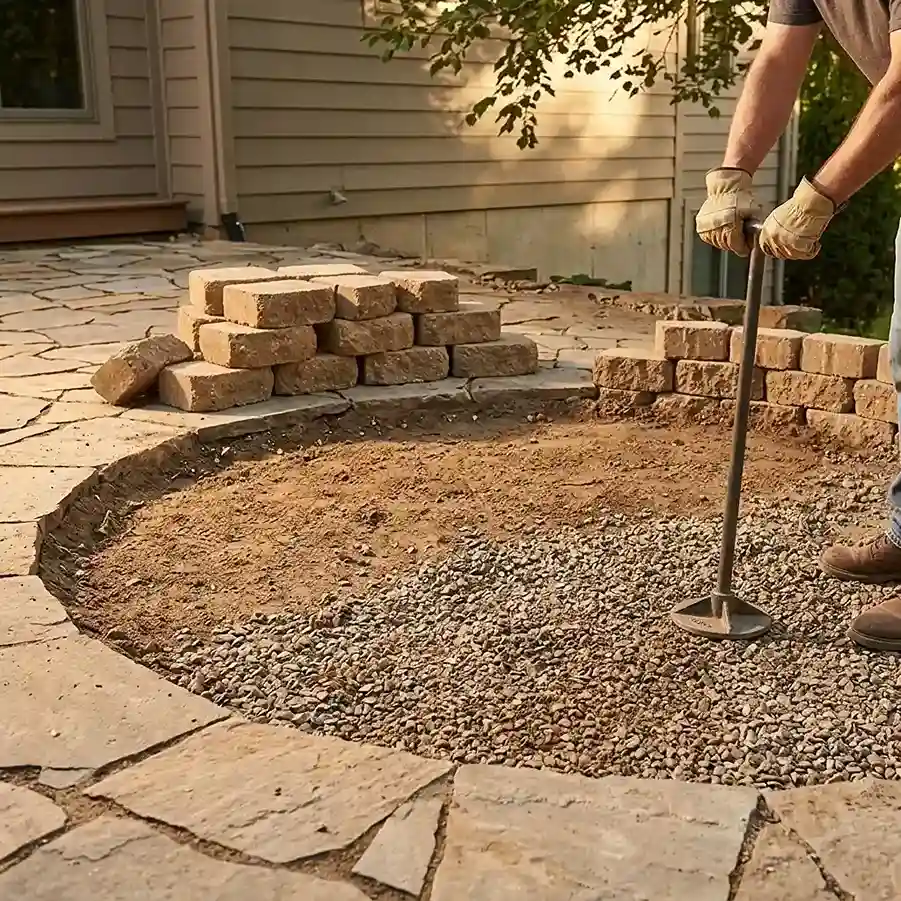
6. Prepare the Ground Properly
Ground preparation is the foundation of any successful patio. A poorly prepared base causes pavers to shift, sink, and become uneven within a single season. A properly prepared base holds perfectly level for decades. Do not rush or skip this step regardless of time pressure.
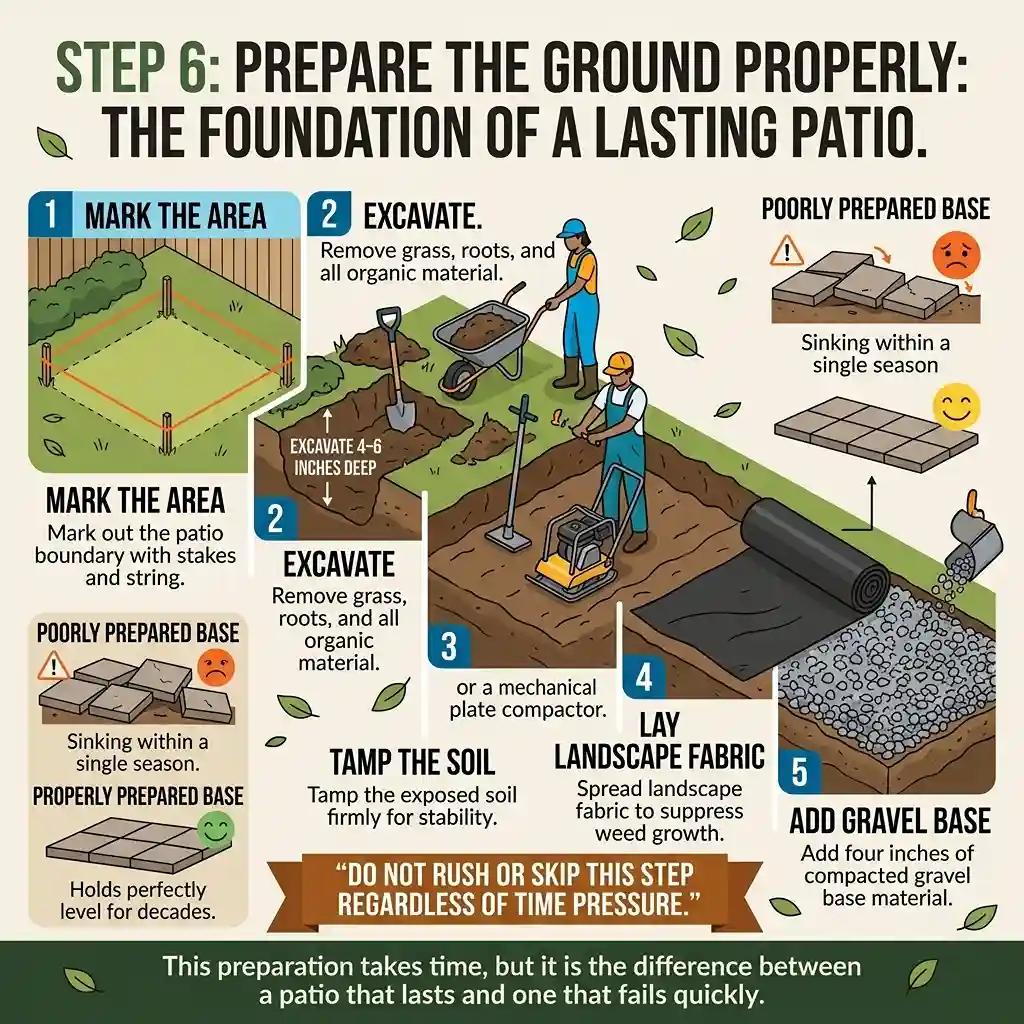
Mark out the patio area with stakes and string lines. Excavate to a depth of four to six inches for a paver or brick patio. Remove all grass, roots, and organic material from the excavated area. Tamp the exposed soil firmly. Lay landscape fabric to suppress weed growth. Add four inches of compacted gravel base material. This preparation takes time but it is the difference between a patio that lasts and one that fails quickly.
| Excavation Depth | Surface Material | Base Required |
|---|---|---|
| 2–3 inches | Gravel only | Landscape fabric |
| 4–5 inches | Concrete pavers | 4 inch compacted gravel |
| 5–6 inches | Brick pavers | 4 inch gravel + 1 inch sand |
| 6–8 inches | Wood decking | Concrete footings at posts |
| 3–4 inches | Flagstone irregular | 2 inch sand bed |
source: @brooklynlimestone
7. Build a Simple Gravel Patio for Under $200
A gravel patio is the fastest, cheapest, and most beginner-friendly patio option. The entire project can be completed in a single day for well under $200. Pea gravel, crushed limestone, and decomposed granite all create attractive, comfortable surfaces. The gravel drains immediately so puddles never form.
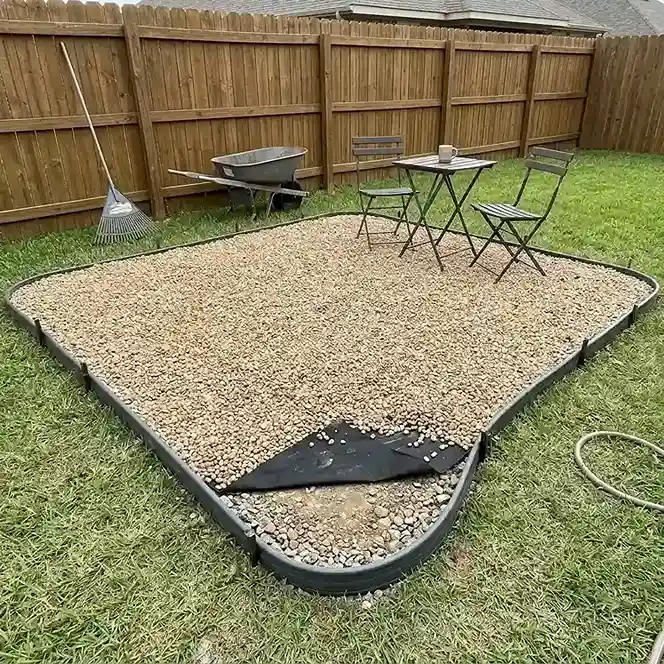
Mark and excavate the area four inches deep. Lay landscape fabric across the entire base. Install plastic or metal edging around the perimeter to contain the gravel. Add four inches of compacted gravel base. Top with two inches of decorative pea gravel or crushed stone. Rake smooth and enjoy your new patio the same day it is built.
8. Lay Concrete Pavers for a Polished Budget Result
Concrete pavers are the most popular DIY patio material for good reason. They look professional. They are durable. They are DIY-friendly. And they deliver the highest return in appearance per dollar spent of any patio material. A properly laid concrete paver patio looks indistinguishable from a professionally installed one.
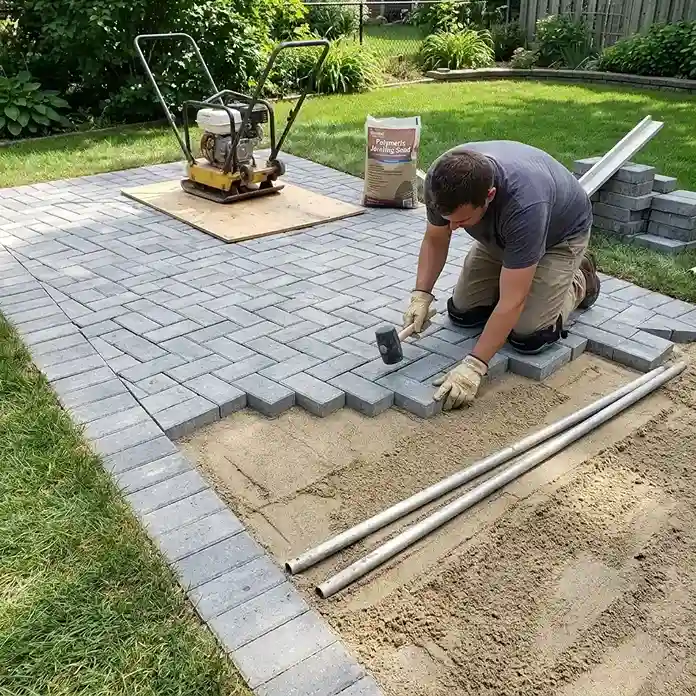
After completing the ground preparation and gravel base, add a one-inch layer of coarse sand. Screed the sand flat using a long board and two parallel pipes as guides. Set pavers from one corner outward in your chosen pattern. Tap each paver level with a rubber mallet. Fill joints with polymeric jointing sand. Compact the entire surface with a plate compactor over a piece of plywood to prevent paver damage. The result is a flat, stable, beautiful surface.
| Paver Pattern | Difficulty | Visual Effect | Waste Percentage |
|---|---|---|---|
| Running bond | Easy | Classic, clean | 5–8% |
| Basketweave | Easy | Traditional, textured | 5–8% |
| Herringbone | Moderate | Dynamic, decorative | 10–15% |
| Pinwheel | Moderate | Interesting, geometric | 8–12% |
| Random ashlar | Moderate | Natural, organic | 10–15% |
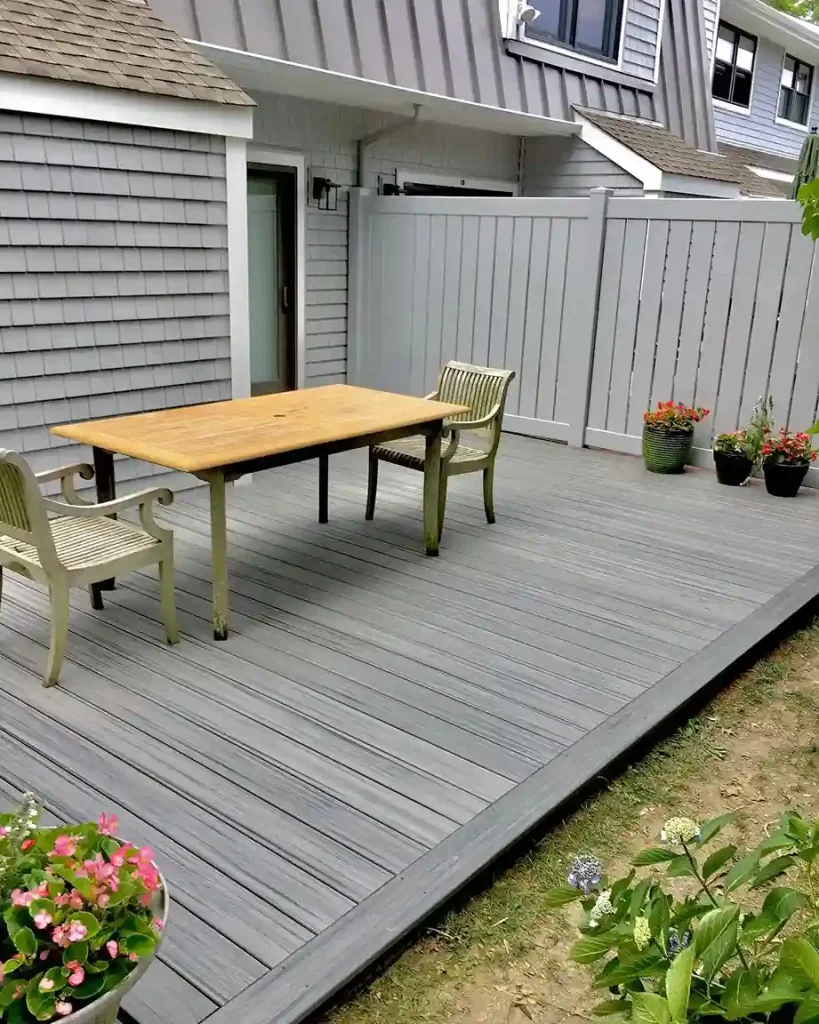
9. Build a Simple Wood Deck Patio on a Budget
A ground-level wood deck patio built from pressure-treated lumber creates a warm, inviting outdoor surface. It is slightly more complex than a paver patio but well within DIY capability. The warm tone of wood underfoot feels more comfortable than hard stone or concrete. A properly built and maintained wood deck lasts fifteen to twenty years.
source: @bestlevelconstructio
Lay out concrete deck block footings at regular intervals on firm, compacted ground. Set pressure-treated 4×4 beams across the footings as the frame. Add 2×6 joists at 16-inch spacing across the beams. Screw 5/4×6 decking boards across the joists with uniform gaps between boards. This simple structure requires no concrete footings or complex framing. A 10×12 foot version costs $400–$700 in materials depending on lumber prices.
- Use exterior-grade screws specifically designed for pressure-treated lumber
- Pre-drill near board ends to prevent splitting during installation
- Allow a 1/8-inch gap between decking boards for water drainage and wood movement
- Apply a water-repellent deck stain or sealant within 30 days of completion
- Re-apply sealant annually to maintain the wood and extend its lifespan significantly
10. Create a Flagstone Patio From Recycled Concrete
Recycled concrete pieces — also called urbanite — create a beautiful, free flagstone-look patio. Demolished driveways, sidewalks, and patios produce concrete pieces that look remarkably like natural flagstone once laid. Many people give away recycled concrete for free on online marketplaces. This is the ultimate zero-material-cost patio surface.
Break large concrete slabs into manageable pieces with a sledgehammer. Lay them puzzle-style across a prepared sand base. Fill the irregular gaps with gravel, sand, or low-growing ground cover plants. The result has a genuine character that manufactured materials cannot replicate. A recycled concrete patio costs almost nothing in materials and looks completely unique.
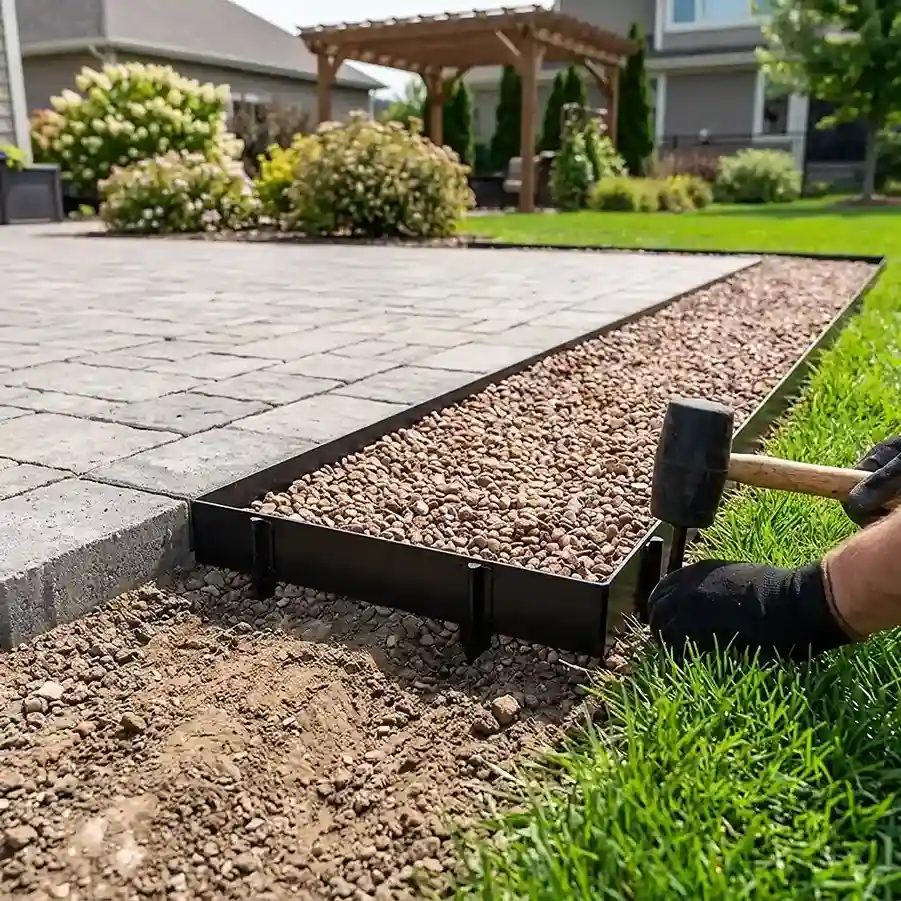
11. Install Proper Edging to Define and Contain
Edging is a small detail that makes an enormous difference to the finished appearance of any patio. Without edging, gravel spreads into the lawn, pavers shift outward over time, and the patio boundary looks soft and unfinished. With proper edging, everything stays exactly where it belongs and the patio looks defined and intentional.
| Edging Type | Cost per linear ft | Appearance | Best With |
|---|---|---|---|
| Black plastic landscape | $0.50–$1.00 | Invisible when installed | Gravel, pavers |
| Steel landscape edging | $1–$3 | Clean, modern | Pavers, flagstone |
| Timber sleeper edge | $2–$5 | Warm, natural | Gravel, wood deck |
| Brick soldier course | $2–$4 | Traditional, defined | Pavers, flagstone |
| Natural stone border | $3–$8 | Beautiful, permanent | Any surface |
12. Manage Drainage to Prevent Water Problems
Poor drainage ruins a patio quickly. Water that pools on the surface creates a slippery, unusable space. Water that drains toward the house foundation causes serious structural damage over time. Proper drainage management is essential and must be built into the design from the very beginning.
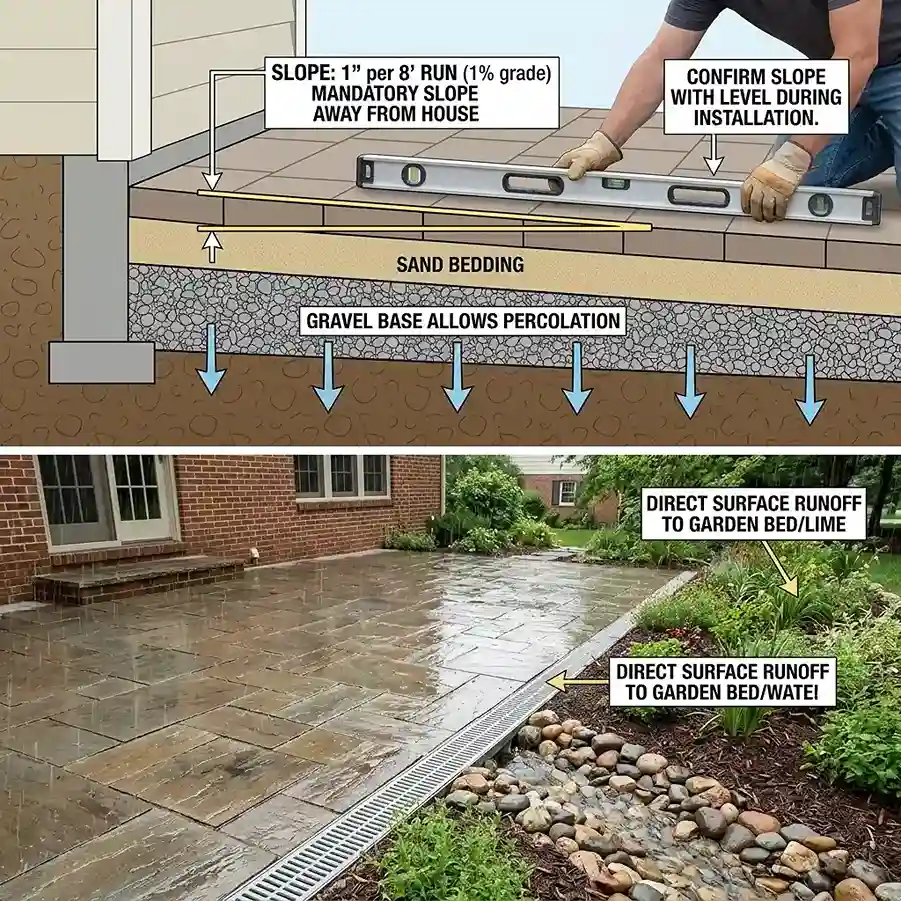
Slope the entire patio surface away from the house by one inch per eight feet of run. This slight gradient is invisible to the eye but moves water efficiently away from the structure. Confirm the slope with a level throughout the installation process. A gravel base beneath paver or stone patios allows water to percolate downward. Direct any surface runoff toward a garden bed, lawn area, or drainage channel rather than toward neighbors or the house.
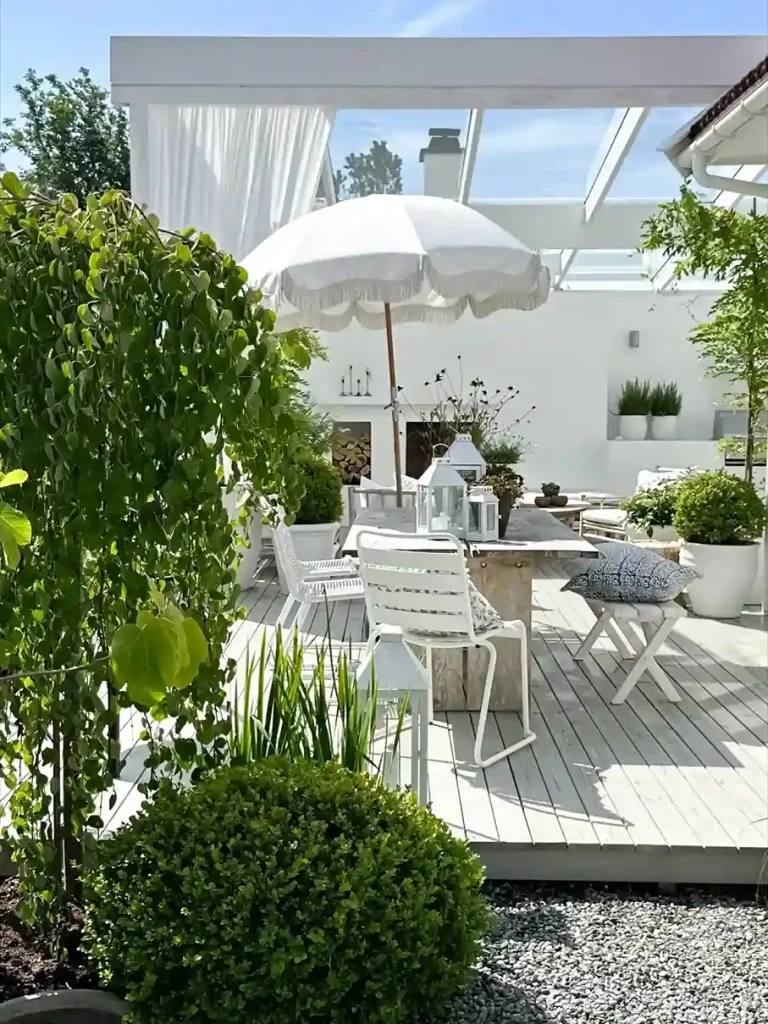
13. Add a Budget Pergola or Shade Structure
A patio without shade is uncomfortable for most of the day in summer. A simple DIY pergola adds shade, structure, and a defined ceiling to the outdoor room. Built from pressure-treated 4×4 posts and 2×6 rafters, a basic pergola costs $200–$500 in materials for a 10×12 foot structure. The result transforms the patio from an open slab into a genuine outdoor room.
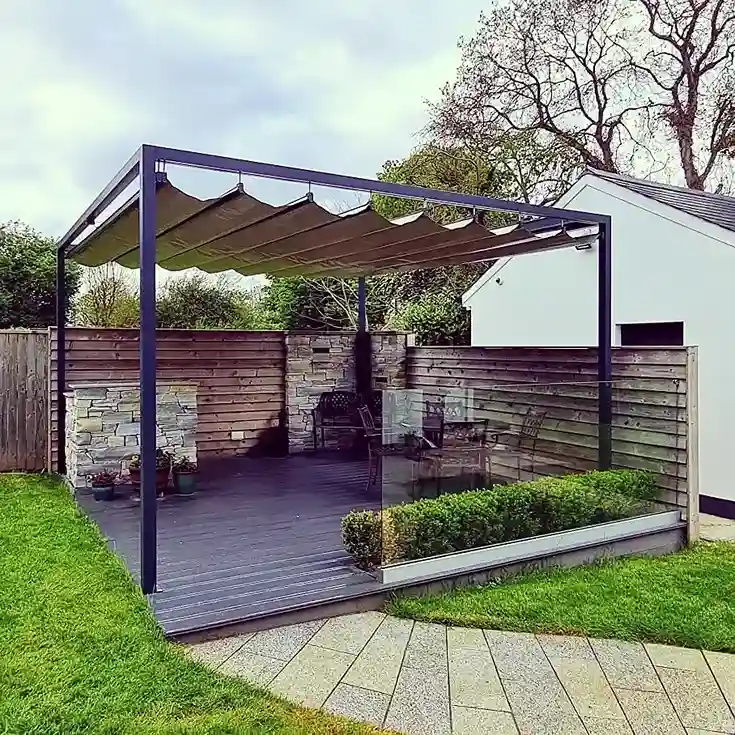
source: @snblinds
Set posts in concrete-filled holes at least 24 inches deep for stability. Attach a ledger board to the house for one side of the pergola if building adjacent to the wall. Add 2×6 rafters at 16-inch spacing across the top. Finish with decorative 2×4 purlins running perpendicular to the rafters. The completed structure provides partial shade and a perfect framework for string lights, climbing plants, and outdoor curtains.
| Shade Structure | Cost Range | DIY Level | Shade Coverage |
|---|---|---|---|
| Simple pergola | $200–$500 | Moderate | 30–50% |
| Shade sail | $30–$100 | Very Easy | 80–95% |
| Market umbrella | $50–$150 | None | Spot coverage |
| Bamboo roll screen | $20–$60 | Easy | Perimeter screening |
| Outdoor curtains | $30–$80 | Very Easy | Flexible coverage |
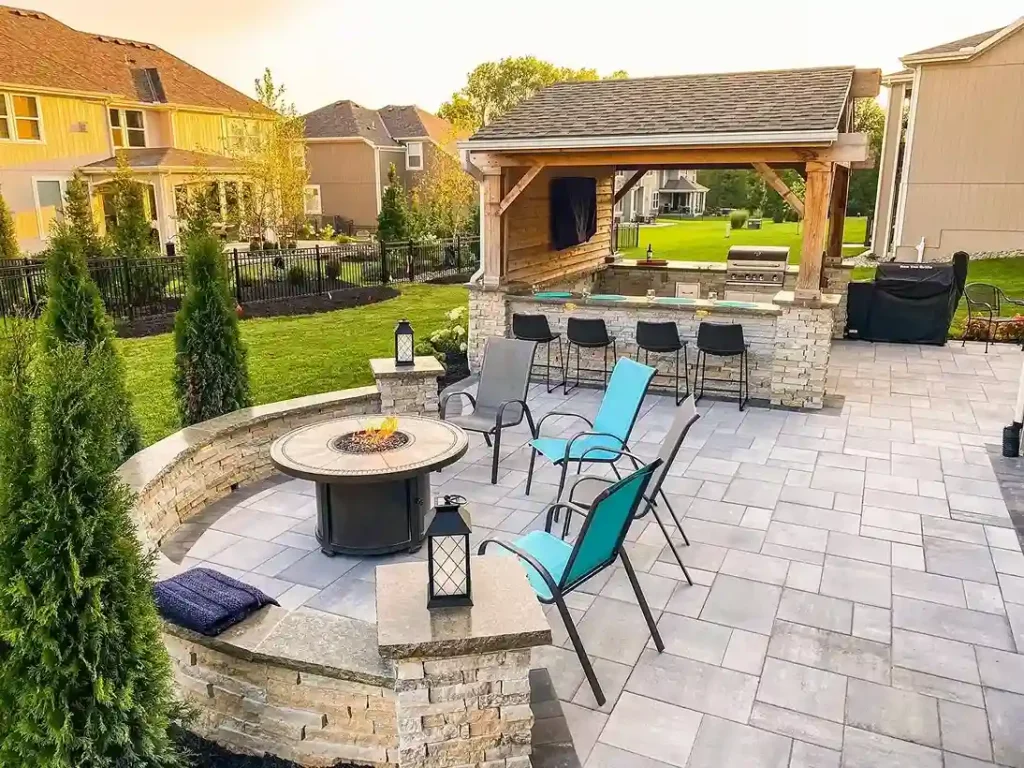
14. Choose Budget Outdoor Furniture That Lasts
Outdoor furniture completes the patio and makes it genuinely usable. Budget outdoor furniture has improved dramatically in recent years. Durable resin wicker, powder-coated steel, and weather-resistant composites provide years of service at accessible prices. You do not need to spend thousands to furnish a patio beautifully.
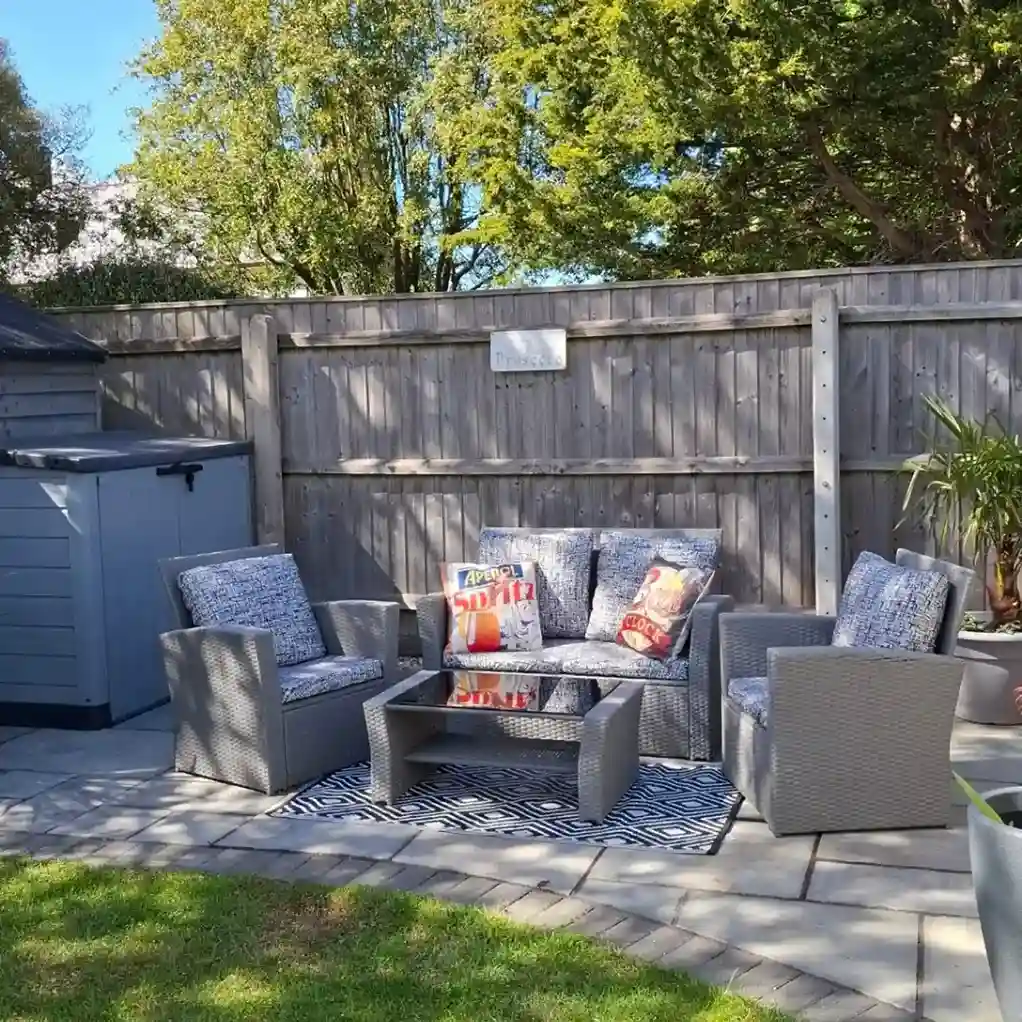
source: @lifewiththebeev
A basic patio furniture set — table and four chairs — from major retailers costs $150–$300. Add a second-hand loveseat or a simple bench from a thrift store or online marketplace for additional seating. Cover cushions in outdoor-rated fabric that withstands UV exposure and moisture. A simple furniture arrangement that fits the patio well always looks better than expensive furniture placed without thought.
- Measure the patio space before purchasing any furniture
- Leave at least 36 inches of clearance around the dining table for comfortable movement
- Choose neutral furniture colors that work with any cushion or accessory color
- Look for end-of-season furniture sales in late summer for the best prices
- Add outdoor cushions in a bold pattern or color for instant personality and comfort
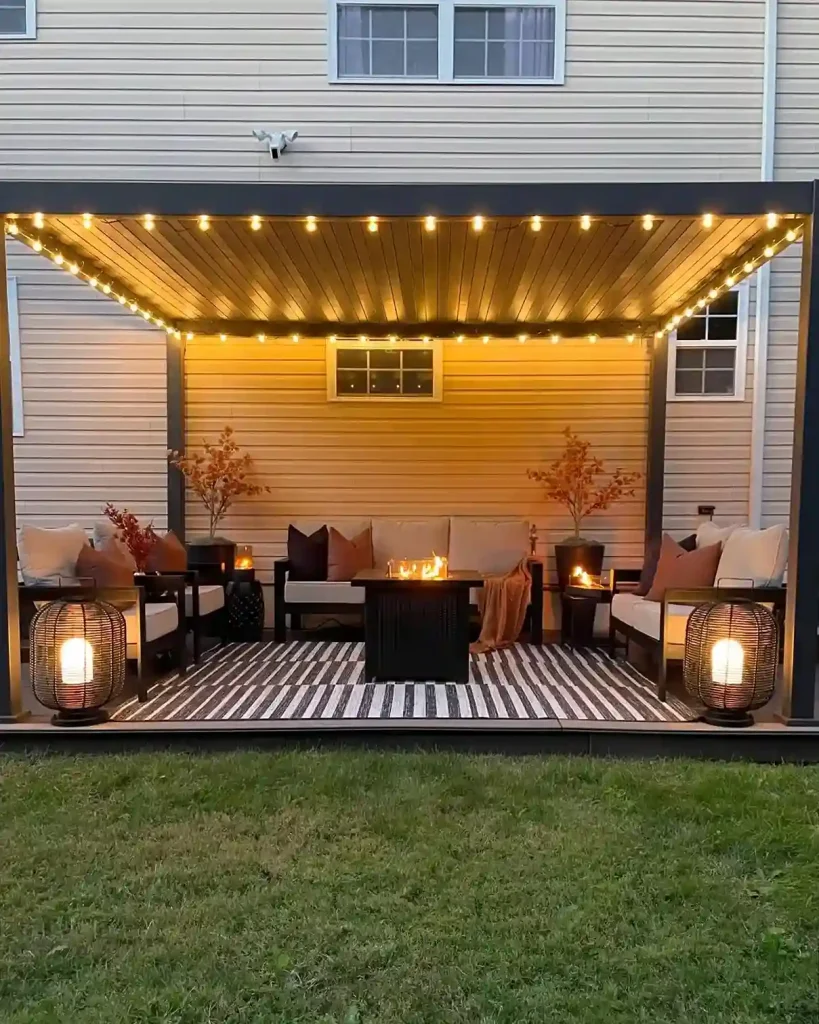
15. Light the Patio for Evening Use
A patio used only during daylight hours delivers a fraction of its potential value. Good outdoor lighting extends the usable hours of your patio into every evening throughout the season. Solar-powered options add zero running cost. Wired options deliver more consistent brightness. Either approach transforms the patio after dark.
source: @greenweddingshoes
String lights hung above the patio are the most popular and impactful lighting choice. A set of outdoor-rated string lights costs $20–$60 and hangs in an afternoon. Solar stake lights placed around the patio perimeter add definition and safety at zero running cost. A few pillar candles or lanterns on the table add warmth and flicker that electric lights cannot replicate.
| Patio Lighting Type | Cost | Running Cost | DIY Level |
|---|---|---|---|
| Outdoor string lights | $20–$60 | Low (LED) | Very Easy |
| Solar stake lights | $15–$40 | Zero | Very Easy |
| Solar lanterns | $10–$30 | Zero | None |
| Wired low-voltage path lights | $30–$80 | Very Low | Moderate |
| Candles in lanterns | $10–$30 | Minimal | None |
16. Add Plants and Greenery on a Tight Budget
Plants are the single most impactful finishing touch on any patio. They add color, fragrance, life, and privacy. Budget-friendly patio plants include lavender, rosemary, ornamental grasses, geraniums, and petunias. These plants are widely available, inexpensive, and perform beautifully in container pots on a patio.

source: @homefixtrends
Group three to five pots together at corners and beside seating areas for maximum visual impact. Choose pots in a consistent color — all terracotta, all white, or all charcoal — for a cohesive, designed look. Tall ornamental grasses or bamboo in large pots provide natural screening from neighbors. The entire patio planting can be completed for under $100 with careful plant selection and pot choices.
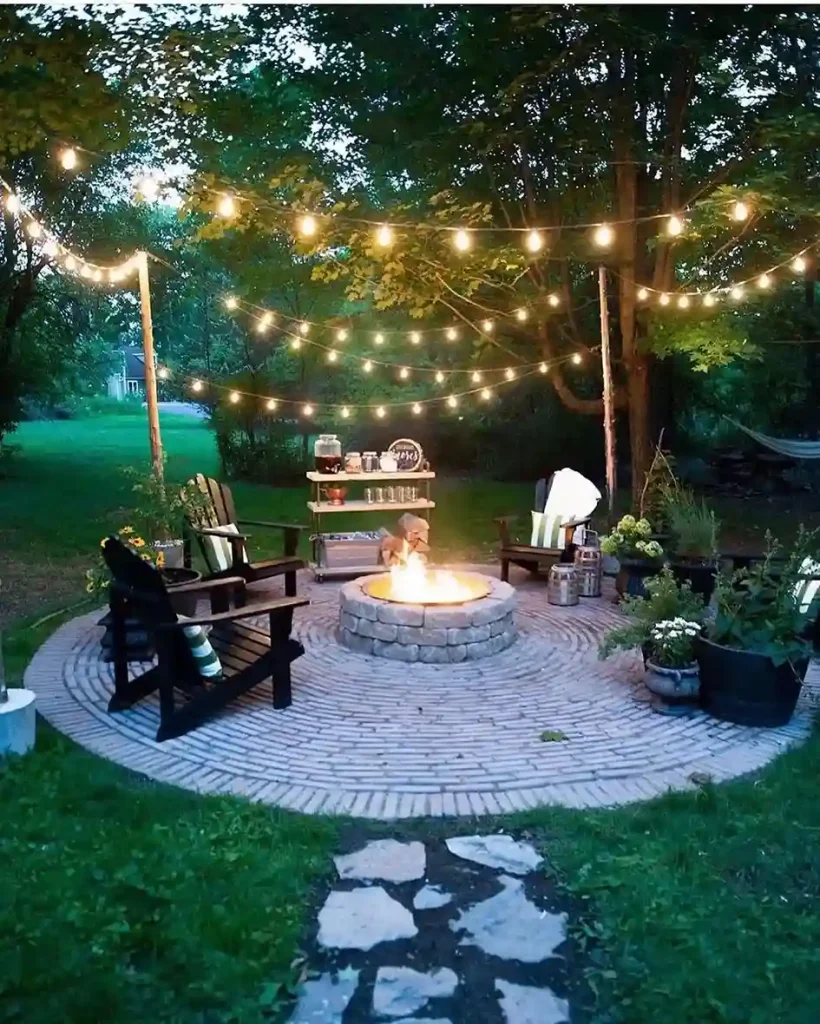
17. Build a Simple DIY Fire Pit for Cozy Evenings
A fire pit beside the patio extends evening enjoyment throughout the entire season. A basic DIY fire pit built from retaining wall blocks costs $50–$150 in materials and takes an afternoon to build. No mortar is required for a simple stacked ring design. The fire pit becomes the social heart of every outdoor evening gathering.
Stack retaining wall blocks in a circle approximately three feet in diameter. Three to four courses of blocks create the ideal height. Level the ground beneath thoroughly before beginning. Place the fire pit on a gravel base at least ten feet from any structure or overhanging plants. Fill the interior with gravel before adding a steel fire ring insert for a clean, long-lasting fire pit that looks genuinely professional.
| Fire Pit Build Option | Materials Cost | Build Time | DIY Level |
|---|---|---|---|
| Stacked block ring | $50–$150 | 2–4 hours | Very Easy |
| Dug pit with stone surround | $20–$60 | 3–5 hours | Easy |
| Purchased steel bowl | $30–$100 | 30 minutes | None |
| Concrete block square pit | $60–$120 | 3–4 hours | Easy |
18. Add Privacy on a Budget
Privacy transforms a patio from a space you use cautiously into one you enjoy completely. Simple, affordable privacy solutions are widely available. A bamboo roll screen attached to existing fence posts installs in minutes. A row of tall potted plants creates a living screen. Outdoor curtains hung from a pergola provide flexible privacy that can be opened or closed as needed.
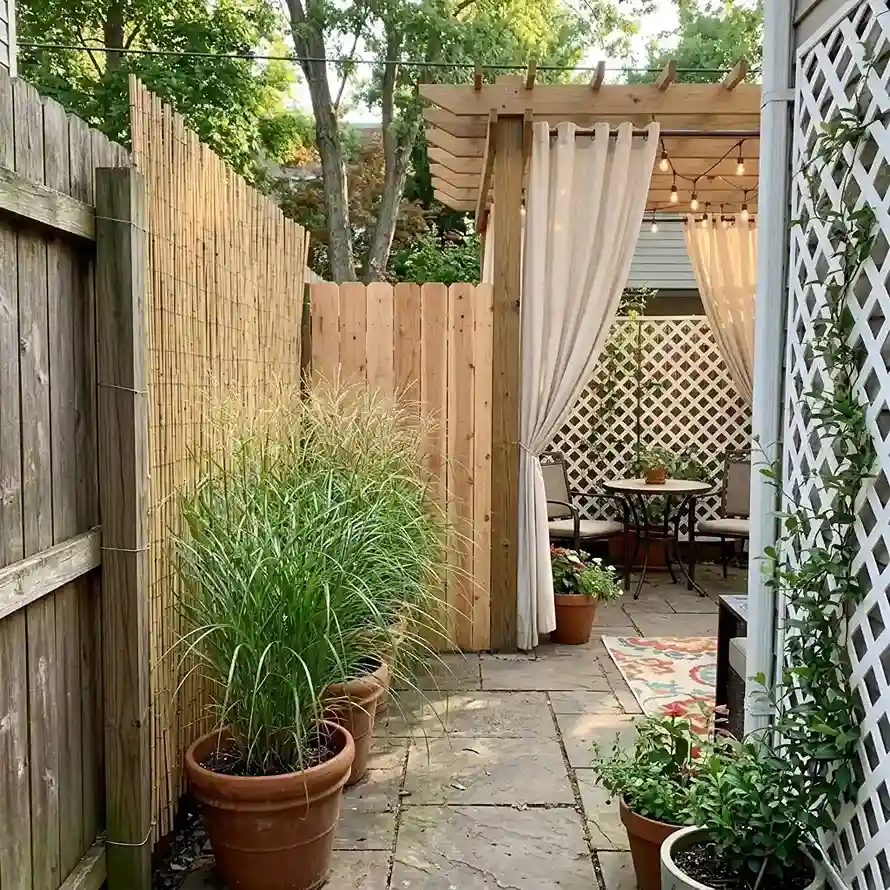
- Bamboo roll screens cost $20–$40 and attach with simple wire ties to any fence post
- Six-foot ornamental grasses in large pots create an instant natural privacy screen
- A simple cedar fence panel on one exposed side costs $30–$60 in materials
- Outdoor curtains on a pergola provide both privacy and a beautiful resort aesthetic
- Lattice panels with climbing plants create romantic, permanent screening over time
19. Finish the Patio With Styling Details
Styling details are what separate a construction project from a finished outdoor room. They cost very little but deliver the final ten percent of impact that makes the whole space feel complete. An outdoor rug under the dining table. A lantern on the side table. A small herb pot beside the door. These details matter enormously.
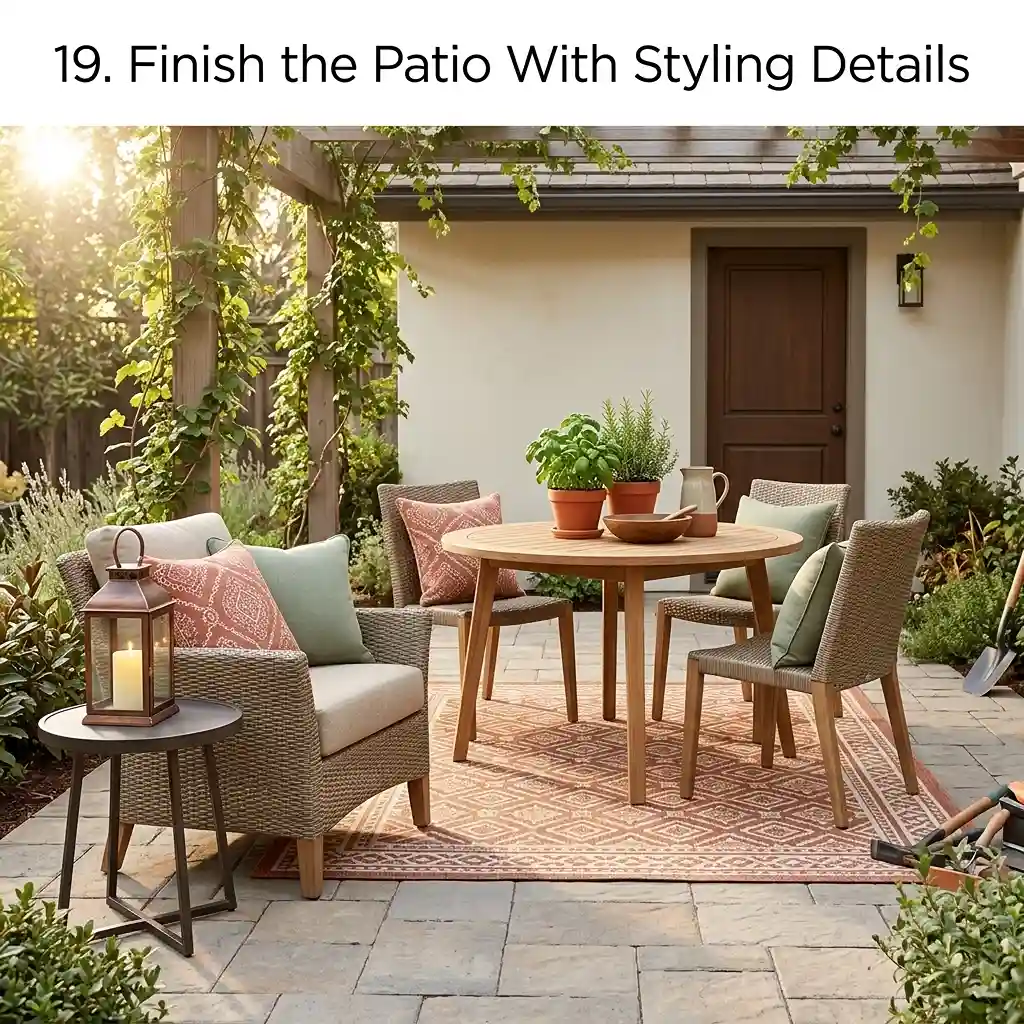
Choose accessories in two or three coordinating colors that match your outdoor cushion fabric. Repeat those colors throughout the space in pots, lanterns, and decorative objects. A consistent color story makes even the simplest collection of budget items look considered and designed. The styling phase is the most enjoyable part of the entire project — take time with it and enjoy the result.
| Styling Element | Cost | Visual Impact |
|---|---|---|
| Outdoor rug | $30–$80 | Very High |
| Lantern with candle | $10–$25 | High |
| Herb pot cluster | $15–$30 | Medium-High |
| Throw cushions (x4) | $20–$50 | Very High |
| Small side table | $20–$60 | High |
20. Maintain Your Patio to Protect Your Investment
A well-maintained patio lasts for decades. A neglected one deteriorates within a few seasons. Basic maintenance costs almost nothing in time and money. It protects the investment you made in building the patio and keeps it looking as good as the day it was completed.
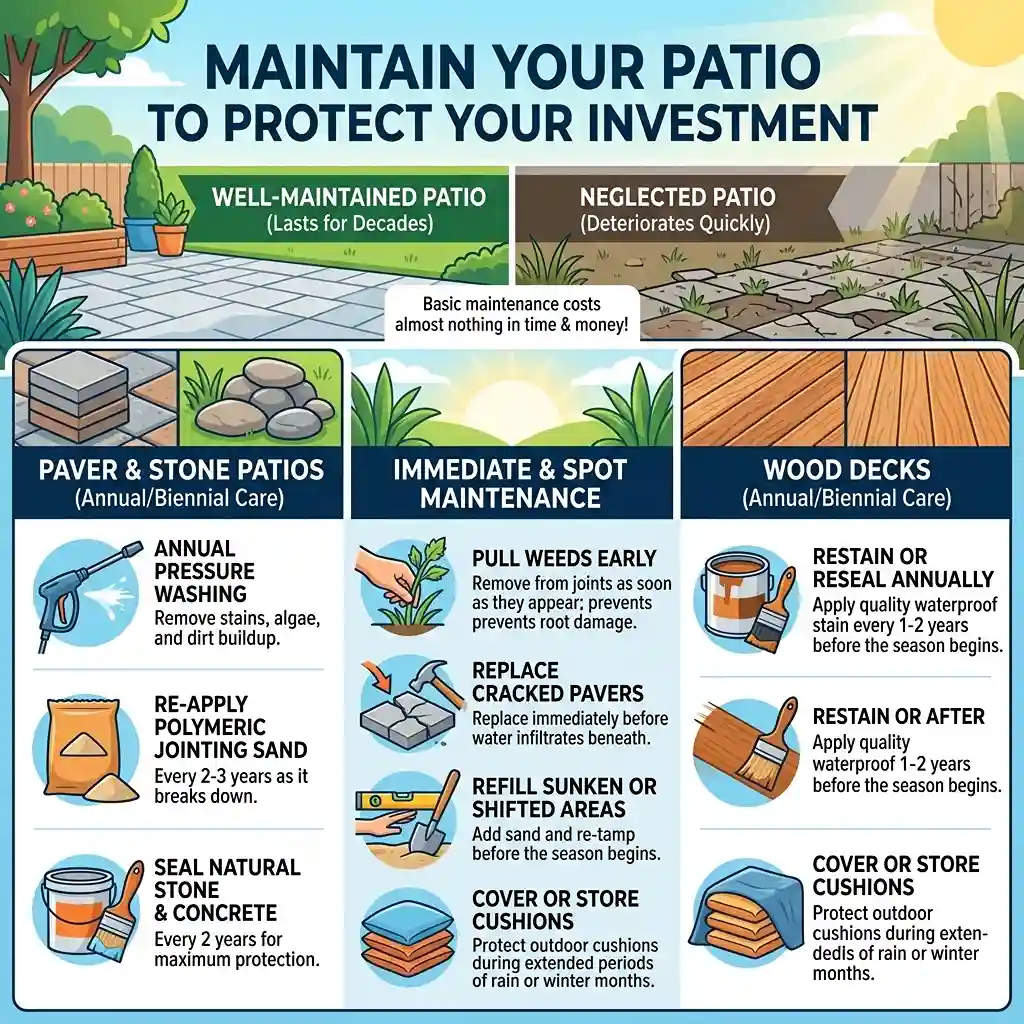
Clean paver or stone patios with a pressure washer annually. Re-apply polymeric jointing sand every two to three years as it breaks down. Seal natural stone and concrete every two years for maximum protection. Restain or reseal wood decks annually before the season begins. Pull weeds from joints as soon as they appear — early removal prevents root damage to the patio surface. Read more about pool deck ideas.
- Pressure wash pavers and stone annually to remove stains, algae, and dirt buildup
- Refill any sunken or shifted areas with additional sand and re-tamp before the season
- Replace any cracked or damaged pavers immediately before water infiltrates beneath
- Treat wood decking with a quality waterproof stain every one to two years
- Cover or store outdoor cushions during extended periods of rain or winter months
21. Complete DIY Patio Under $1000 — Final Budget Summary
A complete, beautiful DIY patio for under $1000 is absolutely achievable with proper planning and smart choices. Here is how a realistic $950 budget might be allocated across a 10×12 foot concrete paver patio with all finishing elements included.
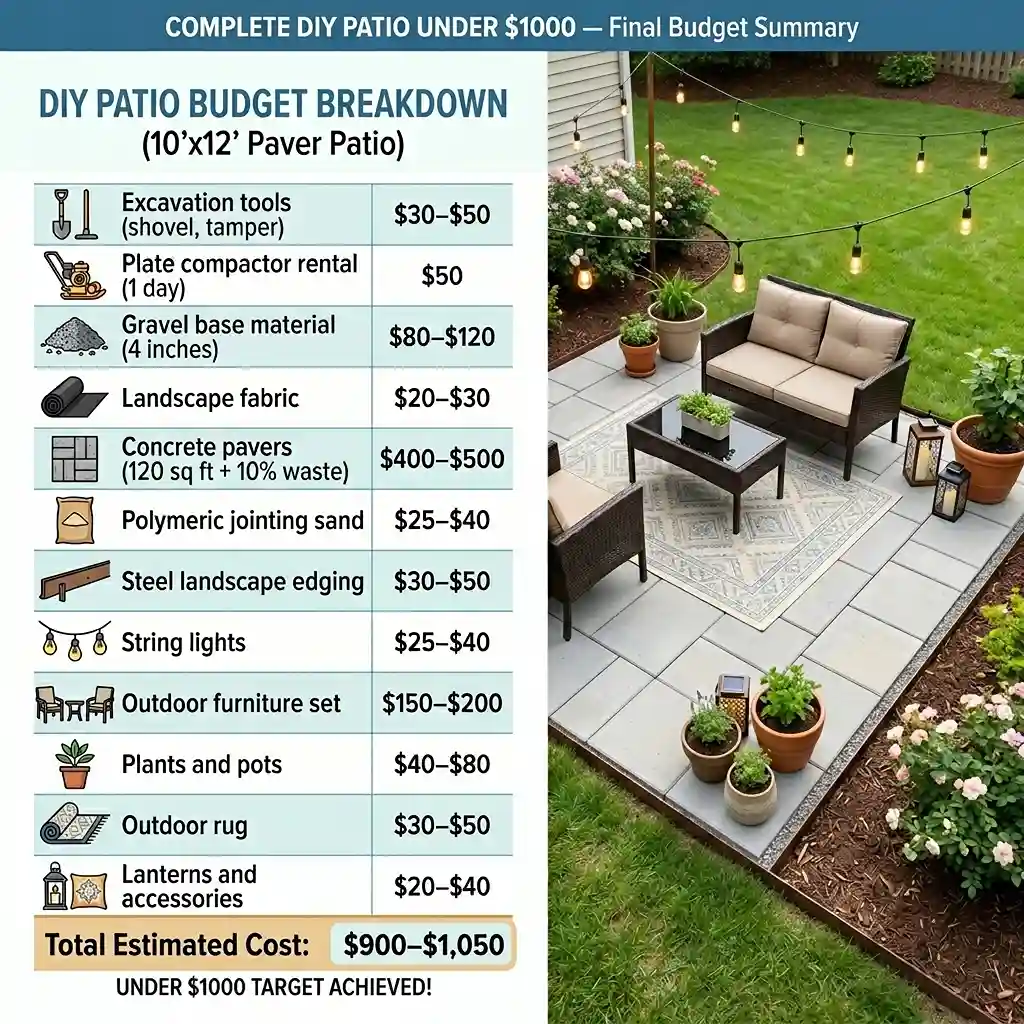
Every dollar in this budget delivers genuine value. The materials create a durable, professional-looking surface. The tools, once purchased, serve dozens of future projects. The furniture and lighting create the outdoor room that makes the investment worthwhile every single time you step outside.
| Item | Estimated Cost |
|---|---|
| Excavation tools (shovel, tamper) | $30–$50 |
| Plate compactor rental (1 day) | $50 |
| Gravel base material (4 inches) | $80–$120 |
| Landscape fabric | $20–$30 |
| Concrete pavers (120 sq ft + 10% waste) | $400–$500 |
| Polymeric jointing sand | $25–$40 |
| Steel landscape edging | $30–$50 |
| String lights | $25–$40 |
| Outdoor furniture set | $150–$200 |
| Plants and pots | $40–$80 |
| Outdoor rug | $30–$50 |
| Lanterns and accessories | $20–$40 |
| Total | $900–$1,050 |
The final total sits right at the $1000 target. Shaving costs in one area — choosing gravel instead of pavers, sourcing second-hand furniture, or borrowing tools — brings the total well under $1000 with no sacrifice to the finished result.
Frequently Asked Questions (FAQs)
Q1: Can I really build a nice patio for under $1000?
Yes, absolutely. A 10×12 foot concrete paver patio with furniture, lighting, and plants is achievable for $800–$1000 with DIY labor. Choosing gravel instead of pavers, sourcing second-hand furniture, or borrowing tools reduces the cost further. Many beautiful patios are completed for $500–$700 with careful planning and smart sourcing.
Q2: How long does it take to build a DIY patio?
A gravel patio takes one day. A concrete paver patio takes one full weekend — one day for excavation and base preparation, one day for laying pavers and finishing. A wood deck patio takes two to three weekends depending on size and complexity. Add one additional day for furniture setup and planting.
Q3: Do I need a permit to build a patio?
Most ground-level patios under a certain size do not require a permit. Requirements vary significantly by location. Check with your local municipality before beginning any permanent structure including a pergola or raised deck. Fines for unpermitted construction can exceed the cost of the patio itself in some areas.
Q4: What is the easiest DIY patio for a complete beginner?
A gravel patio is the easiest option for a complete beginner. Mark the area, excavate four inches, lay landscape fabric, install edging, and fill with gravel. The entire project requires no specialized skills or tools and can be completed in a single day for under $200. It looks genuinely attractive and functions perfectly as a casual outdoor space.
Q5: How do I keep weeds out of my new patio?
Landscape fabric beneath gravel or sand bases is the first line of defense. Polymeric jointing sand in paver joints hardens slightly and resists weed germination significantly better than regular sand. Pull any weeds that appear immediately before they establish roots. Apply a patio weed killer rated for use around hardscaping twice per season as a preventive measure.
Conclusion
A DIY patio under $1000 is not a compromise. Planned well and built carefully, it is one of the most satisfying home improvement projects you can undertake. The outdoor space you create becomes an extension of your home — a place for meals, conversations, mornings with coffee, and evenings by the fire. All of that is available for less than the cost of a single contractor quote.
Start with your plan. Choose your material. Prepare the ground properly. Build it one step at a time. The patio you have been imagining is closer, more affordable, and more achievable than you ever thought. This weekend is a perfectly good time to begin.