Your ceiling is the one surface you never improve. Paint chips, wallpaper peels, and the plain white overhead just sits there doing nothing for the room. You want something better but assume it costs a fortune.
DIY cheap wood ceiling costs far less than most people expect. With basic tools, a weekend of work, and the right material choice, you can transform any ceiling from forgettable to extraordinary.

These 36 ideas cover every approach, every material, every skill level, and every budget — so you can find the perfect wood ceiling for your space and build it yourself.
1. Understand Why Wood Ceilings Transform Rooms
Wood adds warmth to any room that no painted surface can replicate. The natural grain, the texture, and the organic variation of wood create a visual depth that changes how every room feels. A wood ceiling makes rooms feel warmer, cozier, and more intentionally designed.

Wood ceilings also add acoustic benefits. The textured surface absorbs sound rather than reflecting it back across the room. Conversations feel clearer. Music sounds warmer. The room becomes a more pleasant place to spend time even before you look up.
The financial investment in a DIY wood ceiling is genuinely modest. Materials for a standard bedroom ceiling cost $200–$600 depending on the wood species and finish chosen. Professional installation of the same ceiling costs $1,500–$4,000. The DIY savings are substantial at every scale of project.
| Wood Ceiling Type | DIY Material Cost | Professional Cost | DIY Savings |
|---|---|---|---|
| Peel-and-stick planks | $1–$2 per sq ft | $4–$6 per sq ft | 60–70% |
| Shiplap boards | $1.50–$3 per sq ft | $5–$8 per sq ft | 60–70% |
| Pallet wood | Free–$0.50 per sq ft | $4–$7 per sq ft | 80–90% |
| Plywood sheets | $0.50–$1.50 per sq ft | $4–$6 per sq ft | 75–85% |
| Tongue-and-groove | $2–$4 per sq ft | $6–$10 per sq ft | 60–70% |
2. Choose the Right Wood Material for Your Budget
Material selection is the most important cost decision in any DIY wood ceiling project. The same room can be covered for $100 using pallet wood or for $800 using cedar tongue-and-groove. Both look beautiful. The difference is material cost and finishing time.

Pallet wood and plywood are the most affordable starting points. Shiplap from a lumber yard sits in the middle of the cost range. Cedar and pine tongue-and-groove boards cost more but produce the most polished, professional-looking finish. Match material choice to the room’s purpose — a bedroom deserves a finer material than a garage workshop.

- Pallet wood: free or nearly free, most rustic, requires most preparation
- Plywood sheets: lowest cost per square foot, fastest installation, best for large areas
- Peel-and-stick planks: easiest installation, no tools needed, best for renters
- Pine shiplap: best value balance of cost, appearance, and ease
- Cedar or pine tongue-and-groove: most beautiful finish, most professional result
- Reclaimed lumber: variable cost, maximum character, requires inspection and preparation
3. Gather the Right Tools Before Starting
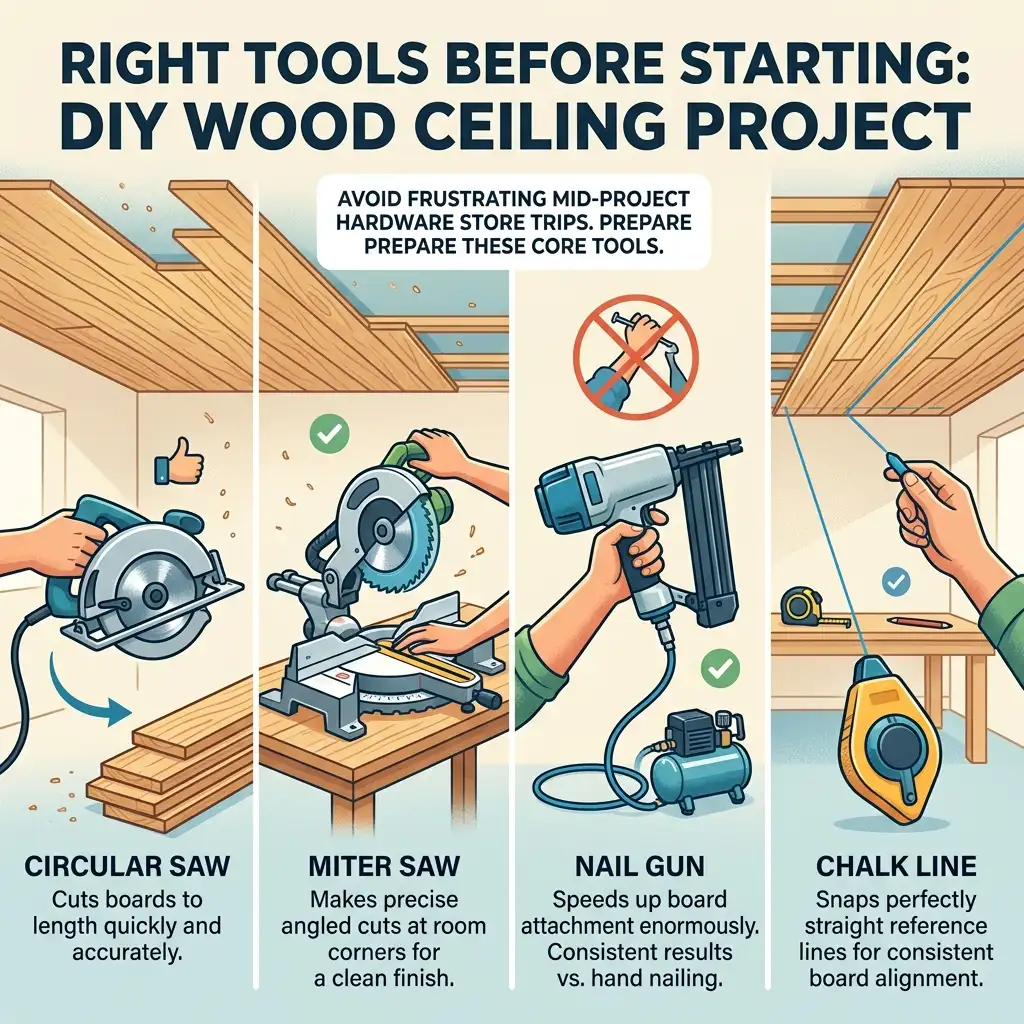
Having the right tools before starting prevents the most frustrating mid-project hardware store trips. Most DIY wood ceiling projects require a small core set of tools that most homeowners already own or can borrow.

A circular saw cuts boards to length quickly and accurately. A miter saw makes angled cuts at room corners clean and precise.
A nail gun speeds up board attachment enormously — hand nailing a full ceiling takes significantly longer and produces less consistent results. A chalk line snaps perfectly straight reference lines across the ceiling for consistent board alignment.
| Tool | Purpose | Rent or Buy | Approximate Cost |
|---|---|---|---|
| Circular saw | Cut boards to length | Buy | $50–$150 |
| Miter saw | Angle cuts at corners | Rent | $30–$50 per day |
| Nail gun (finish nailer) | Attach boards to ceiling | Rent | $30–$50 per day |
| Chalk line | Mark straight reference lines | Buy | $8–$15 |
| Level | Check alignment | Buy | $15–$30 |
| Safety glasses | Eye protection | Buy | $5–$15 |
| Stud finder | Locate ceiling joists | Buy | $15–$40 |
4. Find the Ceiling Joists Before Any Installation Begins
Ceiling joists are the structural members that run across the ceiling. Every board or plank installed on a wood ceiling must fasten into a joist for a secure, safe installation. Boards fastened only into drywall will eventually fall.

Use a stud finder to locate every joist before beginning any installation. Mark joist positions with a chalk line snapped across the full ceiling from wall to wall. These lines guide board placement during installation and ensure every fastener hits solid wood rather than hollow drywall.
Standard ceiling joist spacing is 16 inches on center in most homes. Some older homes use 24-inch spacing. Confirm the actual spacing in your specific ceiling before purchasing any materials — the joist spacing determines how boards are installed and how they are supported between fastening points.
5. Build a Simple Pallet Wood Ceiling for Free
Pallet wood is available for free or nearly free from warehouses, hardware stores, and garden centers. Disassembled carefully, pallet boards provide enough material to cover a full ceiling for almost no material cost. The rustic, weathered character of reclaimed pallet wood creates extraordinary ceiling texture.

Source only pallets marked HT — heat treated. Avoid pallets marked MB — methyl bromide treated. Clean all boards thoroughly. Remove every nail carefully with a pry bar to avoid hidden nail tips. Sand all surfaces with 60-grit paper followed by 100-grit for a smooth, splinter-free finish.
| Pallet Wood Step | Time Required | Tool Needed | Cost |
|---|---|---|---|
| Source and collect pallets | 1–3 hours | Vehicle | Free |
| Disassemble pallets | 2–4 hours | Pry bar, hammer | $0 |
| Remove nails and sand | 3–5 hours | Sander, sandpaper | $10–$20 |
| Sort and organize boards | 1–2 hours | None | $0 |
| Install on ceiling | 4–8 hours | Nail gun, saw | $0 (rent tools) |
6. Install Peel-and-Stick Wood Planks for Zero Mess
Peel-and-stick wood plank panels are the most renter-friendly and beginner-friendly wood ceiling option. They apply directly to any clean, flat surface with no nails, no tools, and no construction experience needed. The adhesive backing holds firmly overhead when applied correctly.

Apply to a clean, dust-free surface for maximum adhesion. Press each plank firmly and fully along its entire length immediately after placement. Start from a straight reference line marked on the ceiling rather than from the wall — ceilings are rarely perfectly square and walls create inaccurate starting points.
For complete wood ceiling ideas covering every material, finish, and installation approach beyond peel-and-stick including planks, beams, and plywood, explore this comprehensive guide on cheap wood ceiling ideas for the full range of affordable wood ceiling approaches.
7. Install Shiplap Boards as the Most Popular DIY Choice
Shiplap is the most popular DIY wood ceiling material for excellent reasons. It installs relatively quickly. It creates clean, consistent shadow lines between boards that add beautiful texture. It accepts paint, stain, and whitewash finishes equally well. And it costs significantly less than tongue-and-groove alternatives.

Start the first row at one wall with a straight, level reference line. Nail each board through its face into the ceiling joists below using a finish nailer. Leave a 1/8-inch gap between boards for the shadow line effect — a small nail or a washer used as a spacer ensures consistent gaps throughout the installation.
| Shiplap Installation Step | Time per 100 sq ft | Skill Level | Key Tool |
|---|---|---|---|
| Mark joist lines on ceiling | 30 minutes | Beginner | Chalk line, stud finder |
| Cut boards to wall length | 1–2 hours | Beginner | Circular saw |
| Nail first row level | 30 minutes | Beginner | Nail gun, level |
| Install subsequent rows | 3–5 hours | Beginner | Nail gun, spacer |
| Fill nail holes and finish | 1–2 hours | Beginner | Filler, brush |
For a comprehensive shiplap ceiling design guide covering installation techniques, finish options, and design applications across every room type, explore these shiplap ceiling ideas for the complete resource on shiplap ceiling design and installation.
8. Use Plywood Sheets for the Fastest Large-Area Coverage
Plywood sheets cover large areas quickly at the lowest possible material cost. A single 4×8 foot sheet of 1/4-inch plywood covers 32 square feet in one piece. A 200 square foot ceiling needs just seven sheets. The installation is faster than any individual plank system.
Sand all sheet surfaces smooth before installation. Fill any surface voids with wood filler and sand flush. Apply a wood conditioner before staining for even color absorption. Paint works beautifully over sanded and primed plywood — the grain shows subtly through paint and adds texture that drywall cannot provide.
- Use 1/4-inch plywood for application over existing drywall ceilings
- Use 3/4-inch plywood for application directly to ceiling joists as the primary surface
- Baltic birch plywood has the finest, most consistent grain for a premium appearance
- Fill all panel joints with paintable wood filler before finishing
- Sand in the direction of the wood grain — cross-grain sanding leaves visible scratches
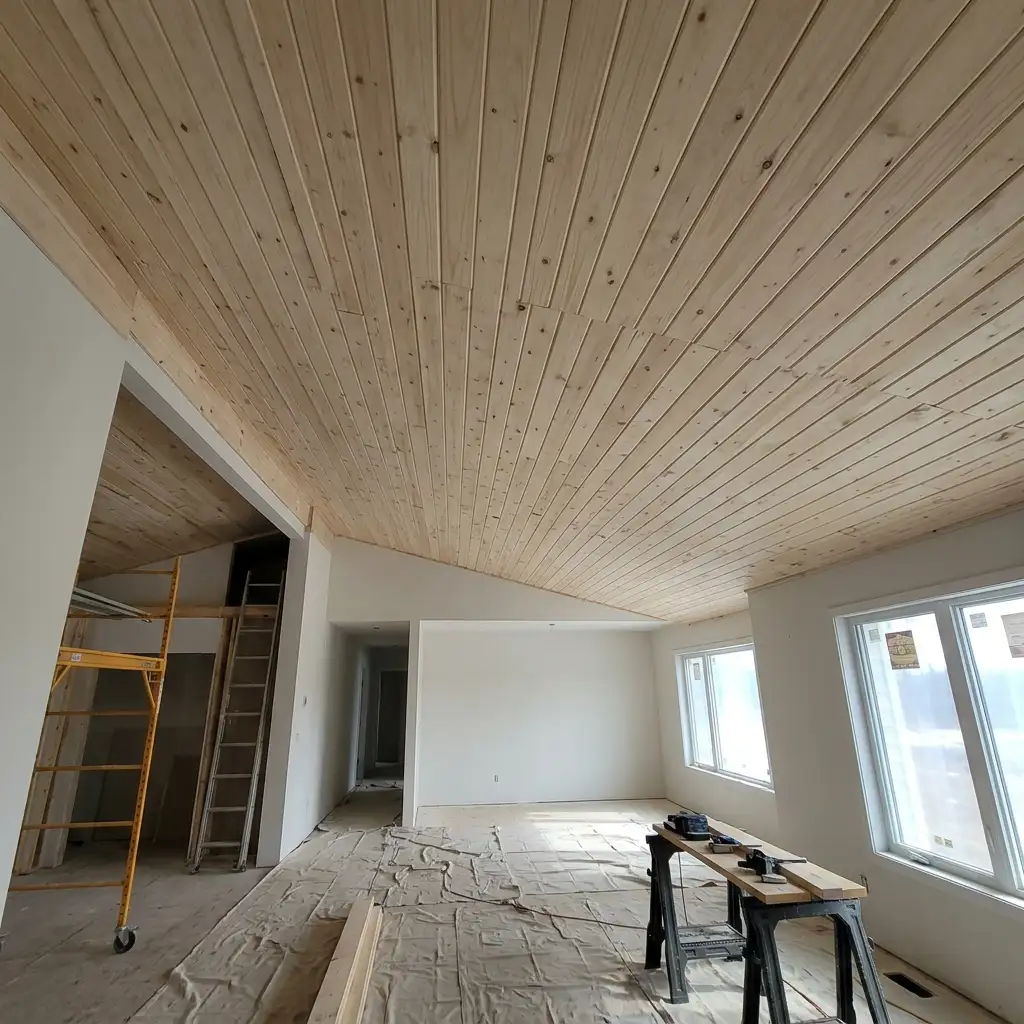
9. Create a Whitewashed Wood Ceiling for Coastal or Cottage Style
A whitewashed wood ceiling creates the most beautiful coastal and cottage ceiling effect available. The whitewash sits in the grain of the wood while allowing the natural pattern to show through. The result is lighter than natural wood but richer than painted white.

Mix white latex paint with water in a 1:1 ratio for a medium whitewash effect. More paint creates a more opaque, painted appearance. More water creates a more translucent, subtle wash. Apply the mix with a brush and wipe back immediately with a clean rag before the wash dries. Work in small sections.
| Whitewash Ratio | Opacity | Best Use | Drying Time |
|---|---|---|---|
| 1 part paint : 3 parts water | Very light | Subtle grain reveal | 15–20 minutes |
| 1 part paint : 2 parts water | Light | Soft whitewash effect | 20–30 minutes |
| 1 paint : 1 water | Medium | Classic whitewash | 30–40 minutes |
| 2 paint : 1 water | Heavy | Near-painted appearance | 40–60 minutes |
10. Build DIY Faux Wood Beams From Lumber
Faux wood beams built from three boards assembled into a hollow U-shape look like solid structural beams at a fraction of the weight and cost. Two side pieces and a bottom piece glued and nailed together create the box beam. Mount the box over a nailer strip attached to the ceiling.

Size the box beam proportionally to the room. A 4-inch wide, 4-inch deep beam suits low ceilings in smaller rooms. A 6-inch wide, 6-inch deep beam suits higher ceilings in larger rooms. Space beams evenly across the ceiling — typically 36 to 48 inches apart — for the most natural structural appearance.
For a comprehensive guide to faux wood beam installation covering materials, sizing, spacing, and every finish option that creates the most beautiful beam ceiling results, explore these faux wood beams ceiling ideas for the complete faux beam design resource.
| Box Beam Size | Room Ceiling Height | Room Size | Spacing |
|---|---|---|---|
| 3×3 inches | 7–8 feet | Small room | 36 inches |
| 4×4 inches | 8–9 feet | Medium room | 42 inches |
| 5×5 inches | 9–10 feet | Large room | 48 inches |
| 6×6 inches | 10+ feet | Very large room | 60 inches |
11. Create a Herringbone Pattern Wood Ceiling
A herringbone pattern ceiling uses the same basic planks as a standard installation but arranges them at 45-degree angles in a V-shaped interlocking pattern. The dynamic, angled arrangement creates extraordinary visual energy that a horizontal installation cannot achieve.
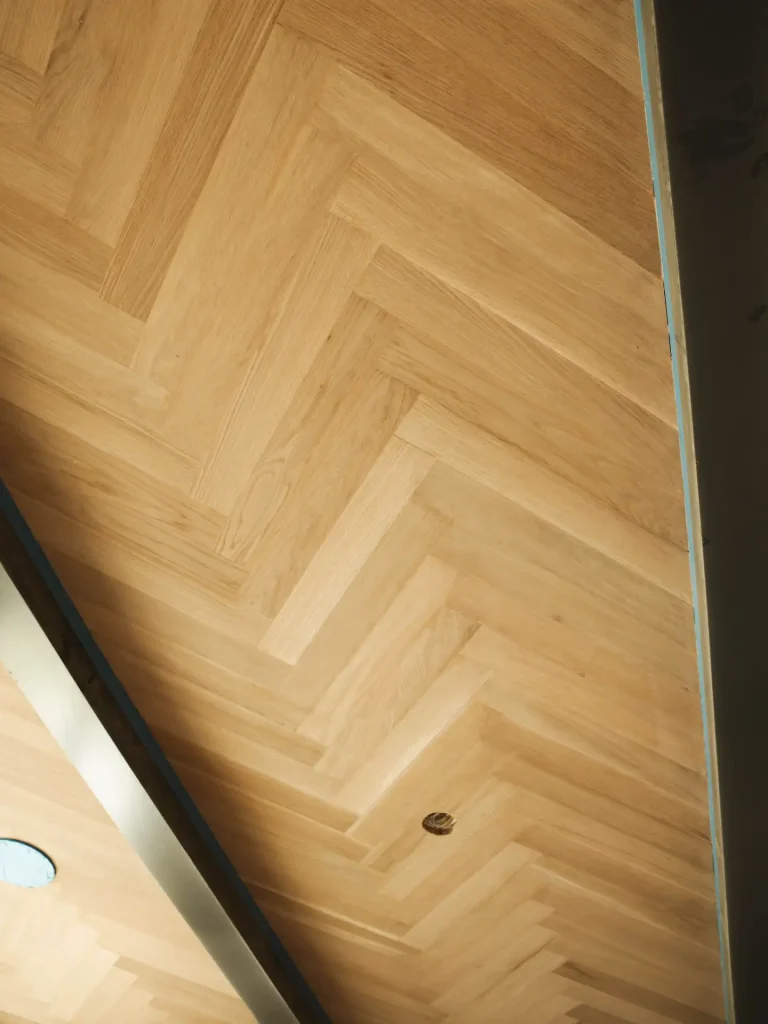
Mark the ceiling center point before beginning any herringbone installation. Start the first two boards at the center line arranged in a V shape. Work outward from the center in both directions simultaneously to maintain symmetrical pattern alignment. Cut all end pieces at 45-degree angles for clean joints at the walls.
The herringbone pattern wastes approximately 15 percent more material than a straight installation due to the angled cuts required. Order 20 percent more material than the calculated ceiling area to account for this waste. The additional material cost is worth the extraordinary visual result the herringbone pattern creates.
12. Install a Wood Plank Ceiling in a Bedroom
A wood plank ceiling in a bedroom creates the most immediately transformative sleeping environment possible. The warmth overhead changes how the entire room feels from the moment you walk in. Even a simple pine board ceiling painted white creates a dramatically more beautiful bedroom than plain drywall.

For complete bedroom design ideas where a wood plank ceiling creates the most beautiful and most characterful sleeping environment, explore these slanted ceiling bedroom ideas for bedroom-specific ceiling design approaches that apply directly to any wood plank ceiling installation in a bedroom.
Position the bed before installing the ceiling so the plank direction can be chosen relative to the bed placement. Planks running parallel to the length of the bed create a sense of extension. Planks running perpendicular to the bed create a sense of width. The plank direction choice is one of the first design decisions to make.
13. Add a Wood Ceiling to a Small Living Room and Dining Area
A wood ceiling in a combined living and dining space creates visual unity across the open-plan area. The continuous warm wood surface overhead connects the two zones and makes the combined space feel designed as a single cohesive room rather than two areas sharing the same floor.

For small living room and dining area design ideas where a wood ceiling creates visual connection between zones and adds warmth to a compact open-plan space, explore these small living room with dining area ideas for complete open-plan room design approaches that pair beautifully with a wood ceiling installation.
Install planks in a consistent direction across both zones without any break at the zone boundary. The uninterrupted plank lines overhead create the visual unity that defines the combined space as a single designed room. A pendant light over the dining table and recessed lighting over the living area can sit within the same continuous plank ceiling.
| Open-Plan Wood Ceiling | Plank Direction | Zone Connection | Visual Effect |
|---|---|---|---|
| Living to dining | Parallel to long wall | Seamless | Expansive |
| Living to dining | Perpendicular to division | Defined | Organized |
| Kitchen to dining | Consistent across both | Unified | Cohesive |
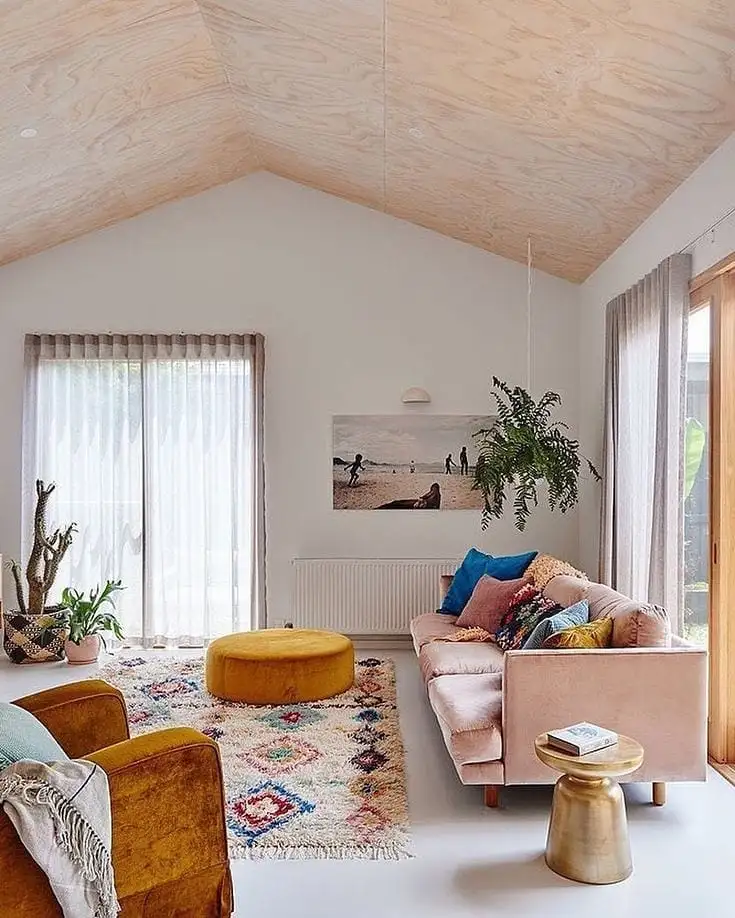
14. Install a Wood Ceiling in a Studio Apartment
A wood ceiling in a studio apartment creates extraordinary warmth and visual interest in a compact space where every design element must work harder than in a larger home. The ceiling is the one surface visible from every point in the room — making it the highest-impact surface to improve.

source: @raycraftagram
For complete studio apartment design ideas where a wood ceiling becomes the primary design feature that creates warmth and cohesion throughout a compact combined living space, explore these small studio apartment ideas for comprehensive approaches to making a small studio apartment genuinely beautiful with a wood ceiling as a central design feature.
Light-toned wood or whitewashed planks suit studio apartments best. The lighter color reflects available light downward rather than absorbing it. The warmth of wood overhead prevents the compact space from feeling institutional or generic. A studio apartment with a wood plank ceiling always photographs and shows beautifully.
15. DIY a Tongue-and-Groove Wood Ceiling for a Polished Finish
Tongue-and-groove boards interlock along their edges to create a seamless, gap-free wood surface. Unlike shiplap which shows a shadow gap between boards, tongue-and-groove creates an almost continuous wood surface. The polished, seamless appearance suits formal living rooms, master bedrooms, and dining rooms.

Install tongue-and-groove from one wall to the opposite. The groove edge of each board receives the tongue of the next board. Face-nail the first and last rows where the interlocking mechanism is accessible. Blind-nail all intermediate rows through the tongue at 45 degrees — the nails are hidden by the next board’s groove.
16. Create a DIY Wood Ceiling in a Home Office
A wood ceiling in a home office adds inspiration and warmth to a space where people spend significant focused time every day. The natural material overhead creates an organic, restorative quality that drywall and paint simply cannot provide. A better ceiling genuinely improves the daily experience of working in the space.

For complete home office design ideas covering desk setup, storage, lighting, and ceiling treatments that create productive, inspiring workspaces where a DIY wood ceiling contributes significantly to the office’s overall quality and atmosphere, explore this comprehensive guide on home office ideas for everything needed to design an exceptional home office with a beautiful wood ceiling.
| Home Office Ceiling Style | Work Atmosphere | Light Reflection | Installation Difficulty |
|---|---|---|---|
| White painted shiplap | Clean, bright, focused | High | Easy |
| Natural pine planks | Warm, creative, organic | Medium | Easy |
| Dark stained boards | Serious, contained | Low | Easy |
| Whitewashed planks | Calm, airy, balanced | High | Easy |
17. Install a Wood Ceiling in a Basement Room
A basement room with a raw, unfinished, or poorly finished ceiling benefits enormously from a DIY wood plank treatment. The warmth of wood counteracts the inherently cool and dark quality of below-grade rooms. The basement stops feeling like a storage area and starts feeling like the most characterful room in the house.

For complete basement ceiling design ideas covering every approach to transforming basement ceilings from raw to beautiful, explore these exposed basement ceiling ideas for the full range of basement ceiling treatments and then these painted exposed basement ceiling ideas for painted approaches that complement wood plank installations in basement rooms.
Seal all wood in basement applications thoroughly with polyurethane. Basements have higher moisture levels than above-grade rooms and unsealed wood absorbs moisture that leads to warping and deterioration. A quality sealant protects the wood indefinitely and makes the ceiling easy to clean.
18. Paint the Wood Ceiling a Bold Color
A painted wood ceiling combines the texture of real wood with the drama of bold color. The paint sits differently in wood grain than it does on drywall — the grain shows subtly through the color, adding depth and texture that a painted drywall ceiling cannot achieve.

Deep navy, forest green, charcoal, and warm terracotta all look spectacular on wood plank ceilings. The paint amplifies the grain texture rather than hiding it. Choose a matte finish to avoid glare that a glossy finish creates on an overhead surface.
For a complete range of painted ceiling ideas covering colors, techniques, and design approaches that work beautifully on wood plank ceilings across every room type, explore these painted ceiling ideas for inspiration that pairs naturally with DIY wood ceiling installations.
| Bold Paint Color on Wood | Atmosphere | Best Room | Wall Pairing |
|---|---|---|---|
| Deep navy | Sophisticated, cozy | Bedroom, study | Warm white |
| Forest green | Natural, calm | Living room, dining | Cream |
| Charcoal grey | Dramatic, modern | Home office, den | Light grey |
| Warm terracotta | Mediterranean, warm | Living room, kitchen | Sandy white |
19. Add Recessed Lighting to a Wood Plank Ceiling
Recessed lighting installed within a wood plank ceiling creates a clean, integrated lighting solution that suits the natural material beautifully. The warm glow of recessed lights against natural wood creates an extraordinary atmosphere in any room.

Plan all lighting positions before beginning any ceiling installation. Mark the exact positions of each recessed light on the ceiling. Cut the recessed light housing holes before installing surrounding boards. Run electrical wiring through the ceiling cavity before boards are installed — fishing wire through a completed wood ceiling is significantly more difficult.
| Recessed Light Placement | Spacing | Wattage | Effect |
|---|---|---|---|
| Over main seating area | 4–6 feet apart | 6–8W LED | Even ambient |
| Over dining table | One centered | 8–12W LED | Focal point |
| Along ceiling perimeter | 18 inches from wall | 6–8W LED | Wall washing |
| Over kitchen workspace | 24 inches apart | 8W LED | Task lighting |
20. Create a DIY Wood Ceiling in a Craft or Hobby Room
A DIY wood ceiling in a craft room creates an inspiring, warm creative environment. The natural material overhead improves the atmosphere of a workspace in ways that are difficult to quantify but immediately felt by anyone who works beneath it.

For complete craft room storage and organization ideas that pair with a warm, natural wood ceiling to create the most beautifully inspiring and functionally excellent creative workspace, explore these craft room storage ideas for complete craft room design that benefits from a warm wood ceiling overhead.

A whitewashed or light-painted wood ceiling in a craft room keeps the workspace feeling bright and energized. A natural wood ceiling creates a warm, organic atmosphere that suits painting, pottery, and textile crafts. Choose based on the type of creative work done in the room and the light levels available.
21. Stain a Wood Ceiling for a Rich, Natural Look
Staining a wood ceiling brings out the natural grain and color of the wood while adding depth and richness that raw or painted wood cannot provide. The stain penetrates the wood fibers and creates color from within rather than on top — the grain remains fully visible and even more beautiful.

Apply stain with a brush to a section of ceiling. Immediately wipe back the excess stain with a clean rag before it dries. Work in sections of three to four boards at a time. Wipe consistently in the direction of the grain. Apply two coats for deeper color — allow the first coat to dry fully before applying the second.
| Stain Color | Wood Appearance | Best Room | Protection Needed |
|---|---|---|---|
| Natural / clear | Wood grain highlighted | Bedroom, living room | Polyurethane top coat |
| Golden oak | Warm honey tone | Farmhouse, traditional | Polyurethane top coat |
| Dark walnut | Rich, deep brown | Formal rooms, study | Polyurethane top coat |
| Grey wash | Coastal, modern | Contemporary rooms | Polyurethane top coat |
| Ebony | Very dark, dramatic | Home theater, bar | Polyurethane top coat |
22. Build a Coffered Wood Ceiling From MDF Trim
A coffered ceiling uses a grid of recessed panels to create architectural depth overhead. The DIY version builds from MDF or pine trim pieces arranged in a rectangular grid pattern applied to the existing drywall ceiling. Paint everything the same color for a seamless built-in result.

Measure and mark the grid pattern on the ceiling before cutting any trim. The grid should create evenly sized rectangular panels — panels between 18 and 36 inches wide look most proportional on standard ceiling heights. Nail trim pieces to the ceiling drywall with a finish nailer and construction adhesive. Fill all nail holes and joints before painting.
For a complete range of wood ceiling design ideas that include coffered ceilings and every other wood ceiling approach across every budget and skill level, explore this comprehensive guide on cheap wood ceiling ideas for the full resource on affordable wood ceiling transformations.
23. Install a Cedar Plank Ceiling for Natural Fragrance
Cedar is a naturally fragrant wood that adds a beautiful sensory dimension no other ceiling material provides. The aromatic red cedar fragrance fills the room with a clean, woody scent that reduces with time but can be refreshed by lightly sanding the surface.

Cedar is lightweight, easy to cut, and works beautifully with standard finish nailers. It accepts stain, paint, and clear finish equally well. The natural reddish-brown tones of unfinished cedar create beautiful warm ceiling color that suits cottage, rustic, and farmhouse interior styles perfectly.
| Cedar Ceiling Benefit | Impact Level | Longevity | Refresh Method |
|---|---|---|---|
| Natural fragrance | Strong initially | 2–5 years | Light sanding |
| Moth deterrent | Effective | 2–5 years | Light sanding |
| Visual warmth | High | Indefinite | Re-stain as needed |
| Natural rot resistance | High | Decades | Periodic sealing |
24. DIY a Vintage Wood Ceiling With Reclaimed Materials
A vintage DIY wood ceiling uses reclaimed timber, old fence boards, and salvaged flooring to create a ceiling with authentic character that no new material can replicate. The weathered grey tones, nail holes, saw marks, and natural imperfections of old wood tell decades of story.

Source reclaimed wood from architectural salvage yards, demolition sites, barn dismantling operations, and online marketplaces. Inspect every board for structural integrity. Remove all old nails carefully. Sand all surfaces thoroughly. Seal with a clear matte polyurethane to prevent dust and preserve the weathered patina.
For complete vintage home decor and room design ideas that pair with a vintage reclaimed wood ceiling to create the most characterful and authentically personal interiors, explore these vintage craft room ideas for the vintage aesthetic approach that applies naturally to any room with a reclaimed wood ceiling.
25. Create a Feature Ceiling Section Rather Than the Full Ceiling
A feature wood ceiling section covers only a portion of the ceiling rather than the entire surface. The partial treatment creates maximum visual impact with minimum material cost. The wood section defines the most important zone of the room — above the bed, above the dining table, or above the primary seating area.
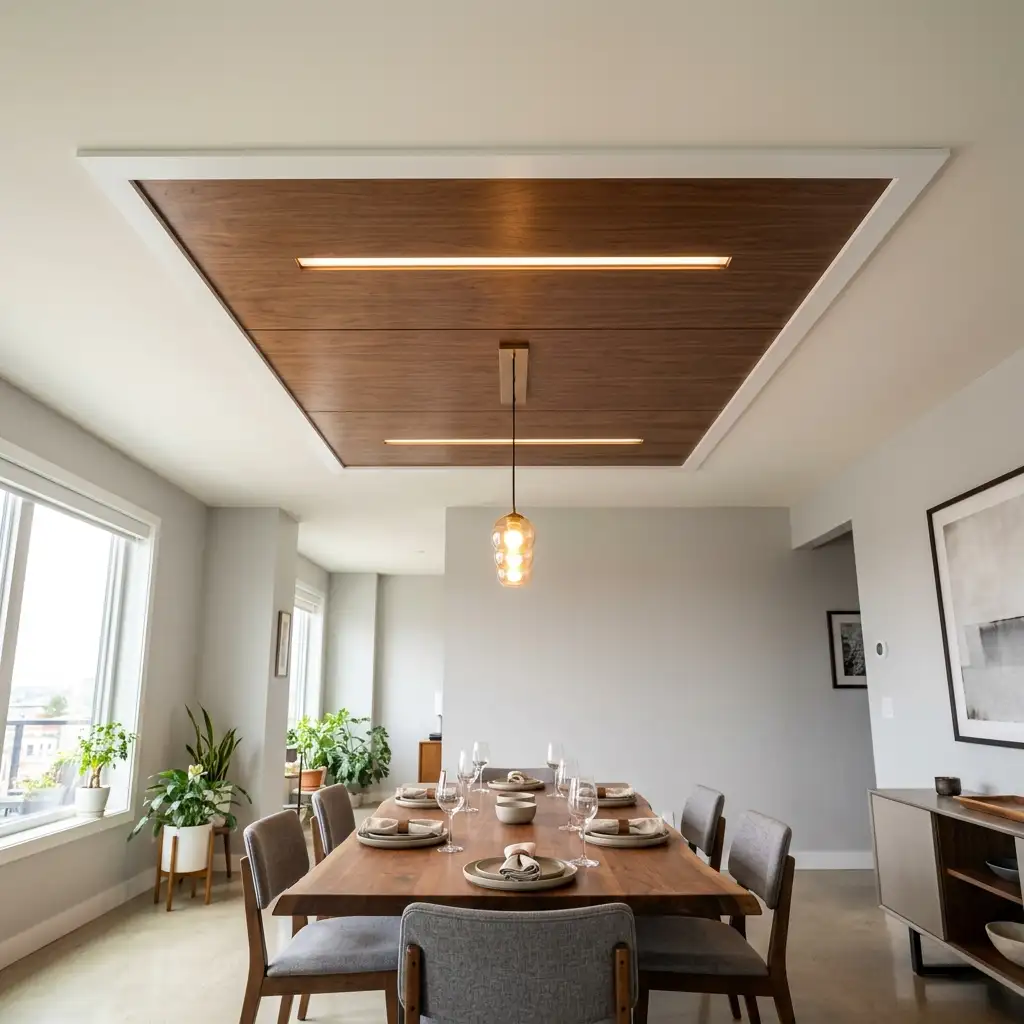
A feature section typically requires 30 to 50 percent less material than a full ceiling treatment. The edge between wood and plain drywall needs a clean border — a simple wood trim strip painted the ceiling color creates a finished, intentional transition.
| Feature Section Position | Zone Defined | Material Saving | Visual Focal Point |
|---|---|---|---|
| Above the bed | Sleeping zone | 40–60% | Very High |
| Above dining table | Dining zone | 50–70% | Very High |
| Above sofa | Living zone | 40–60% | High |
| Entryway only | Entry zone | 60–80% | High |
26. Install a Wood Ceiling in a Boy’s Bedroom
A DIY wood ceiling in a boy’s bedroom creates a rugged, adventurous atmosphere that most boys genuinely love. The natural wood overhead adds a cabin or treehouse quality that makes the bedroom feel exciting and genuinely personal.

For complete boys bedroom design ideas where a wood ceiling creates the most adventurous, characterful bedroom atmosphere, explore these boys bedroom ideas for comprehensive bedroom design approaches where a DIY wood ceiling becomes the room’s defining design feature.
Dark stained boards above a gaming or music-themed room. White shiplap above an adventurous, outdoors-themed room. Natural pine planks above a cabin or sports-themed room. The wood ceiling choice suits every boy’s bedroom theme and makes the room feel genuinely extraordinary compared to a plain painted ceiling.
27. Add String Lights to a Wood Plank Ceiling
String lights mounted to or woven between wood ceiling planks create extraordinary warmth and atmosphere. The warm light plays against the wood grain texture creating a golden, dimensional glow that flat ceilings and plain lighting cannot replicate.
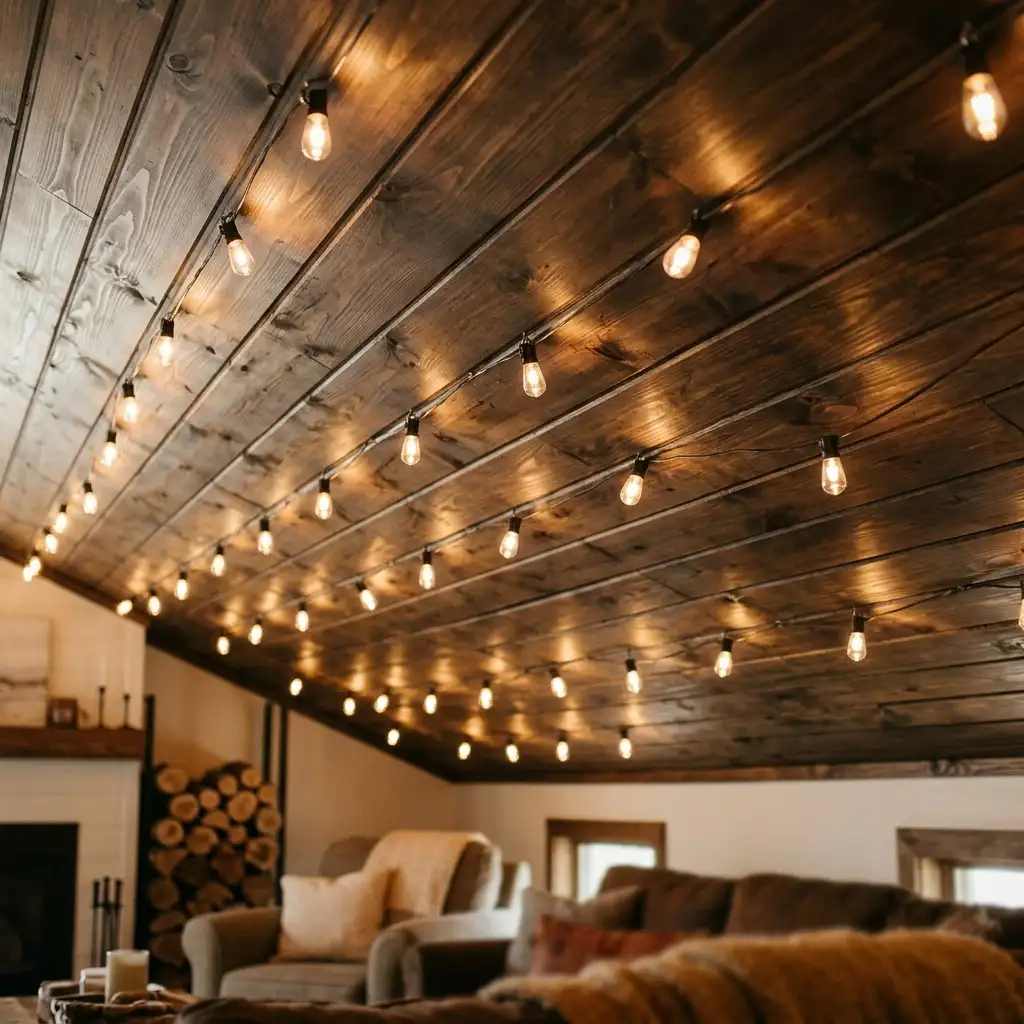
Mount cup hooks into the ceiling joists behind the wood planks. Thread string light cables along the plank lines. The hooks sit in the shadow gaps between planks and are effectively invisible. The warm glow emanates from the cable strung along the natural ceiling lines.
For complete covered patio and outdoor room ideas where string lights create beautiful atmosphere on wood-planked pergola and patio ceilings, explore these covered patio ideas for string light installation approaches that apply equally to indoor wood plank ceilings.
28. Create a DIY Wood Ceiling for a Country Teen Bedroom
A DIY wood plank ceiling in a country-style teen bedroom adds the warm, natural character that defines the country aesthetic while creating a room that feels genuinely grown-up and distinctive. The natural material suits the country design direction perfectly.

For complete country teen bedroom design ideas where a wood plank ceiling creates a beautiful, warm, country-style bedroom that teenagers genuinely love, explore these country teen bedroom ideas for comprehensive country bedroom design that pairs naturally with a DIY wood ceiling installation.
White shiplap above a pale sage green bedroom wall creates the classic country bedroom ceiling combination. Add vintage-style lighting fixtures in brushed bronze or oil-rubbed black for a complete country teen bedroom ceiling that looks extraordinary for a very modest DIY material investment.
29. Finish and Protect the Wood Ceiling Properly
A finished and protected wood ceiling lasts for decades without deterioration. An unfinished or poorly sealed ceiling absorbs dust, develops surface damage, and requires complete replacement rather than simple maintenance. Spending time on proper finishing is as important as the installation itself.
Apply finish in optimal conditions — temperatures between 60 and 85 degrees Fahrenheit with low humidity. Use a quality natural bristle or foam brush for oil-based finishes. Use a synthetic brush for water-based finishes. Apply in thin, even coats. Two or three thin coats produce a better result than one heavy application.
| Ceiling Finish Option | Appearance | Durability | Drying Time |
|---|---|---|---|
| Water-based polyurethane | Clear, slight sheen | Very Good | 2–3 hours |
| Oil-based polyurethane | Warm amber tint | Excellent | 8–24 hours |
| Hard wax oil | Natural, matte | Good | 8–24 hours |
| Exterior grade (for outdoor) | Clear to slight sheen | Excellent | Varies |
| Chalk paint (painted ceilings) | Matte, flat | Fair | 1–2 hours |
30. Troubleshoot Common DIY Wood Ceiling Problems
Even well-planned DIY wood ceiling projects encounter problems. Knowing the most common issues before they occur — and knowing how to address them — prevents minor problems from becoming major failures.

Boards that cup or bow after installation typically indicate wood with too much moisture content. Allow all wood to acclimate in the room for at least 72 hours before installation. First rows that are not level create compounding alignment problems throughout the entire ceiling.
Always check the first row with a level before nailing it permanently. Gaps at wall joints occur when walls are not perfectly plumb — small gaps fill with flexible caulk and paint over invisibly.
| Common Problem | Cause | Solution | Prevention |
|---|---|---|---|
| Cupping boards | High moisture content | Re-nail when dry | Acclimate wood 72+ hours |
| Off-level rows | Unlevel first row | Remove and reinstall first row | Always check level first |
| Visible nail holes | Incorrect filler | Re-fill with matching filler | Use wood-colored filler |
| Gaps at walls | Imperfect walls | Caulk and paint | Use quarter-round trim |
| Loose boards | Missed joists | Re-nail into joists | Mark joists clearly first |
31. Calculate Materials Accurately Before Purchasing
Accurate material calculation prevents both costly overbuying and frustrating shortfalls mid-project. Measure the ceiling area carefully — length multiplied by width gives square footage. Add 10 percent for waste on straight installations and 15 percent for herringbone or diagonal patterns.

Convert the square footage into board quantities using the actual coverage width of the chosen board. A 1×6 board covers 5.5 inches of width — not 6 inches. A 1×4 board covers 3.5 inches. The nominal width overstates actual coverage and leads to shortfall if not accounted for in calculations.
| Room Size | Coverage Needed | 1×6 Boards at 8 ft | Waste Added | Total to Buy |
|---|---|---|---|---|
| 10×10 ft | 100 sq ft | 22 boards | 10% | 25 boards |
| 12×14 ft | 168 sq ft | 37 boards | 10% | 41 boards |
| 14×16 ft | 224 sq ft | 50 boards | 10% | 55 boards |
| 16×20 ft | 320 sq ft | 70 boards | 10% | 77 boards |
32. Apply the DIY Wood Ceiling to a Hobbyist Space
A hobby room with a DIY wood ceiling creates the most inspiring creative environment possible. The natural warmth of wood overhead makes any creative space feel genuinely special — a room worth spending time in regardless of the activity happening within it.

For complete hobby room design ideas covering layout, storage, lighting, and atmospheric elements where a DIY wood ceiling creates the ideal creative atmosphere for any hobby or personal interest, explore these hobby room design ideas for comprehensive creative space design that pairs beautifully with a DIY wood ceiling installation.
33. Create a DIY Wood Ceiling in a Small Apartment
A wood plank ceiling in a small apartment transforms the most visible surface in the home at very low material cost. In a compact space, the ceiling is visible from nearly every position. Improving it improves the entire apartment’s perceived quality immediately.

For complete small apartment design ideas where a DIY wood ceiling creates warmth and character in a compact home, explore these small apartment ideas for comprehensive approaches to making every surface — including the ceiling — work beautifully in a small apartment.
Light-toned or whitewashed planks suit small apartments best. They reflect available light downward and prevent the compact space from feeling darker or more enclosed. The warmth of the wood overhead transforms the apartment from generic rental to personal, designed home.
34. Add a Wood Ceiling to a Laundry Room
A wood plank ceiling in a laundry room transforms the most utilitarian space in the home into something genuinely pleasant. Nobody enjoys doing laundry — but a bright, beautifully finished laundry room with a wood ceiling makes the experience significantly more tolerable.

For complete laundry room design ideas where a wood ceiling and a cohesive design approach transform this functional space into something attractive and genuinely pleasant to use, explore these laundry room ideas for comprehensive laundry room design that pairs naturally with a DIY wood ceiling treatment.
Use moisture-resistant polyurethane sealant on wood ceilings in laundry rooms. The moisture and humidity from washer and dryer use requires a durable seal that prevents moisture absorption into the wood. A properly sealed wood laundry room ceiling lasts for decades without warping, discoloration, or deterioration.
35. Maintain a DIY Wood Ceiling for Long-Term Beauty
A properly maintained wood ceiling lasts for decades and looks better with age. A neglected ceiling deteriorates faster and eventually requires complete replacement. The maintenance investment is modest — the payback in longevity is substantial.

Dust the ceiling every three to six months with a soft brush attachment on a vacuum. Inspect the surface annually for any areas where the finish has worn or where wood has begun to show weathering. Touch up worn finish sections with matching sealant before deterioration spreads to surrounding areas.
| Annual Maintenance Task | Time Required | Cost | Impact on Lifespan |
|---|---|---|---|
| Dust removal | 30–60 minutes | $0 | High |
| Inspect for finish wear | 15 minutes | $0 | Very High |
| Touch up worn sections | 30–60 minutes | $10–$30 | Very High |
| Full refinish (every 5–10 years) | 4–8 hours | $30–$80 | Maximum |
36. Plan the Complete DIY Wood Ceiling Project From Start to Finish
A successful DIY wood ceiling project requires planning every stage before purchasing anything. The planning investment — a few hours of measurement, material calculation, and sequencing — prevents the costly mistakes and frustrating delays that derail most DIY projects.

Start with room measurement and joist location. Choose the wood material and finish based on budget and aesthetic. Calculate material quantities with 10 percent waste added. Create a tool list and source everything before starting day one. Plan the installation sequence — which wall to start from, which direction the boards run, where lighting is positioned. Execute one stage at a time.
The DIY wood ceiling you build over a weekend costs a fraction of professional installation. It creates a genuinely beautiful, lasting improvement to any room. And the satisfaction of looking up every day at something you built with your own hands adds a dimension of personal pride that no purchased improvement can provide.
| Project Stage | Time Required | Order | Key Decision |
|---|---|---|---|
| Measure and plan | 2–4 hours | 1st | Material choice |
| Source and purchase materials | 1–3 hours | 2nd | Budget allocation |
| Gather and prepare tools | 1–2 hours | 3rd | Rent vs buy |
| Mark joists and prepare ceiling | 1–2 hours | 4th | Joist spacing |
| Install boards | 4–12 hours | 5th | Direction and start point |
| Fill, sand, and finish | 2–4 hours | 6th | Stain or paint |
| Final inspection and touch-up | 1–2 hours | 7th | Quality check |
Frequently Asked Questions (FAQs)
Q1: What is the cheapest DIY wood ceiling material?
Pallet wood is the cheapest — it costs nothing in materials. Reclaimed fence boards and demolition lumber are equally affordable. Plywood sheets at 1/4-inch thickness provide the lowest cost per square foot of any purchased material at $0.50–$1.50 per square foot. Peel-and-stick wood planks at $1–$2 per square foot are the easiest to install at the lowest cost for a beginner.
Q2: Do I need special skills to install a DIY wood ceiling?
Basic DIY skills are sufficient for most wood ceiling installations. Shiplap, peel-and-stick planks, and plywood sheet installations require only the ability to measure accurately, cut straight lines with a circular saw, and use a nail gun. The most important skills are patience and careful planning before beginning installation. Watching installation tutorial videos specific to the chosen material before starting is strongly recommended.
Q3: How long does a DIY wood ceiling installation take?
A 10×12 foot bedroom ceiling typically takes one full day for a single person working at a moderate pace. Larger ceilings or more complex patterns take proportionally longer. Peel-and-stick planks install significantly faster than nail-up shiplap for the same area. Allow an additional day for finishing — sanding, filling nail holes, staining or painting, and sealing.
Q4: Can I install a wood ceiling over existing drywall?
Yes — in most cases. Use 1/4-inch plywood or thin plank material applied over existing drywall using screws long enough to penetrate through the drywall and into the ceiling joists beneath. Never attach a wood ceiling to drywall alone — the fasteners must reach the structural joists. A stud finder locates joists through existing drywall accurately.
Q5: How do I prevent a DIY wood ceiling from sagging or falling?
Every fastener must penetrate into a ceiling joist — never into drywall alone. Mark all joist positions clearly with chalk lines before beginning installation. Use fasteners of adequate length — finish nails should penetrate at least 1.5 inches into the joist beyond the board and drywall thickness. Check that every board is properly secured at each joist crossing before moving on to the next board.
Conclusion
A DIY wood ceiling is one of the most rewarding home improvement projects available to any homeowner. The material cost is modest. The skill requirement is achievable. The transformation is extraordinary. A ceiling that was a blank, forgettable surface becomes the defining design feature of the room — something worth looking at every single day.
Choose the material that suits your budget and your room. Build the plan before buying anything. Prepare the tools and the surface properly. Install one board at a time, checking alignment and fastening at every step. Finish and seal the surface thoroughly. Then step back and look up. The ceiling you built with your own hands — warm, textured, and beautiful — is one of the most satisfying things you will ever create in your home.