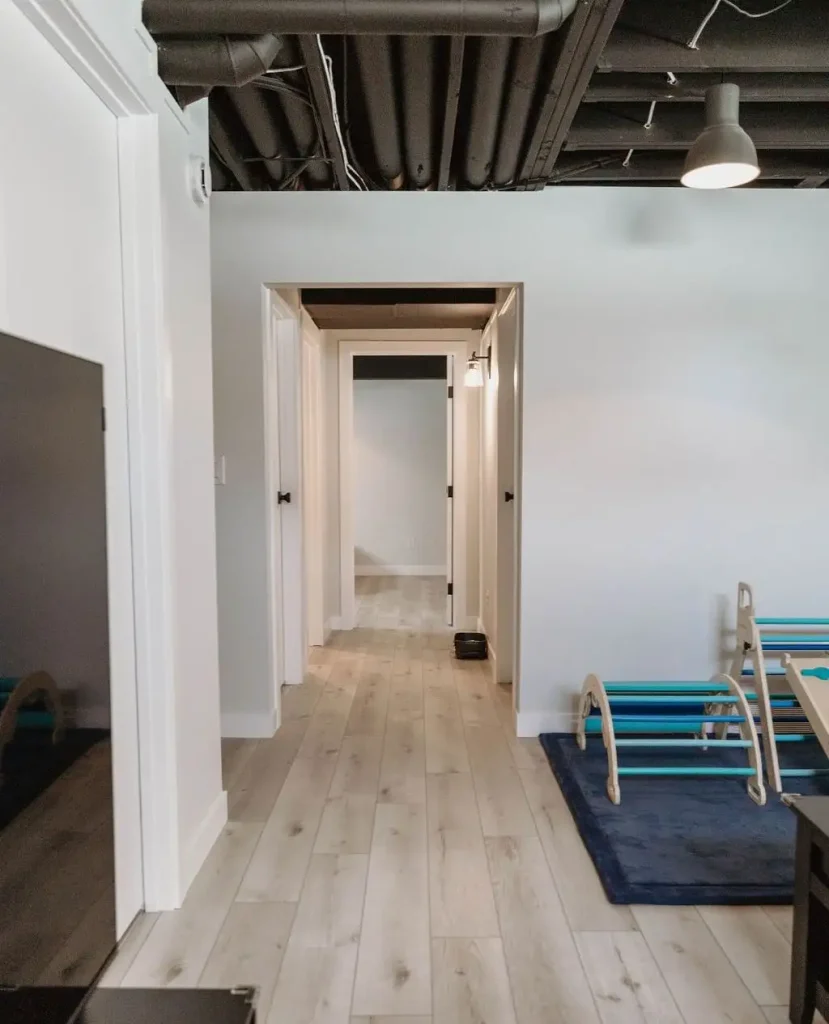
Your basement ceiling is a jumble of joists, pipes, ducts, and wiring that you have been hiding behind a drop ceiling for years. Every time you walk downstairs the ceiling tiles feel oppressive and the space feels low, dark, and uninspiring!
You want to finish the basement properly but the cost of a traditional drywall ceiling feels enormous. And all those mechanical systems running overhead make a conventional ceiling feel almost impossible anyway!
source: @basementpros
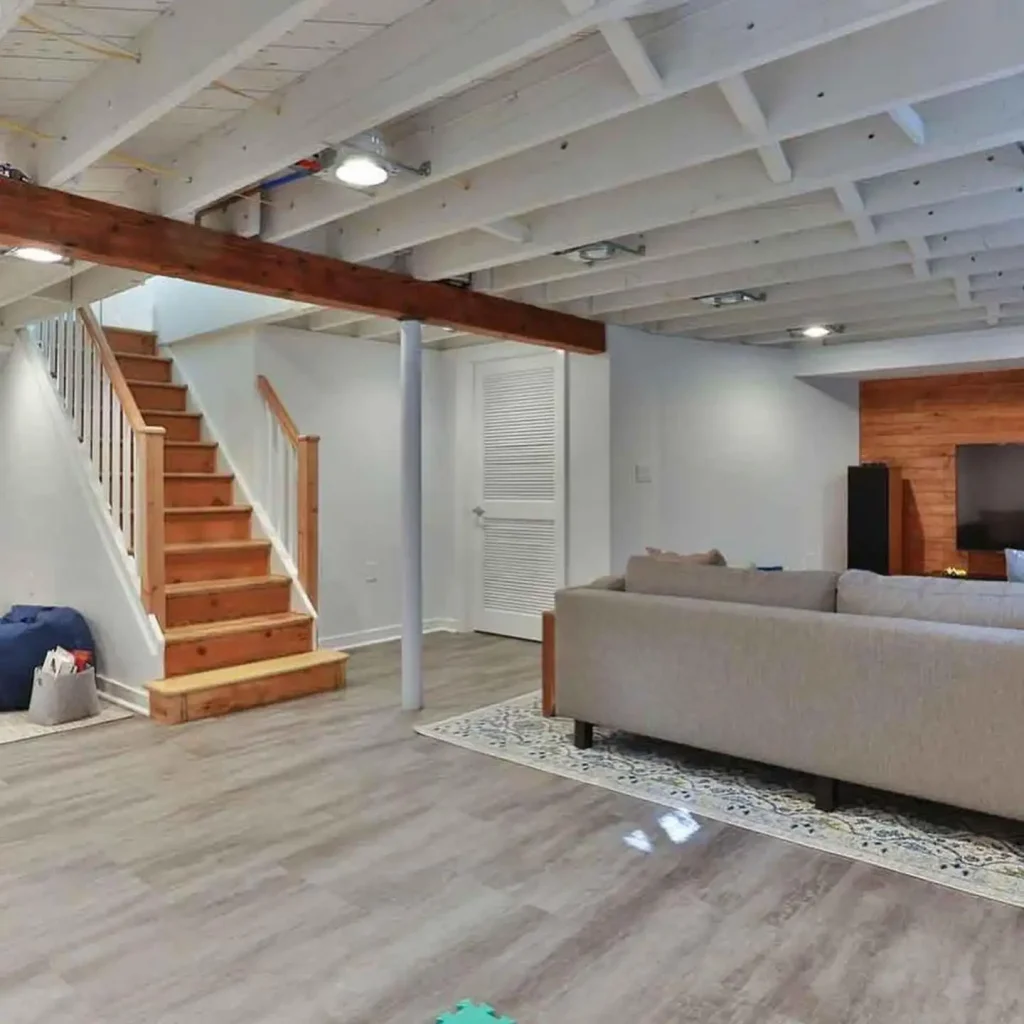
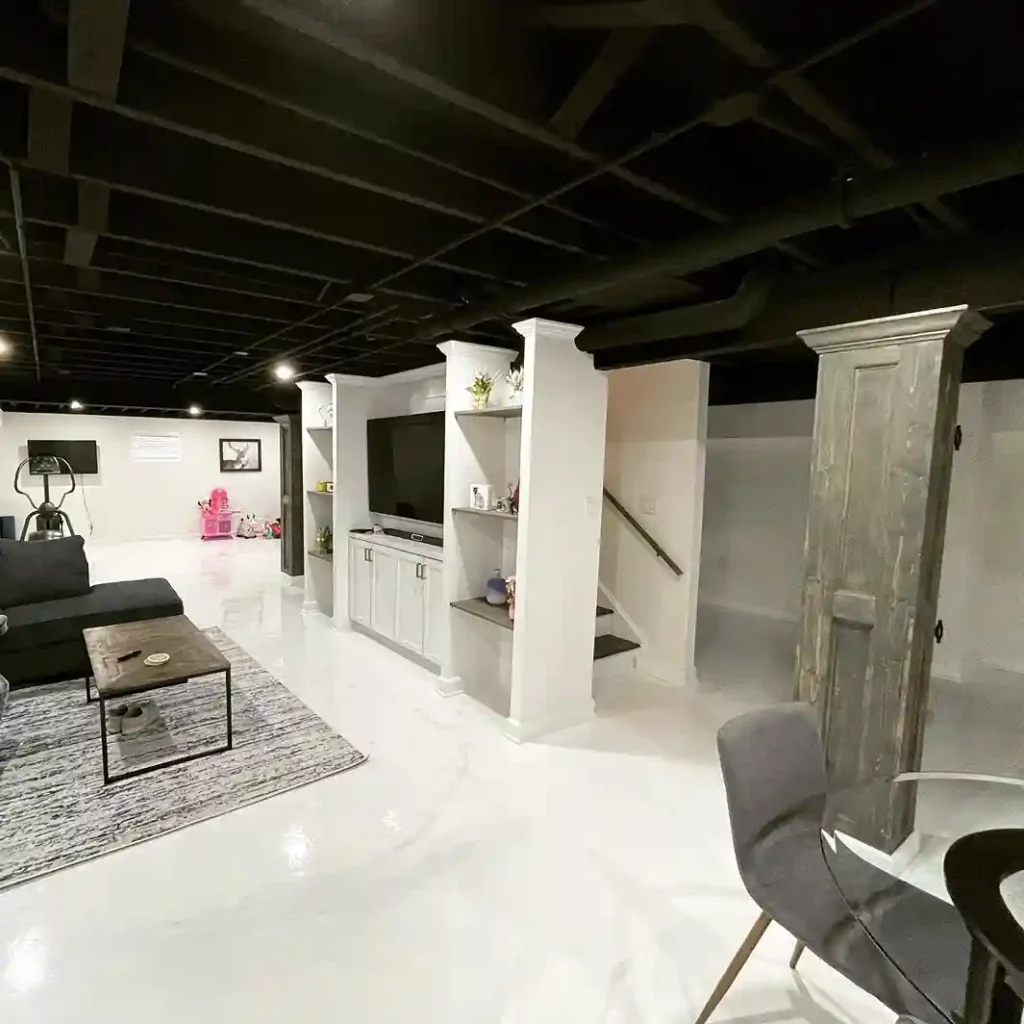
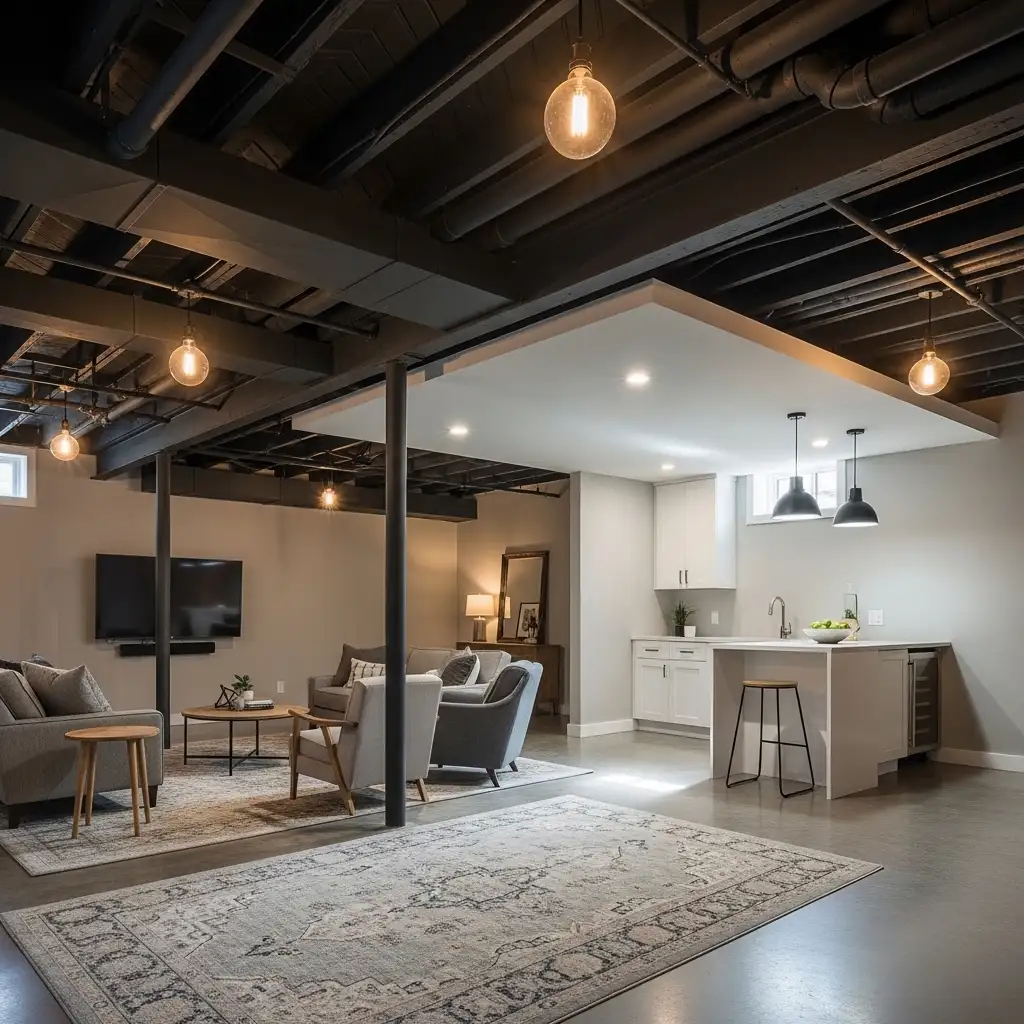
An exposed basement ceiling is the answer you have been looking for. Instead of hiding everything above, you embrace it. You clean it up, paint it, light it beautifully, and turn what was a liability into one of the most striking and characterful design features your home can have.
Exposed ceilings look deliberate, industrial, and genuinely cool. They are also significantly cheaper than traditional ceiling options.
source: @nodrippainting
This complete guide covers everything you need to know about creating a stunning exposed basement ceiling that makes the whole space feel larger, better lit, and completely transformed.
What Is an Exposed Basement Ceiling?
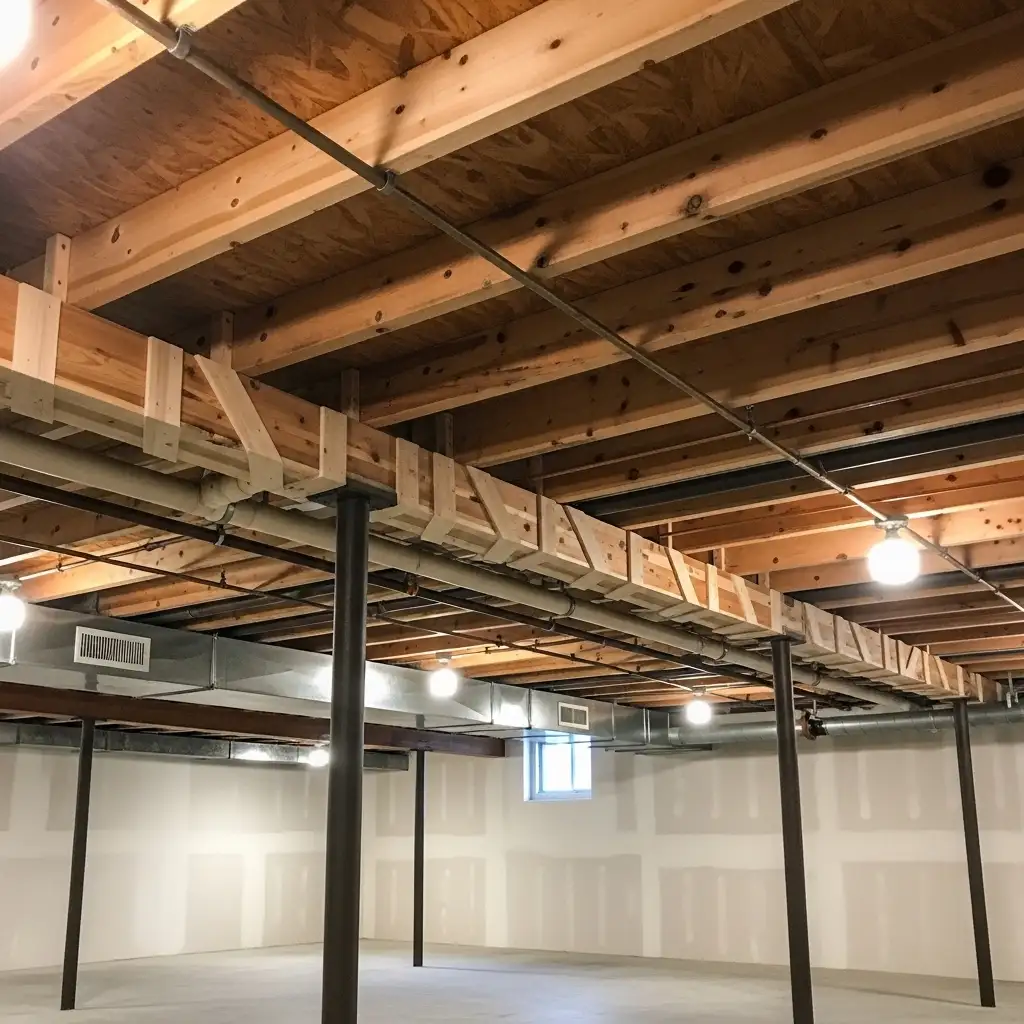
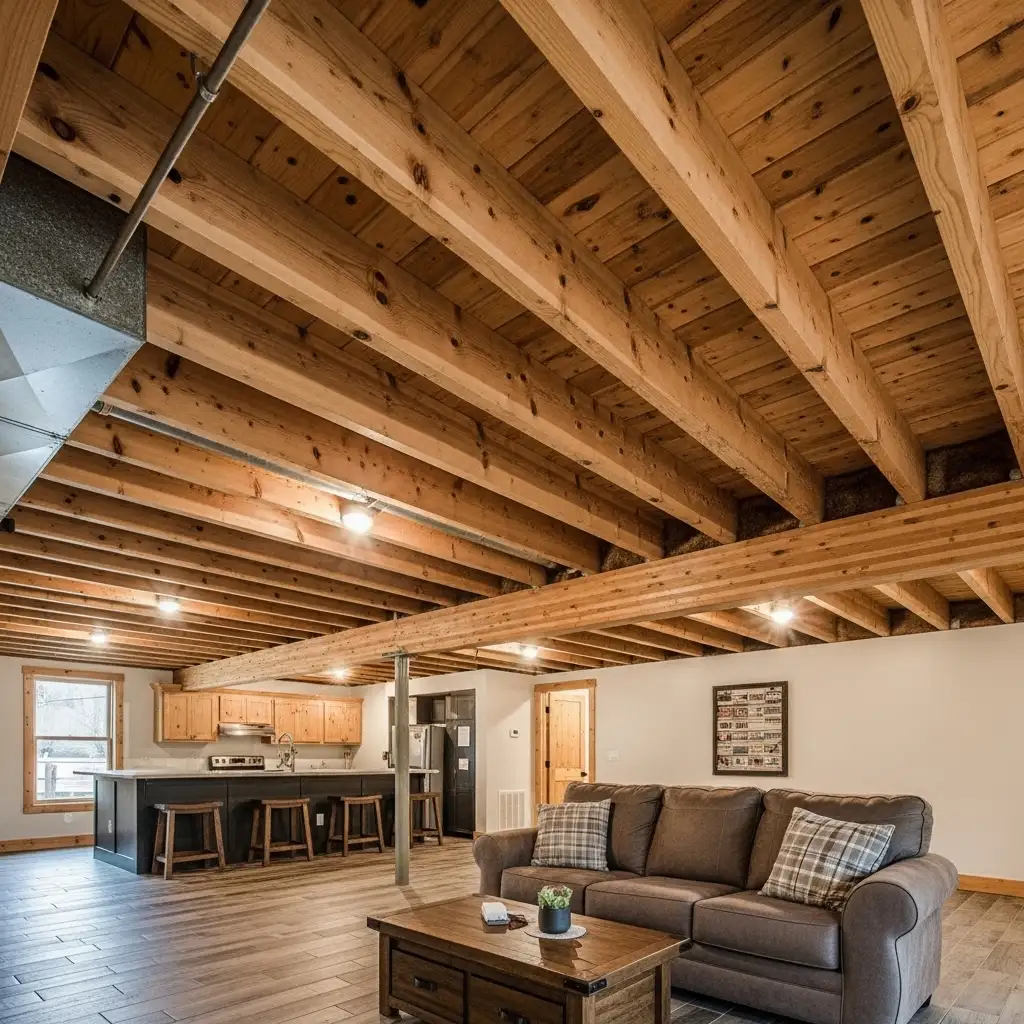
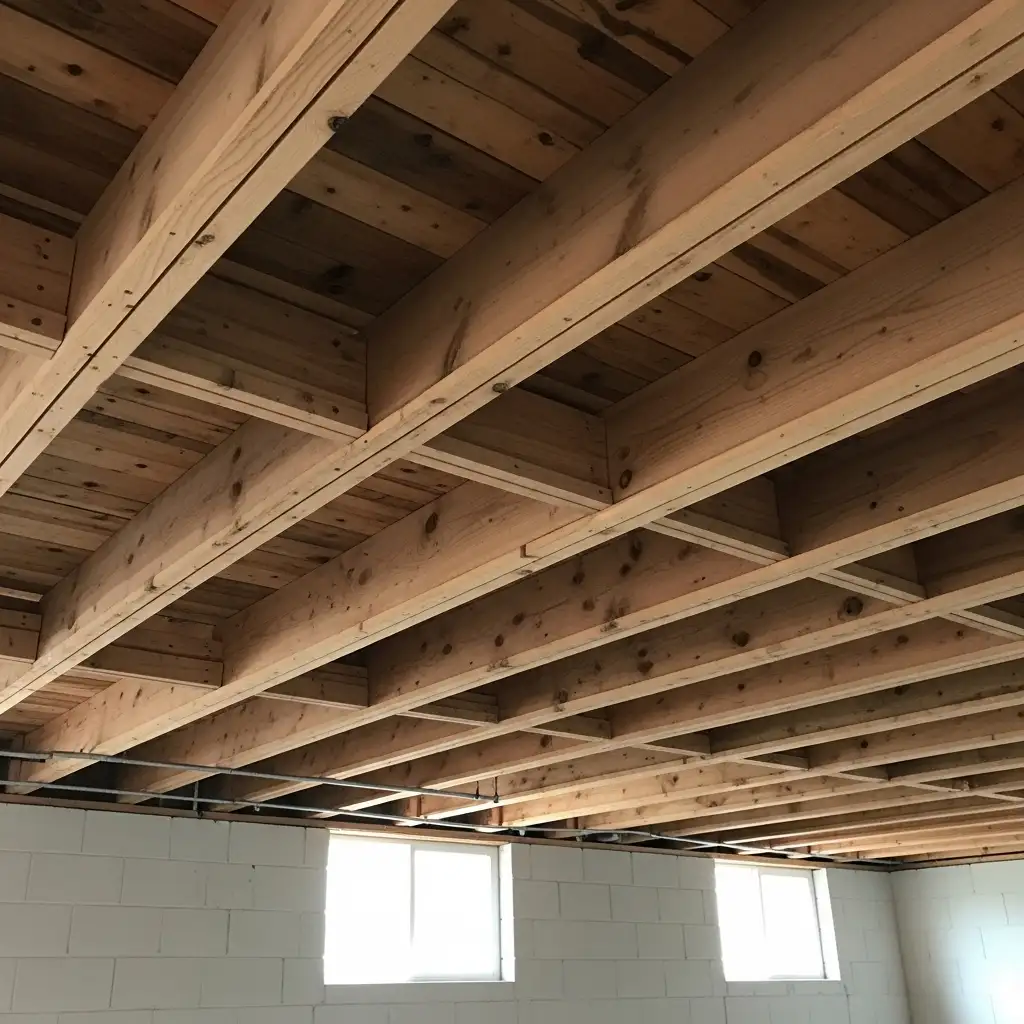
An exposed basement ceiling leaves the structural elements of the floor above fully visible rather than concealing them behind drywall or drop ceiling tiles. The joists, beams, subfloor boards, pipes, electrical conduits, and ductwork all remain visible as deliberate design elements rather than hidden necessities. For more interesting ideas see our guide on shiplap ceiling, you can try in your basement as well.
source: @duffyand.co
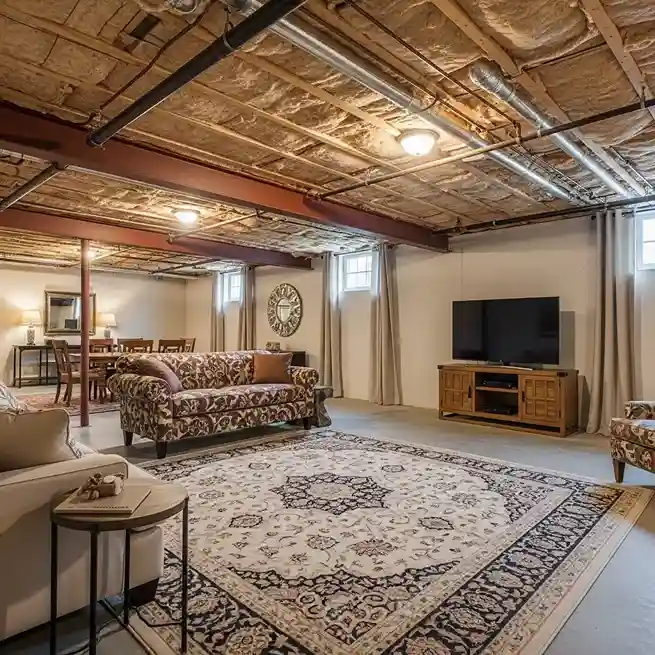
This approach originated in industrial and commercial spaces like warehouses and factories where ceilings were never intended to be finished. The look migrated into residential design through loft conversions and urban apartments where the industrial aesthetic became fashionable.
source: @duffyand.co
Today an exposed basement ceiling is one of the most popular choices for basement finishing because it is honest, characterful, cost-effective, and delivers ceiling height that traditional finished ceilings sacrifice.
| Exposed Ceiling Element | Design Role |
| Structural joists and beams | Architectural skeleton, honest structure |
| Plumbing pipes | Industrial character element |
| Electrical conduit | Technical texture and visual rhythm |
| HVAC ductwork | Bold graphic form overhead |
| Subfloor boards from above | Natural wood texture on the ceiling |
Why Choose an Exposed Basement Ceiling?
An exposed basement ceiling offers multiple advantages that make it one of the smartest choices for basement finishing projects. The first and most immediately compelling advantage is cost. Eliminating the ceiling finishing entirely removes a significant portion of the basement renovation budget. No drywall, no ceiling tiles, no ceiling grid, no additional framing and no finishing labor translates directly into thousands of dollars saved.
source: @sterlingridgecontracting
The second major advantage is ceiling height. Every traditional ceiling type takes away headroom. A drop ceiling typically loses eight to twelve inches of ceiling height. A drywall ceiling loses five to six inches. Leaving the ceiling exposed keeps every inch of available headroom in the basement which often makes the difference between a space that feels liveable and one that feels oppressively low.
The third advantage is access. Every pipe, wire, and duct remains accessible for maintenance and future modification without tearing out finished ceiling materials. See our guide on faux wood beams ceiling for your basement.
| Advantage | Detail |
| Cost savings | Eliminates ceiling materials and labor |
| Maximum ceiling height | Keeps every inch of headroom |
| Easy system access | Pipes and wires reachable without damage |
| Industrial character | Genuinely cool and on-trend aesthetic |
| Faster renovation | Less work, shorter project timeline |
Is an Exposed Basement Ceiling Right for Your Space?
An exposed basement ceiling suits some spaces and some homeowners much better than others. Before committing to this approach, honestly assess your basement’s specific conditions and your own tolerance for the industrial aesthetic. Not every basement is an equally good candidate for an exposed ceiling.
source: @jjmfg_contracting
Basements with a reasonable amount of mechanical systems running overhead make excellent candidates. The more organized and cleanly run those systems are, the more beautiful the exposed ceiling will look after painting. Basements used as rec rooms, home theaters, gyms, bars, and creative studios all suit the industrial exposed ceiling aesthetic wonderfully.
Basements being finished as formal bedrooms or luxury living spaces may be better served by a more traditional finished ceiling approach that creates a gentler, more residential feel.
| Basement Use | Exposed Ceiling Suitability |
| Recreation room or den | Excellent, industrial suits casual use |
| Home gym or fitness space | Excellent, tough look matches purpose |
| Home theater or media room | Very good with proper painting |
| Home bar and entertainment | Excellent, urban industrial character |
| Formal bedroom or living room | Less ideal, consider finished ceiling |
Preparing the Basement Ceiling Before Exposing It
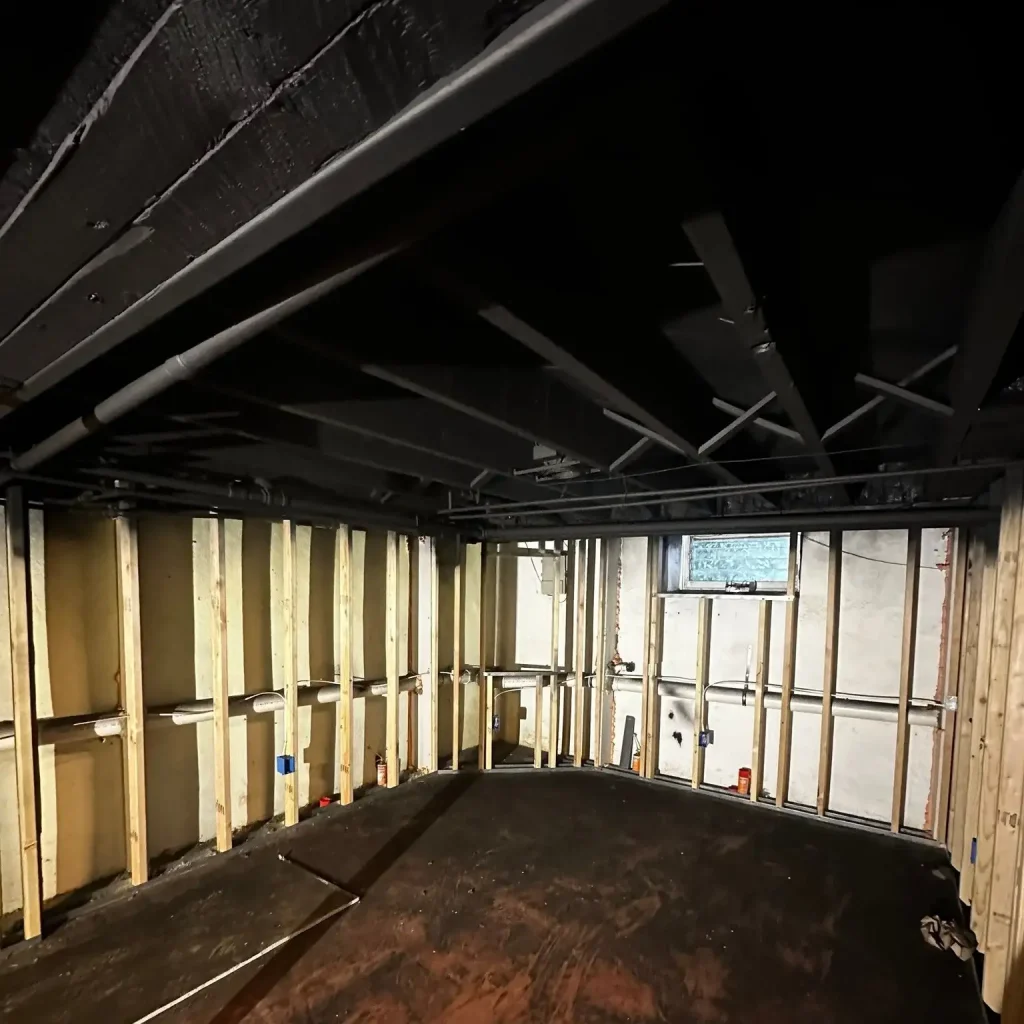
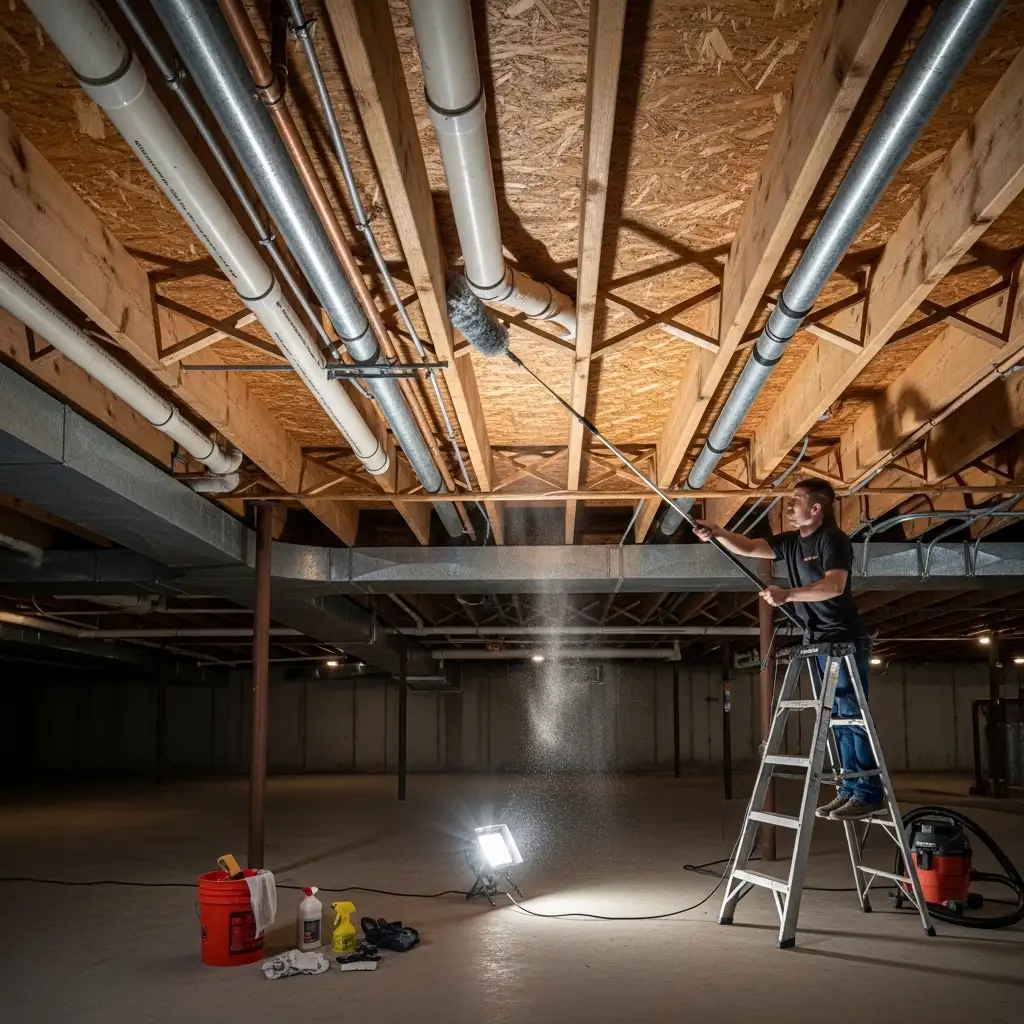
Proper preparation before exposing and painting the basement ceiling is the most important stage of the entire project. Rushing preparation leads to a messy, unprofessional result that looks worse than the drop ceiling it replaced. Taking time to prepare properly transforms the outcome completely.
source: @panddpowerwash
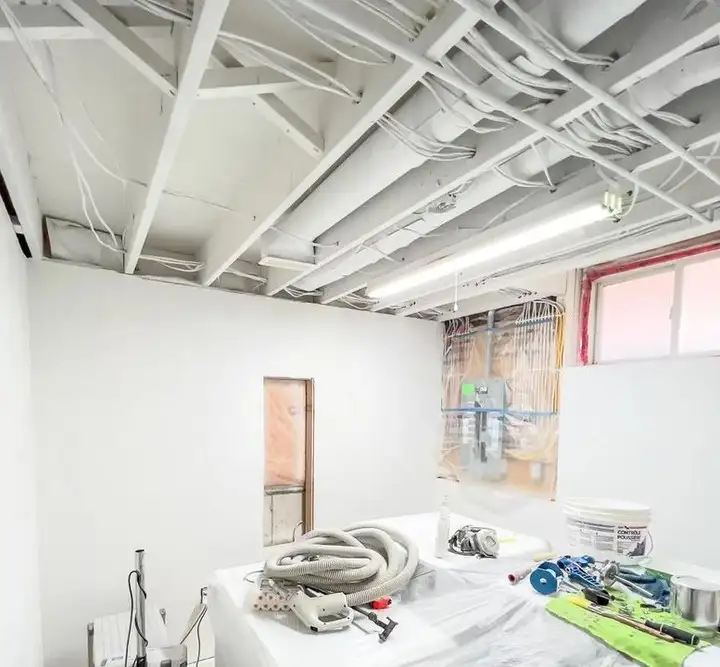
Start by removing the existing drop ceiling grid and tiles if present. Inspect every element above for structural issues, moisture damage, pest evidence, and mold. Address any issues found before proceeding. Remove all insulation batts from between the joists if this is not a cold climate where they are truly needed above. Tuck all loose wiring neatly and secure it properly to the joists.
Organize all pipes and ducts as tidily as possible before painting covers everything. Clean every surface thoroughly to remove dust and cobwebs. Good preparation is the foundation of a beautiful result.
| Preparation Step | Why It Matters |
| Remove drop ceiling grid | Clears space for proper inspection |
| Inspect for mold and moisture | Safety and structure must be sound first |
| Secure loose wiring neatly | Organized wires look better when painted |
| Remove unnecessary insulation | Clean surfaces prepare for paint |
| Thorough cleaning of all surfaces | Paint adhesion requires clean substrate |
Painting an Exposed Basement Ceiling: The Complete Method
Painting the exposed basement ceiling is the single most transformative step in the entire process. It is what turns a messy jumble of pipes and joists into a deliberate, cohesive, and genuinely beautiful design statement. The right paint color and the right application method make an enormous difference to the final result.
source: @wicklinedesign
Use a thick-nap roller for the flat surfaces of joists and the subfloor above. Use a quality brush for pipes, conduit, and any elements too small or complex for a roller. Apply two full coats of paint for complete, even coverage that hides the visual complexity of multiple overlapping elements.
Start from the farthest corner of the room and work toward the exit so you never paint yourself into a corner. Allow full drying time between coats. The painting alone typically takes a full weekend for an average-sized basement ceiling.
| Painting Method Detail | Best Practice |
| Thick-nap roller for flat surfaces | Covers rough textures in fewer passes |
| Brush for pipes and conduit | Reaches complex shapes and small elements |
| Two full coats minimum | Complete even coverage throughout |
| Start from far corner | Work toward exit to avoid stepping on wet |
| Full drying between coats | Second coat over wet first causes problems |
Best Paint Colors for an Exposed Basement Ceiling
The color you choose for the exposed basement ceiling dramatically affects the atmosphere and perceived height of the entire basement space. Different colors create fundamentally different effects and suit different basement uses and aesthetics. Understanding what each color does to the space helps you choose the right one for your specific situation.
source: @summerspainting
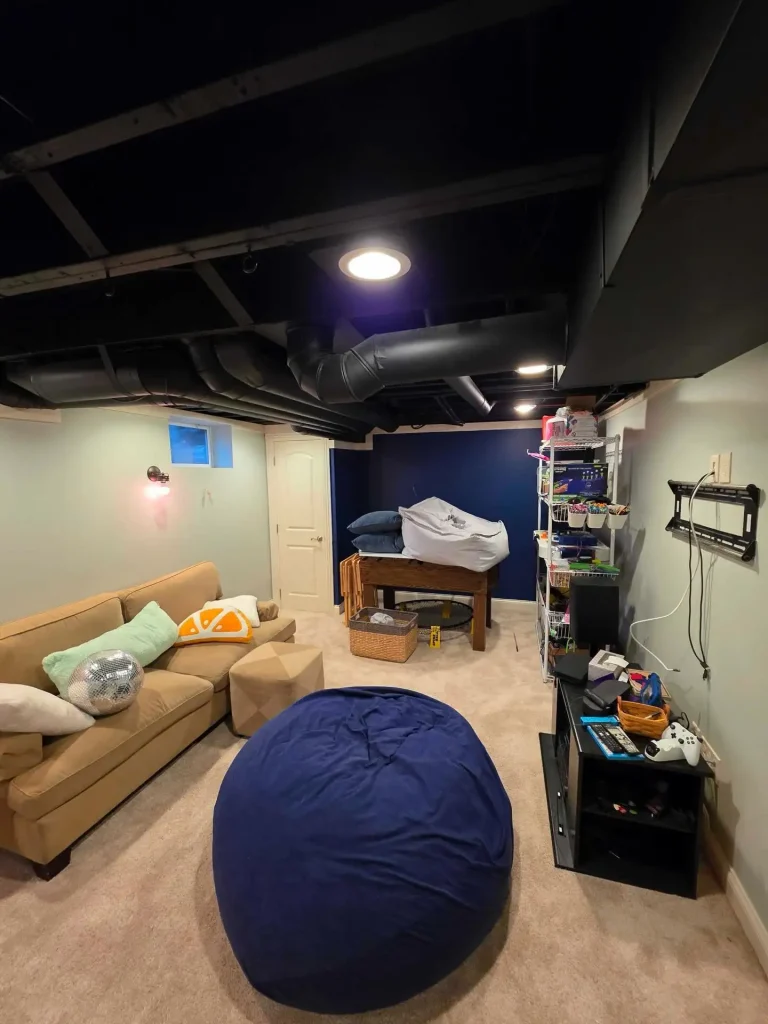
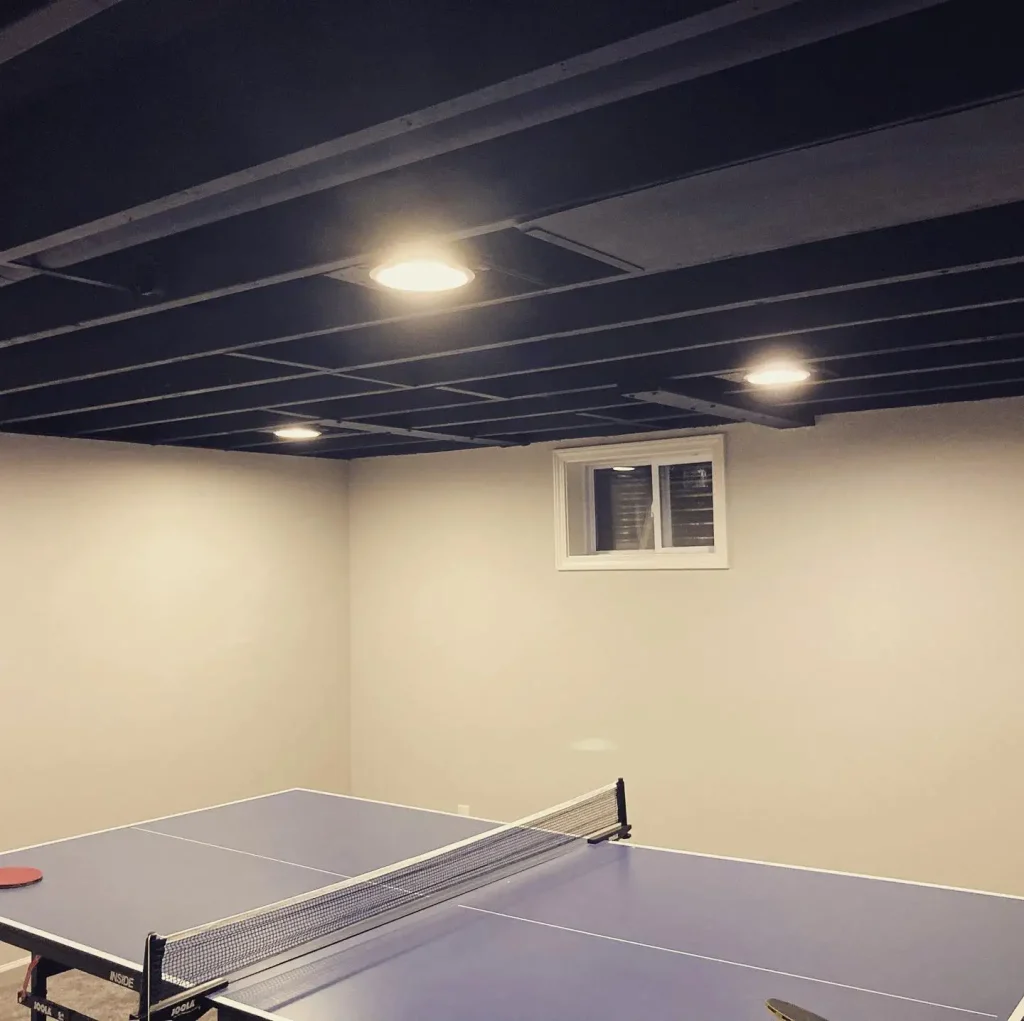
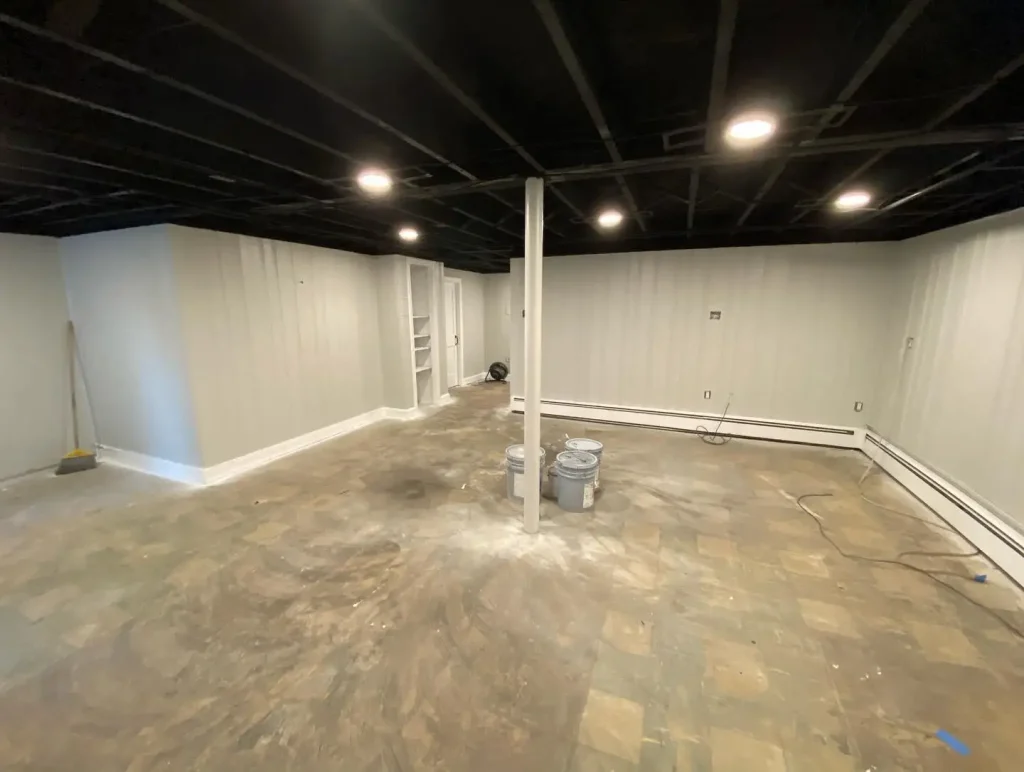
Matte black is the most popular and most dramatic choice. It creates a sky-like depth overhead that makes the ceiling seem to recede into darkness. When the elements are painted black they become less individually visible and the ceiling reads as a unified dark surface with interesting texture rather than a jumble of separate mechanical components.
White creates brightness and maximizes light reflection. Gray is sophisticated and works beautifully in modern and contemporary basements. Navy blue adds deep drama. All colors should be applied in a flat or matte finish which hides imperfections and reads as most intentional.
| Ceiling Paint Color | Space and Atmosphere Effect |
| Matte black | Ceiling recedes, industrial drama, elements unify |
| Flat white | Brightest option, maximum light reflection |
| Charcoal gray | Sophisticated, modern, less intense than black |
| Navy blue | Deep and dramatic, unique and bold choice |
| Warm greige | Softer than gray, warmer than white |
Why Matte Black Is the Most Popular Exposed Ceiling Choice
Matte black deserves its own dedicated discussion because it is so consistently the most successful and most requested exposed basement ceiling color. Understanding why it works so well helps you commit to it confidently rather than defaulting to white out of uncertainty.
source: @planrebuild
Black paint on an exposed ceiling does something remarkable. It makes every individual element, the joists, pipes, conduit, and ducts, visually recede into a unified dark mass. Rather than seeing a jumble of competing elements in different colors and materials, the eye sees a single dark textured ceiling with interesting variation.
The mechanical systems stop fighting for individual attention and become part of a cohesive architectural composition. Additionally, black overhead mirrors the effect of a night sky and makes the space feel significantly taller because the eye reads the dark overhead as depth rather than as a physical boundary.
| Why Black Works on Exposed Ceilings | Visual Mechanism |
| Unifies all elements into one mass | Stops individual pipes competing |
| Ceiling appears to recede upward | Dark reads as depth not surface |
| Hides imperfections and mess | Shadows conceal what paint misses |
| Makes lighting fixtures pop | High contrast with any light color |
| Universally accepted as intentional | Nobody thinks it was accidental |
Lighting an Exposed Basement Ceiling Beautifully
Lighting is the element that transforms a painted exposed basement ceiling from an interesting raw space into a genuinely beautiful, atmospheric, and functional room. The right lighting works with the exposed ceiling rather than fighting against it. It highlights the industrial character while providing the practical illumination the space needs for whatever activities happen below.
source: @scm.stl
Track lighting is one of the most practical and attractive choices for exposed basement ceilings. Mount the track directly to the joists and position the individual heads to illuminate the room as needed. Track lighting is also completely flexible.
You can reposition the heads without any new wiring whenever the room’s layout or function changes. Pendant lights hung at varying heights from the joists create a beautifully layered visual effect. Edison bulb pendants suit the industrial aesthetic perfectly and add warm amber glow that complements the rawness of the exposed structure above.
| Lighting Type | Best for Exposed Ceiling |
| Track lighting on joists | Flexible, practical, industrial look |
| Edison bulb pendant lights | Warm glow, perfect industrial character |
| LED strip lights on joists | Ambient indirect glow along structure |
| Recessed lights between joists | Clean modern look, no hanging fixtures |
| Industrial cage pendant lights | Bold statement, matches raw aesthetic |
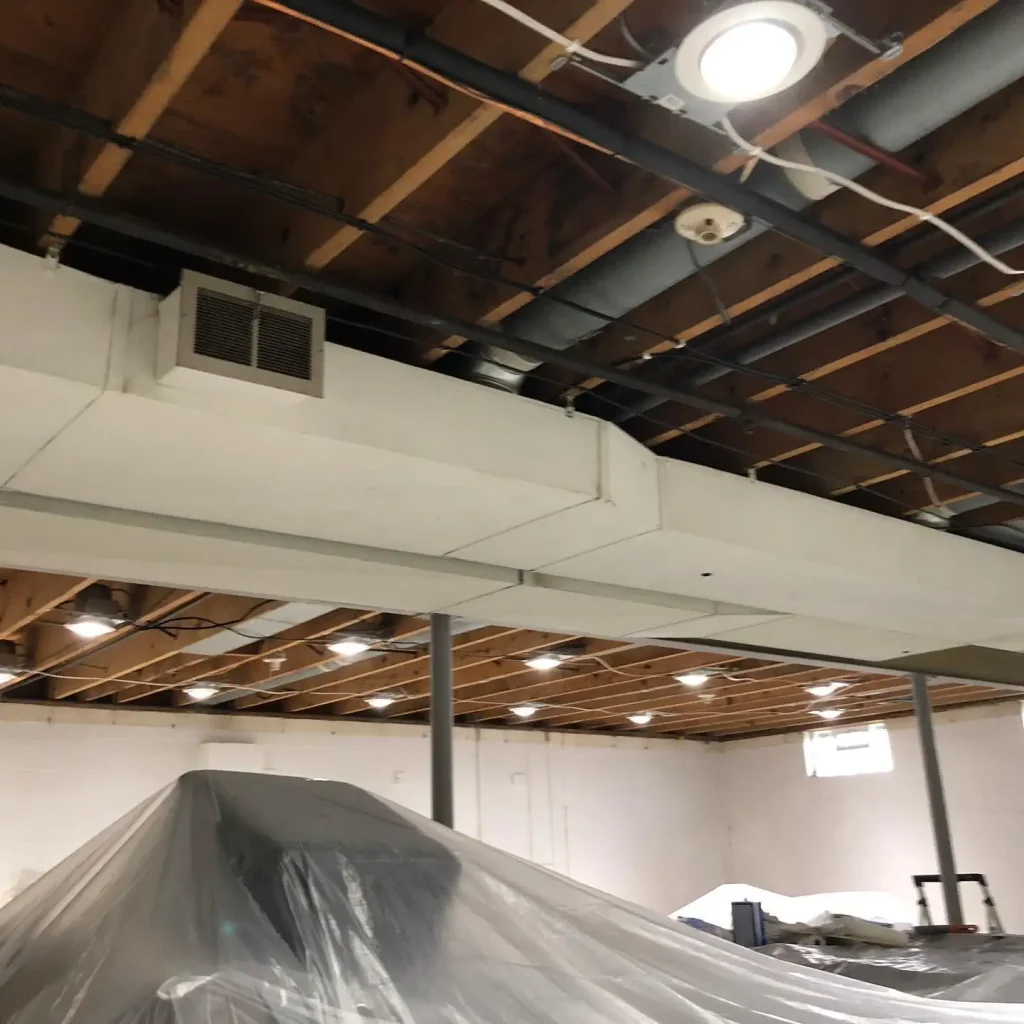
How to Handle Ductwork in an Exposed Basement Ceiling
HVAC ductwork is often the most visually dominant element in an exposed basement ceiling. Large rectangular or round metal ducts run across the ceiling in bold, graphic forms that immediately draw the eye. How you handle the ductwork visually makes a significant difference to the overall success of the exposed ceiling design.
source: @100things2do.ca
The simplest and most effective approach is to paint all ductwork the same color as everything else. When everything overhead is matte black, the ductwork becomes part of the unified composition rather than an eyesore.
Some homeowners choose to highlight ductwork by painting it a contrasting color to make it a deliberately bold graphic feature. Polished or brushed silver duct paint creates a steampunk-inspired industrial look that suits creative and eclectic basement spaces beautifully.
| Ductwork Treatment | Visual Result |
| Paint same color as ceiling | Unifies with everything overhead |
| Highlight in contrasting color | Bold graphic feature statement |
| Metallic silver duct paint | Steampunk and industrial character |
| Wrap in wood for warmth | Softens industrial quality of ducts |
| Reroute where possible first | Tidier before painting everything |
Managing Pipes and Plumbing in the Exposed Ceiling
Plumbing pipes in a basement ceiling come in many forms. Cast iron drain pipes are large and imposing. Copper supply lines are relatively slim and often beautiful in their own right. PVC pipes in white or gray are functional and simple. Each type requires slightly different treatment to look its best in an exposed ceiling composition.
source: @loganwerxconstruction
The most important step before painting is to organize loose pipes neatly and secure them properly to the joists with appropriate hangers and clips. Pipes that run at odd angles or that appear to go nowhere in particular should be traced back and either properly secured or, where possible, rerouted to run more cleanly. Once organized and painted a consistent color, even complex pipe runs look intentional and characterful rather than chaotic and haphazard.
| Pipe Type | Treatment Recommendation |
| Cast iron drain pipes | Paint black, becomes bold industrial element |
| Copper supply lines | Leave copper natural or paint to match |
| White or gray PVC pipes | Must paint to match ceiling color |
| Loose hanging pipes | Secure to joists before painting |
| Visible pipe joints and fittings | Paint same color as pipe throughout |
Organizing Electrical Wiring for a Clean Exposed Ceiling
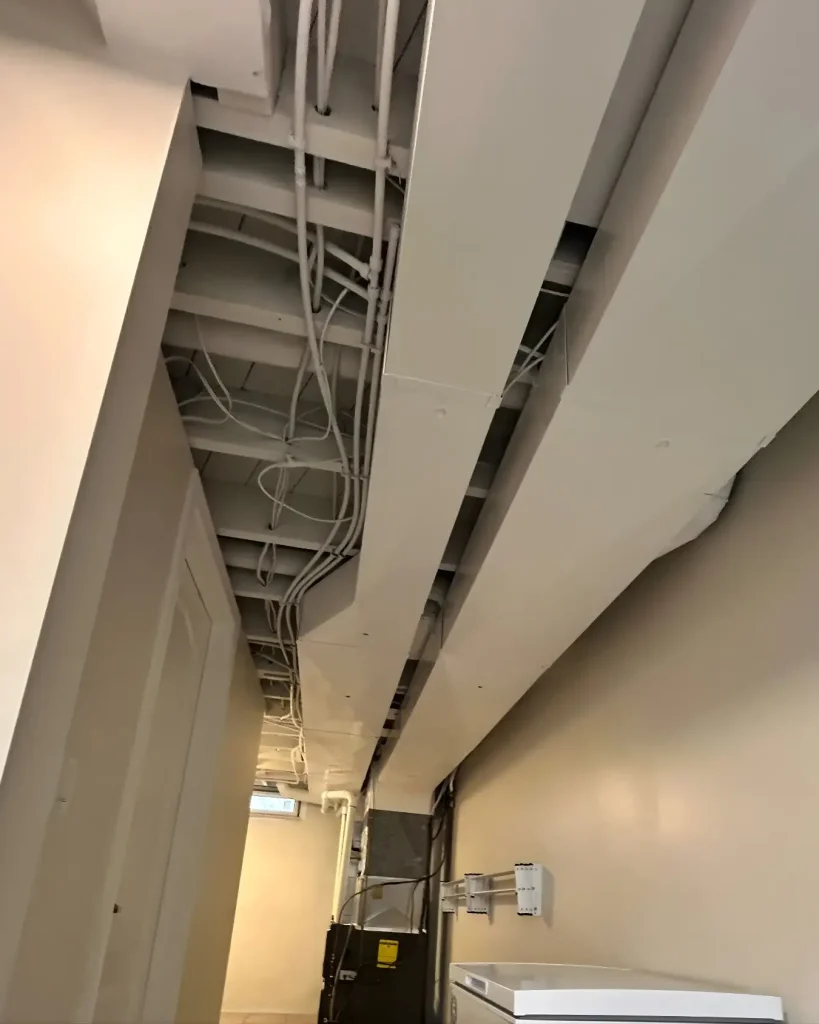
Electrical wiring is often the most visually chaotic element in an exposed basement ceiling. Decades of added circuits, old wiring alongside new, and multiple trades installing their own runs independently creates a tangled visual mess overhead. Organizing wiring before painting is one of the most important and most often neglected preparation steps.
source: @jjmfg_contracting
Group parallel wires together and secure them to the side of joists with cable staples for a neat horizontal run. Route wires along the sides of joists rather than hanging them in loops beneath the joists where they catch the eye. Bundle multiple wires together with zip ties at regular intervals and secure the bundle along a single path. Remove any abandoned wiring that serves no current purpose. Properly organized and painted wiring becomes an almost invisible part of the unified ceiling composition rather than a visual distraction.
| Wiring Organization Method | Result Achieved |
| Group parallel wires together | Clean bundled run instead of chaos |
| Route along joist sides not below | Wires less visible from below |
| Zip tie bundles at intervals | Neat organized appearance |
| Remove abandoned wiring | Reduces clutter significantly |
| Label circuits before organizing | Easy future identification after painting |
Insulation Considerations for an Exposed Basement Ceiling
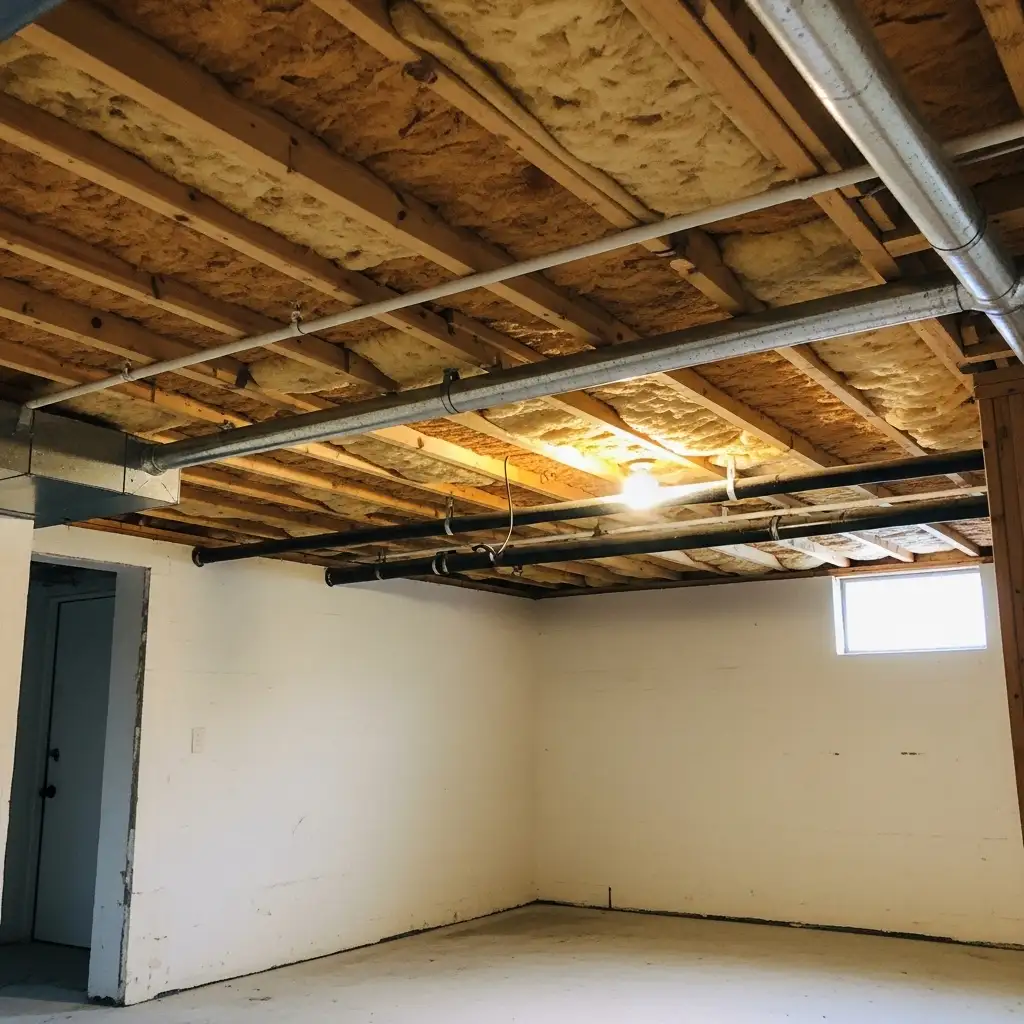
One of the common concerns about exposing a basement ceiling is what to do with insulation. In a traditional basement ceiling finish, insulation batts are placed between the joists before the drywall or tiles go up. An exposed ceiling eliminates this option and raises questions about thermal performance and sound transmission.
In mild and moderate climates, the insulation between the first floor joists may not be essential from a thermal perspective, particularly in a heated and conditioned basement. Removing it gives a cleaner exposed ceiling. In cold climates where the insulation is genuinely needed for thermal comfort, consider rigid foam insulation installed flat against the subfloor above, between the joists, where it is less visible from below.
For sound insulation between the basement and the floor above, resilient channels and mass-loaded vinyl are more effective solutions that can be incorporated without ruining the exposed look.
| Insulation Situation | Recommended Approach |
| Mild climate, heated basement | Remove batts for clean exposed ceiling |
| Cold climate, thermal need | Rigid foam flat against subfloor above |
| Sound transmission concern | Mass-loaded vinyl on joists before paint |
| Moisture in ceiling cavity | Address moisture first, then decide |
| Fire-rated assembly required | Consult code before removing insulation |
Exposed Basement Ceiling for a Home Theater
A home theater in the basement is one of the most popular basement uses and one where the exposed ceiling can be used to particularly dramatic and functional effect. The dark environment required for good movie watching aligns perfectly with the matte black ceiling that makes exposed ceilings look their best.
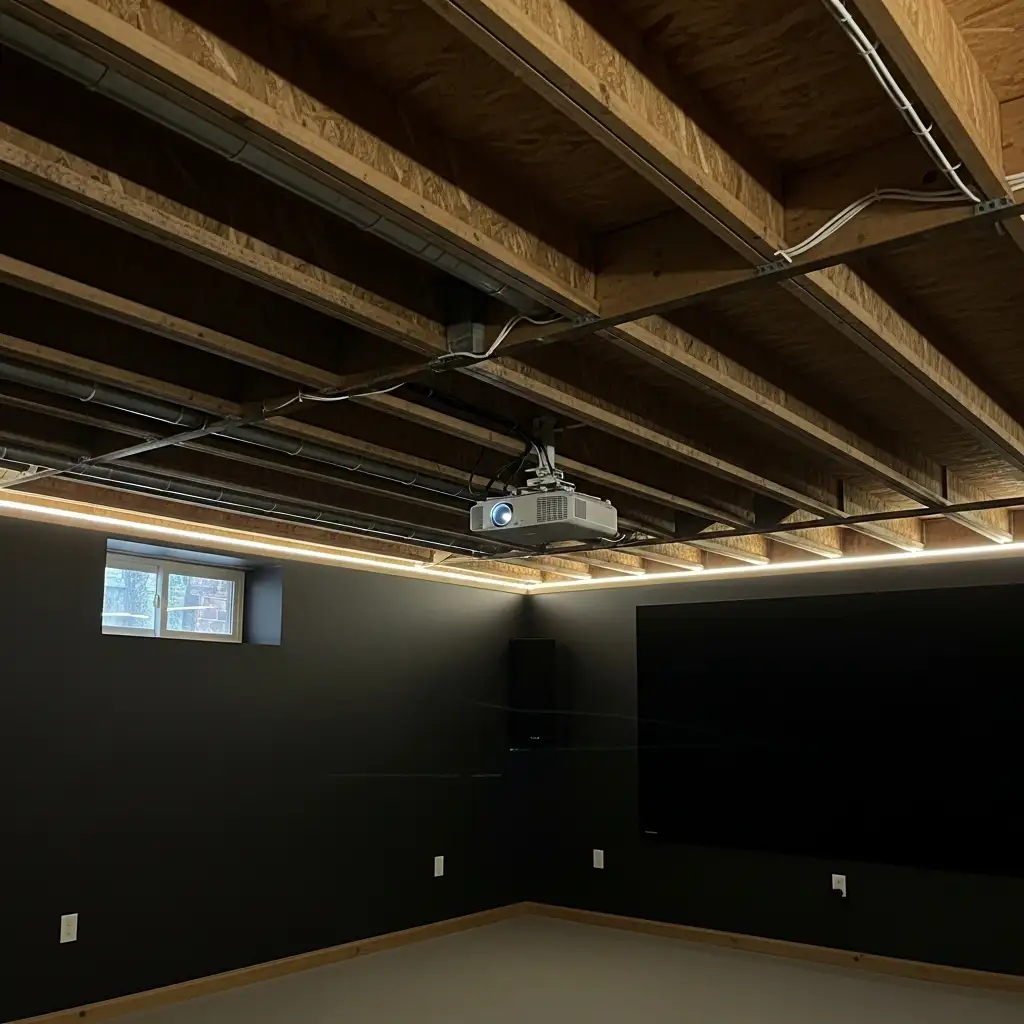
Paint everything overhead matte black for maximum light absorption and the most immersive cinema atmosphere. Mount a projector directly to the joist structure overhead for a clean, stable installation without a separate projector mount on the wall.
Route speaker wiring through the exposed ceiling structure in a clean organized manner before painting so all cables disappear into the black composition overhead. Add dimmable LED strip lights along the joist lines at the perimeter of the room for controllable ambient lighting that does not interfere with projection quality during viewing.
| Home Theater Ceiling Element | How to Handle It |
| Overall ceiling color | Matte black throughout for immersion |
| Projector mounting | Bolt directly to joist for clean install |
| Speaker wire routing | Run through joist structure before paint |
| Ambient perimeter lighting | Dimmable LED strips along joist lines |
| Sound treatment | Acoustic panels between joists if needed |
Exposed Basement Ceiling for a Home Gym
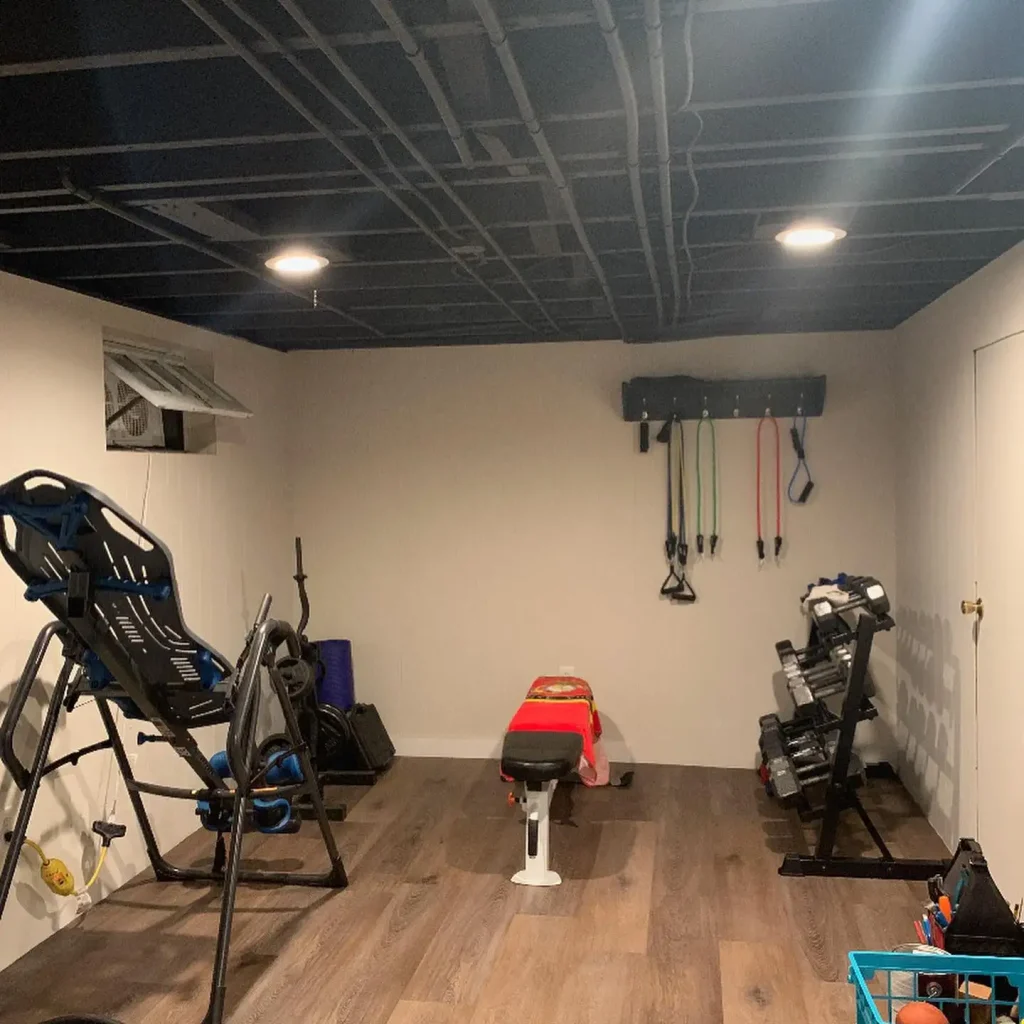
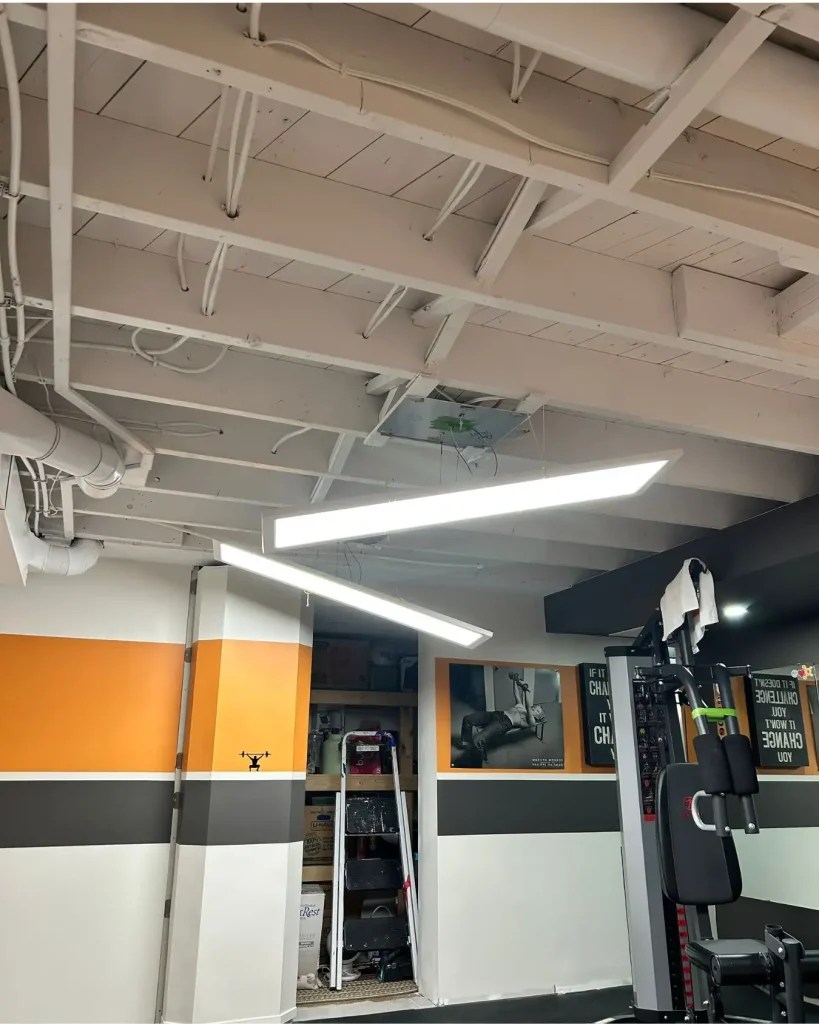
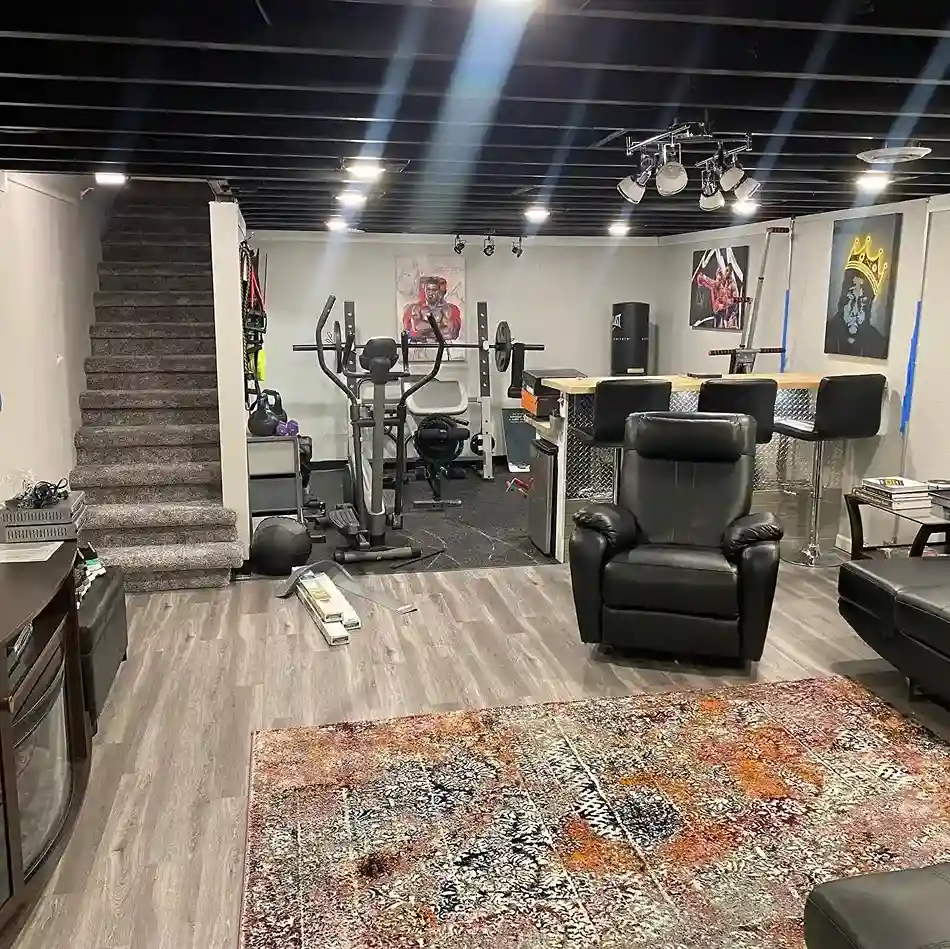
A home gym basement is one of the best possible uses for an exposed ceiling treatment. The industrial rawness of the exposed structure matches the functional, no-nonsense character of a serious workout space perfectly. Nothing about a home gym benefits from a polished, finished ceiling overhead.
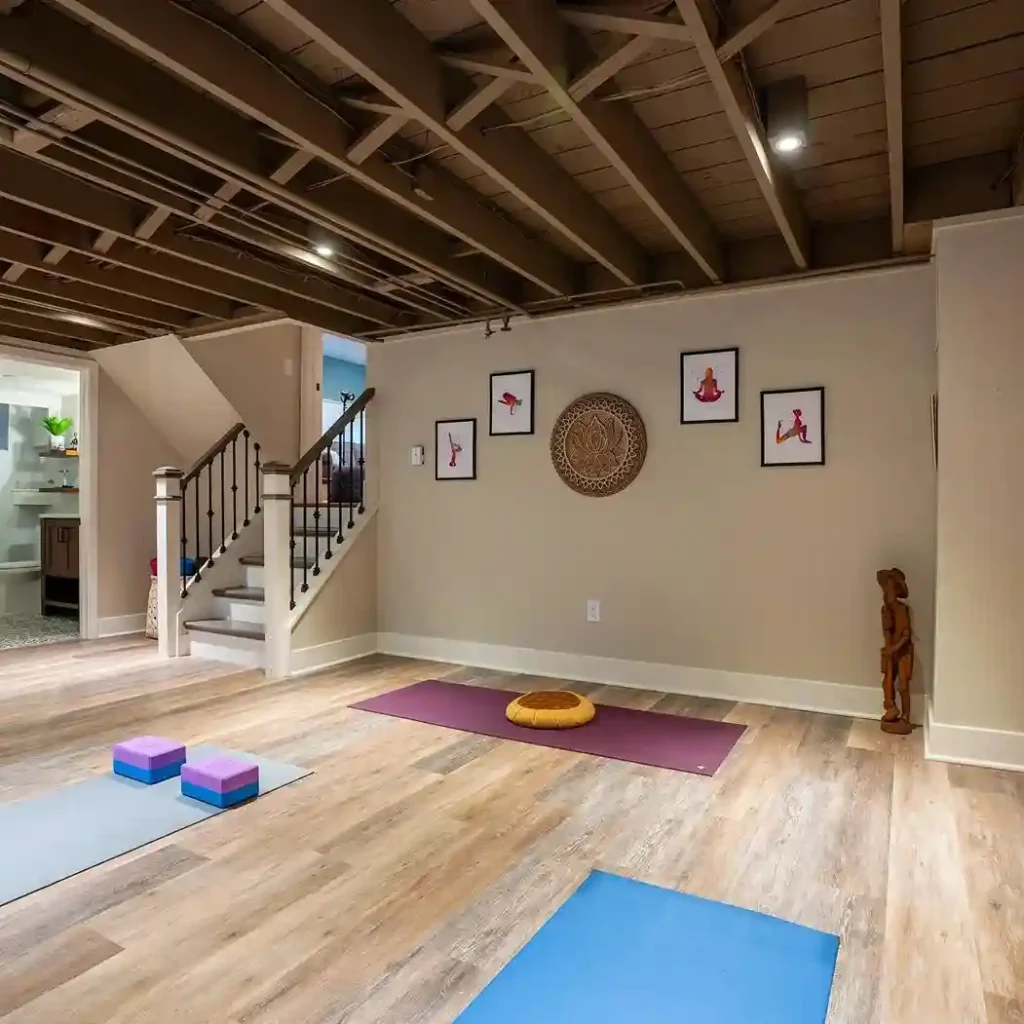
Paint the exposed ceiling in a color that energizes. Matte black is popular for its focused, serious atmosphere. Bright white maximizes the light reflected by the gym lighting.
Some gym owners paint the ceiling a bold accent color that matches their gym equipment or motivational color scheme. Mount heavy-duty ceiling hooks directly into the joists for battle ropes, suspension trainers, and hanging punching bags. Install high-output LED shop lights between the joists for bright, even, shadow-free illumination across the entire workout floor.
| Home Gym Ceiling Feature | Installation Detail |
| High-output LED shop lights | Mounted between joists for bright coverage |
| Ceiling mount hooks for equipment | Bolt directly into joists for strength |
| Battle rope anchor point | Heavy-duty eye bolt into doubled joist |
| Suspension trainer mount | Beam clamp on solid joist section |
| Mirror wall opposite exposed ceiling | Doubles visual height perception |
Exposed Basement Ceiling for a Home Bar and Entertainment Space
A home bar and entertainment basement is perhaps the most naturally suited space for an exposed ceiling treatment. The urban bar and restaurant aesthetic that has made exposed ceilings famous in hospitality design translates directly and beautifully into a residential home bar. The industrial exposed ceiling instantly gives the space the authentic character of a cool downtown bar.
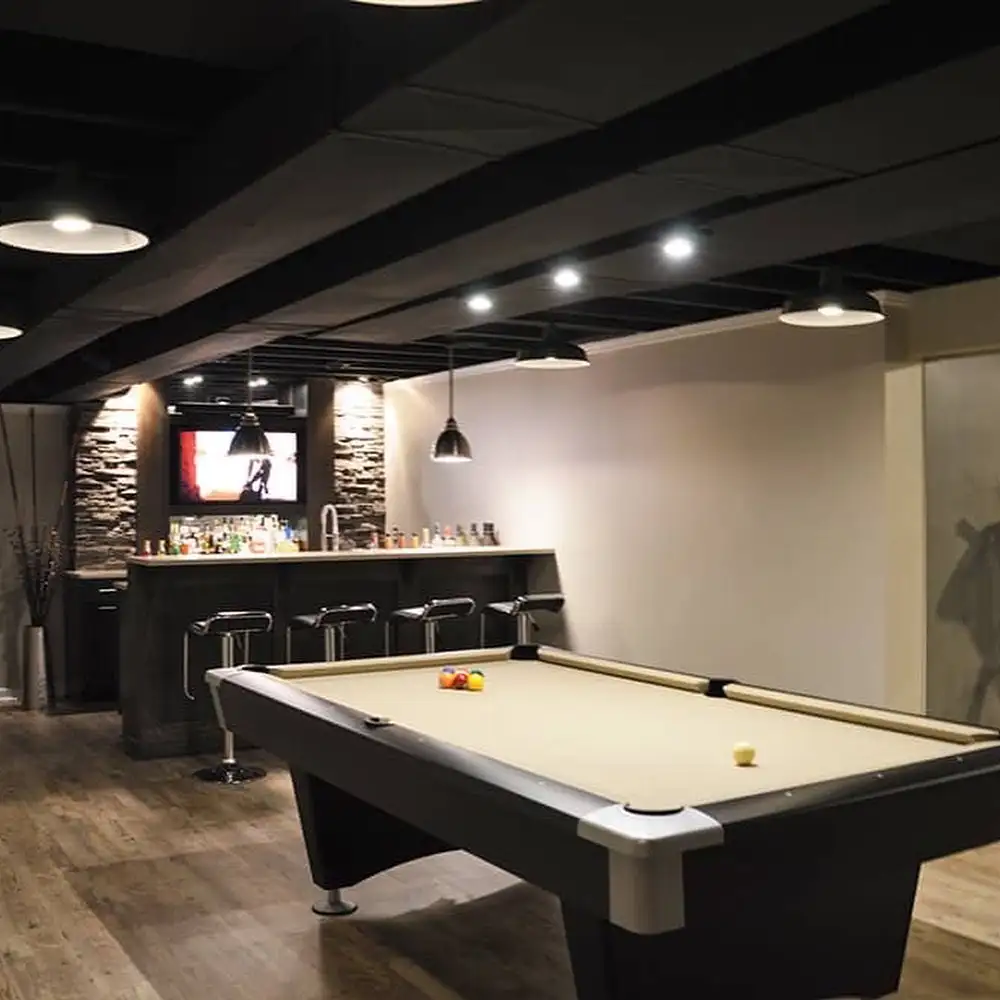
String Edison bulb lights between the joists for a warm, festive, and instantly social atmosphere. Mount bottle storage racks directly to the exposed joist structure for additional character and practical storage. Install a central pendant light fixture above the bar counter as the main focal point.
Route all bar lighting on a separate dimmer circuit so the lighting atmosphere can be adjusted from bright and functional to intimate and atmospheric at any time. The exposed ceiling makes the home bar feel like a proper hospitality venue rather than a suburban basement.
| Home Bar Ceiling Feature | Design and Function |
| Edison string lights between joists | Warm, festive, social atmosphere |
| Bottle rack mounted to joists | Storage and industrial bar character |
| Pendant light over bar counter | Focal point illumination |
| Separate dimmer circuit for bar | Adjustable atmosphere control |
| Chalkboard paint on one joist face | Menu or drink specials written above |
Exposed Basement Ceiling Cost Compared to Other Options
One of the most compelling reasons to choose an exposed basement ceiling is the significant cost saving compared to every alternative finishing method. Understanding exactly how much you save helps you make a fully informed decision and often reveals that the money saved can be invested in higher-quality flooring, lighting, or furnishings that elevate the finished space far more than a ceiling tile would.
source: @artisan_painting
A traditional drop ceiling grid and tile system costs between three and six dollars per square foot for materials alone. Professional installation adds another two to four dollars per square foot. A drywall ceiling adds framing, drywall, taping, mudding, sanding, and painting costs that total eight to fifteen dollars per square foot installed.
An exposed ceiling treatment costs primarily the price of paint and the labor to apply it. For a typical basement of one thousand square feet, the saving over a drop ceiling is typically three thousand to six thousand dollars. Over a drywall ceiling the saving is eight thousand to fifteen thousand dollars.
| Ceiling Option | Approximate Cost Per Square Foot |
| Exposed painted ceiling | $0.50 to $1.50 (paint only) |
| Drop ceiling grid and tiles | $5 to $10 installed |
| Drywall finished ceiling | $8 to $15 installed |
| Tongue and groove wood ceiling | $10 to $20 installed |
| Coffered ceiling | $25 to $50 installed |
Adding Wood Elements to an Exposed Basement Ceiling
Raw painted joists and pipes create an undeniably industrial look. But not every homeowner wants pure industrial in their basement. Adding wood elements to the exposed ceiling introduces warmth, organic character, and a softer aesthetic that bridges the gap between raw industrial and rustic or Scandinavian warmth. The result is an exposed ceiling that feels intentional and warm rather than unfinished.
Wrap exposed steel beams or large ductwork in thin wood planks for a dramatic contrast between industrial and natural. Install tongue and groove wood paneling flat against the subfloor above, between the painted joists, to create a beautiful alternating pattern of dark painted joists and warm wood panels.
Add a wood stain to the natural wood elements of the joists themselves if they are in good condition. Even a single reclaimed wood beam added decoratively across the ceiling creates a warm focal element against the black painted composition.
| Wood Element Addition | Visual Effect |
| Wood planks wrapping steel beams | Warm contrast to industrial metal |
| Tongue and groove between joists | Natural wood panels in black frame |
| Stained natural joists | Warm wood ceiling with visible grain |
| Decorative reclaimed wood beam | Rustic focal element in industrial space |
| Wood paneled ceiling section | Defined zone within open ceiling plan |
Exposed Basement Ceiling in a Modern Industrial Style
The modern industrial style takes the raw honesty of exposed ceilings and pairs it with clean-lined contemporary furniture, polished concrete floors, and a refined material palette to create a space that feels deliberately designed rather than unfinished. This is the most sophisticated expression of the exposed basement ceiling aesthetic.

Paint the ceiling matte black or dark charcoal as the bold foundation. Pair with polished concrete or large-format gray tile flooring for a continuous industrial material palette. Choose furniture in black metal frames with leather or linen upholstery.
Add industrial-style pendant lights and track lighting in matte black or brushed steel. Use minimal decoration, relying instead on the quality of materials and the drama of the raw ceiling itself to provide visual interest. Modern industrial design is about confident restraint and material authenticity.
| Modern Industrial Element | Design Choice |
| Ceiling color | Matte black or dark charcoal |
| Flooring | Polished concrete or gray large-format tile |
| Furniture frames | Black metal or brushed steel |
| Lighting fixtures | Matte black track lights or pendants |
| Decoration philosophy | Minimal, material-led, no decorative excess |
Exposed Basement Ceiling in a Rustic Style
Rustic style and exposed basement ceilings create a warm, cabin-inspired aesthetic that feels completely natural and deeply inviting. The visible wood structure of the joists already carries inherent rustic character. Leaning into that quality rather than painting it black creates an entirely different but equally beautiful exposed ceiling look.
Leave the wood joists in their natural color or apply a warm wood stain for a rich, honeyed tone. Install reclaimed wood planking flat against the subfloor between the joists for a fully clad wood ceiling appearance that reveals the joist structure as a grid of dividers.
Paint any pipes and mechanical elements in a matte black or dark brown to recede them against the warm wood above. Add wrought iron or vintage Edison bulb lighting to complete the rustic atmosphere. Rope-wrapped pipes and iron fixtures add further rustic character throughout.
| Rustic Exposed Ceiling Element | How to Achieve It |
| Natural or stained wood joists | Leave wood natural or apply warm stain |
| Reclaimed wood between joists | Warm planked ceiling with joist grid |
| Pipes painted dark to recede | Matte black or dark brown for pipes |
| Wrought iron light fixtures | Industrial vintage meets rustic warmth |
| Rope or hemp wrapped pipes | Natural material detail on mechanical |
Sound and Acoustics in a Room with an Exposed Ceiling
One of the honest disadvantages of an exposed basement ceiling compared to a finished ceiling is acoustic performance. A finished ceiling with insulation and drywall above absorbs sound and reduces reverberation. An exposed ceiling with hard surfaces of joists, pipes, and subfloor reflects sound, creating an echoey quality that some people find uncomfortable in spaces used for conversation, music, or television.
Address acoustics through wall and floor treatments rather than compromising the exposed ceiling. Large area rugs absorb a significant amount of sound energy. Upholstered furniture, heavy curtains, and soft furnishings all reduce reverberation.
Acoustic panels mounted on the walls or even suspended horizontally from the joists, painted to match the ceiling, address sound without hiding the structure. A basement used as a home theater or recording space may need more substantial acoustic treatment than a casual rec room.
| Acoustic Solution | How It Helps |
| Large area rugs | Absorbs significant floor reflection |
| Upholstered furniture | Soft surfaces absorb mid and high frequencies |
| Heavy curtains on walls | Dampens reverb without covering ceiling |
| Acoustic panels on walls | Targeted absorption where needed most |
| Suspended acoustic panels from joists | Ceiling-level absorption, matches paint |
Moisture and Vapor Considerations for Exposed Ceilings
Moisture management is a critical consideration in any basement renovation and particularly important when leaving the ceiling structure exposed. A finished ceiling can conceal minor condensation issues that an exposed ceiling makes immediately visible. Addressing moisture before exposing the ceiling ensures the final result stays beautiful and structurally sound for years.
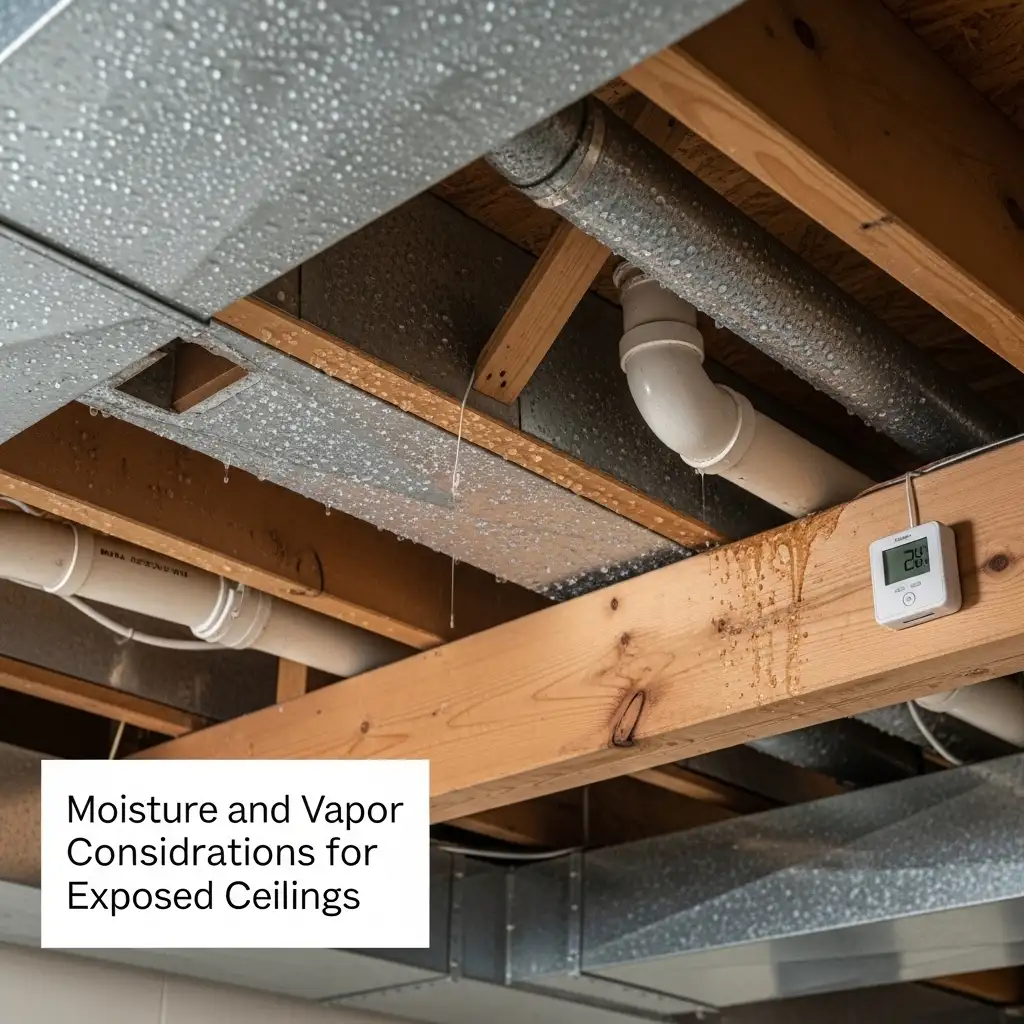
Inspect the entire ceiling cavity carefully for signs of past or current moisture intrusion. Look for water stains on the subfloor above, rust on any metal elements, and mold or mildew on the wood surfaces. Address all moisture sources before painting.
Ensure the basement has adequate ventilation and controlled humidity. A dehumidifier sized appropriately for the basement volume is essential in humid climates. Apply a mold-inhibiting primer to all wood surfaces before the topcoat of paint for long-term protection.
| Moisture Management Step | Why It Is Critical |
| Inspect for water stains and rust | Identifies existing problems before they hide |
| Address all moisture sources first | Paint does not fix moisture problems |
| Adequate ventilation system | Prevents future condensation buildup |
| Correctly sized dehumidifier | Controls humidity in sealed basement |
| Mold-inhibiting primer on wood | Long-term protection beneath topcoat |
How to Paint an Exposed Basement Ceiling Like a Professional
The painting process for an exposed basement ceiling is physically demanding and technically different from painting a flat finished ceiling. The irregular surfaces, multiple elements at different depths, and the sheer volume of surface area to cover make it a challenging but entirely achievable DIY project with the right approach and the right tools.
source: @davebelcherpainting
Wear old clothes and protect your eyes with safety glasses. Lay drop cloths across the entire floor. Use an airless paint sprayer to apply the first coat over everything. A sprayer covers all the complex overlapping elements far more efficiently than a brush or roller alone. Follow the sprayer with a brush to touch in any areas the spray missed, particularly the backs of pipes and the undersides of joists.
Apply the second coat by hand with a combination of roller and brush for complete coverage. The sprayer plus hand touch-in combination delivers the fastest and most thorough coverage on complex exposed ceiling surfaces.
| Painting Technique | Why It Works Best |
| Airless sprayer for first coat | Covers all complex elements efficiently |
| Brush for touch-in behind pipes | Reaches surfaces spray cannot reach |
| Roller for flat joist faces | Efficient on larger flat surfaces |
| Second coat by hand | Ensures complete coverage everywhere |
| Drop cloths across entire floor | Spray and drips require full protection |
Exposed Ceiling With Drop Ceiling Combined: The Hybrid Approach
A hybrid approach combines an exposed ceiling in the main living area with a partial drop ceiling or boxed soffit in specific zones where mechanical access is less important or where a finished ceiling is strongly preferred. This gives you the best of both approaches in the same basement renovation.
Expose the ceiling in the main open areas of the basement where ceiling height and industrial character are most desirable. Build a finished drywall soffit or partial drop ceiling only around the perimeter where ductwork runs lowest, where a bathroom requires code-compliant ceiling materials, or where a bedroom zone needs a more residential feel. The contrast between the finished soffit and the exposed ceiling within the same space can itself become an attractive design detail that defines different zones visually and functionally.
| Hybrid Zone | Ceiling Treatment |
| Main open living area | Exposed painted ceiling throughout |
| Perimeter duct zone | Boxed drywall soffit conceals lowest runs |
| Bathroom area | Full drywall ceiling for code compliance |
| Bedroom zone if present | Finished ceiling for residential feel |
| Transition between zones | Clean drywall edge as visual boundary |
Exposed Basement Ceiling with Reclaimed Wood Planks
Using reclaimed wood planks between the joists of an exposed basement ceiling creates one of the most beautiful and warmly characterful finished looks available. The combination of the structural joist grid with the warmth of reclaimed wood boards produces a ceiling that is simultaneously industrial in its honesty and organic in its material beauty.
Source reclaimed barn wood, old flooring boards, or pallet wood for the planks. Sand them enough to remove splinters and sharp edges while preserving the aged patina and character marks that make reclaimed wood beautiful. Cut them to fit between the joists and nail or screw them flat against the subfloor above. Stagger the joints between boards for a more natural appearance. Seal with a clear matte finish to protect the wood and make it easier to clean. This ceiling treatment takes significantly more time than a simple paint job but the result is extraordinary.
| Reclaimed Wood Ceiling Step | Detail |
| Source reclaimed boards | Barn wood, old flooring, or pallet boards |
| Sand to remove splinters | Safe but preserve aged character marks |
| Cut to fit between joists | Precise fit, stagger joints naturally |
| Nail flat to subfloor above | Secure fixing, flush with joist bottom |
| Seal with clear matte finish | Protection while preserving aged look |
Adding Color Accents to an Exposed Basement Ceiling
While a single consistent paint color across the entire exposed ceiling is almost always the most successful approach, adding deliberate color accents within the composition can create additional visual interest and personality in specific basement spaces. Color accenting works best when it is deliberate, restrained, and connected to the overall room color scheme.
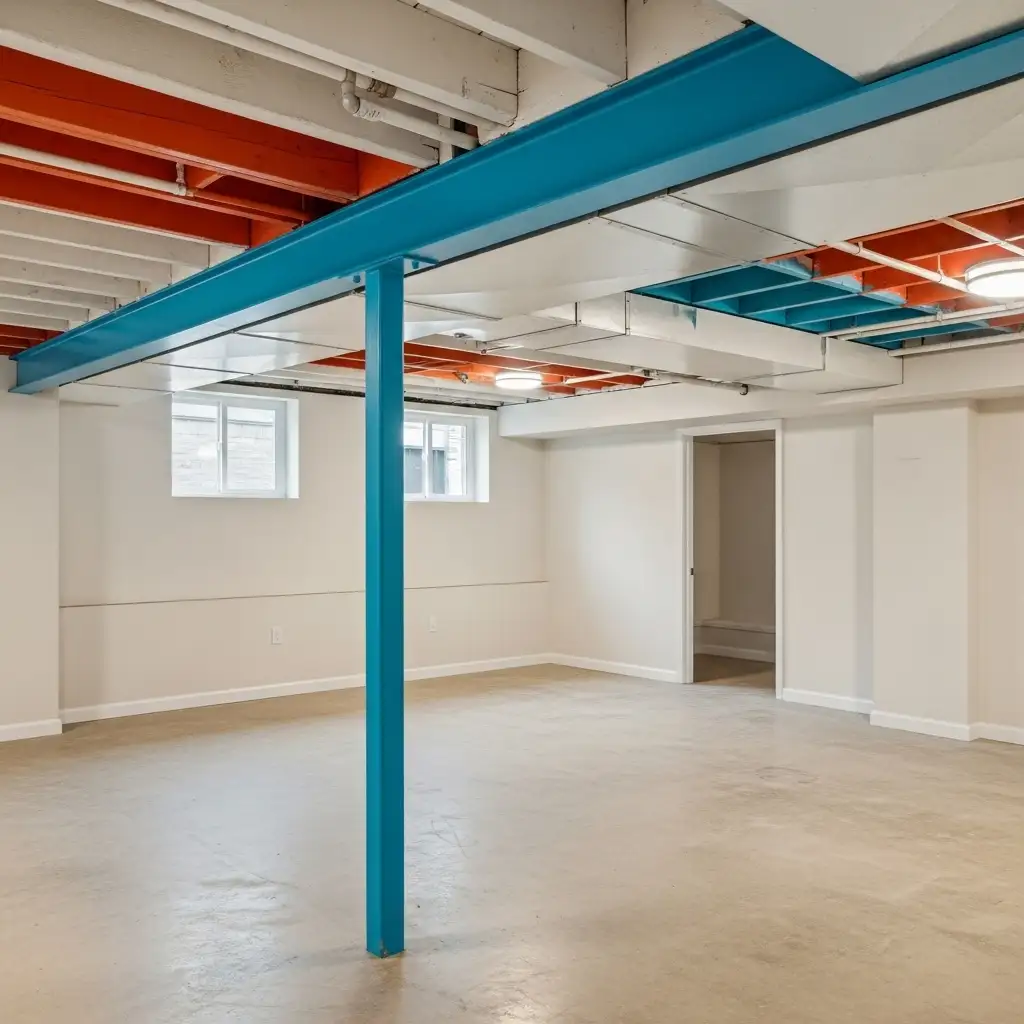
Paint the structural joists in the primary ceiling color but highlight all ductwork in a contrasting metallic color such as copper, silver, or gold. This makes the duct runs a bold graphic feature rather than something to minimize. In a home gym, paint the ceiling black but highlight specific pipes in bright red or yellow to create an energetic industrial look. In a creative studio, use the different overhead elements as canvases for different colors in an artistic, intentional composition. Color accenting rewards a bold creative approach and suits spaces used for creative work and active entertaining.
| Color Accent Approach | Best Space |
| Copper ducts on black ceiling | Sophisticated bar or entertainment room |
| Bright red pipes on black | High-energy gym or studio space |
| Gold ductwork highlight | Glamorous entertainment basement |
| White joists, colored pipes | Playful creative or kids basement |
| Ombre gradient across ceiling | Artistic and unique creative studio |
Building Codes and Permits for Exposed Basement Ceilings
Before exposing or modifying a basement ceiling, it is important to understand what building codes in your jurisdiction require and whether any permits are needed. Code requirements vary significantly between municipalities and ignoring them can create costly problems when you later try to sell the home or when the work is inspected.
In most jurisdictions, painting an existing exposed ceiling requires no permit as it does not change the structural or mechanical systems. However, if you are removing an existing finished ceiling, rerouting any mechanical systems, adding new electrical circuits or fixtures, or making any structural modifications, a permit is almost certainly required. Certain basement uses, particularly if bedrooms are involved, require specific fire-rated ceiling assemblies that an exposed ceiling cannot meet. Always consult your local building department before starting any basement renovation that involves the ceiling.
| Action | Permit Typically Required? |
| Painting existing exposed ceiling | No permit typically needed |
| Removing existing drywall ceiling | Check local codes before removing |
| Adding new electrical fixtures | Permit almost always required |
| Rerouting mechanical systems | Permit required in most jurisdictions |
| Basement bedroom with exposed ceiling | Fire-rated assembly may be required |
Exposed Basement Ceiling Maintenance and Cleaning
An exposed basement ceiling requires different maintenance than a finished ceiling. The complex overlapping surfaces of joists, pipes, and conduit trap dust and cobwebs more readily than a smooth flat drywall ceiling. Regular cleaning keeps the ceiling looking its best and prevents dust accumulation from becoming visible against the painted surfaces.
Use a long-handled duster or a vacuum with a brush attachment to clean the ceiling surfaces quarterly. Pay particular attention to the tops of horizontal pipe runs, the corners between joists and the subfloor above, and any rough textured surfaces where dust clings. Touch up the paint in any areas that show wear, scratches, or chipping annually. Check all pipe connections and wire junctions periodically for signs of leaks or deterioration. A well-maintained exposed ceiling stays beautiful and functional for many years with minimal ongoing effort.
| Maintenance Task | Frequency |
| Dust with long-handled duster | Quarterly throughout the year |
| Vacuum cobwebs from corners | Monthly or as needed |
| Paint touch-up on worn areas | Annually or when noticed |
| Check pipe connections for leaks | Every six months |
| Inspect wiring junctions | Annually during cleaning |
Exposed Basement Ceiling in a Creative Studio or Workshop
A creative studio or workshop basement is one of the most natural and exciting spaces for an exposed ceiling treatment. Whether the space is used for art, music, woodworking, photography, or any other creative pursuit, the raw industrial character of the exposed ceiling creates an environment that feels genuinely creative, serious, and inspiring.
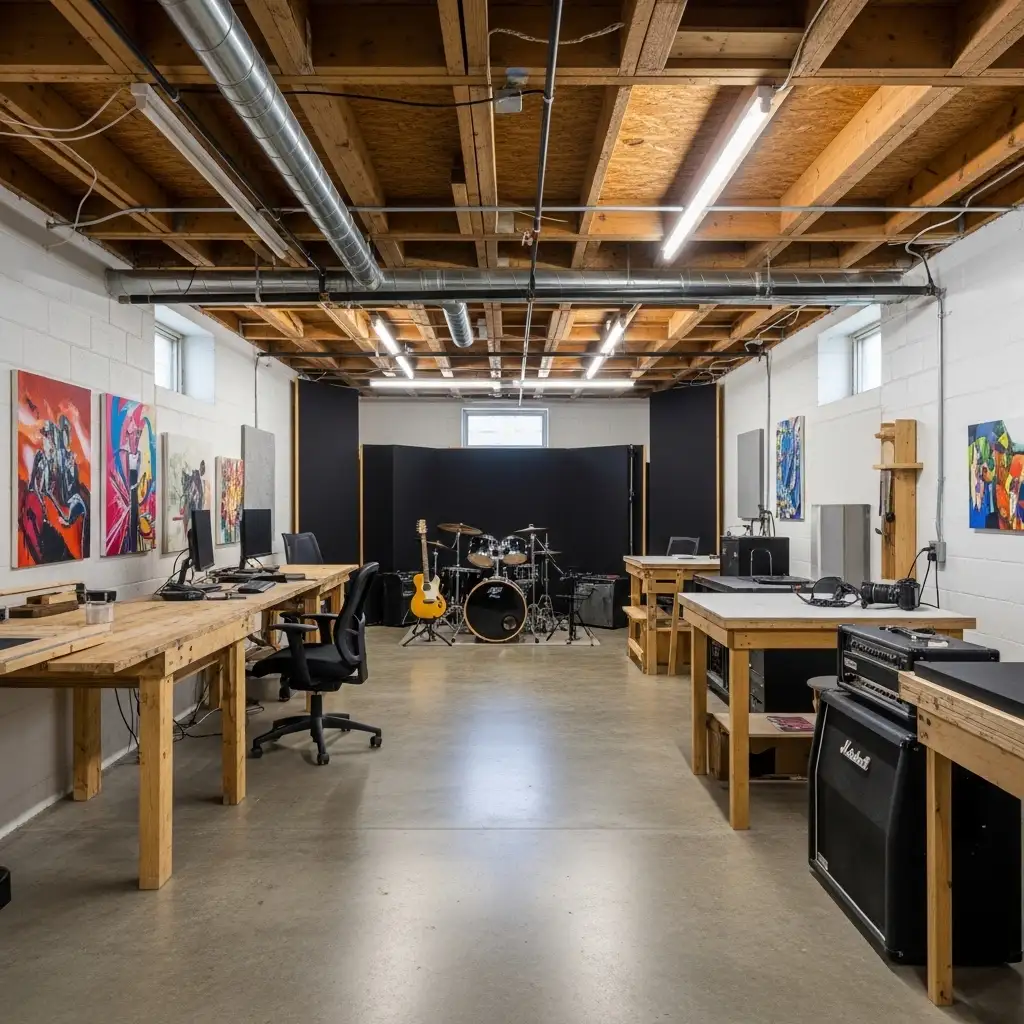
Mount tool storage directly to the exposed joist structure for accessible workshop organization. Install heavy-duty lighting between the joists for bright, even work light across the entire studio floor. Route compressed air lines through the ceiling structure for a clean workshop setup. Add a chalkboard paint section on one joist face for project notes and sketches. String lights along the joist lines for warmer ambient light during less task-focused creative sessions. The exposed ceiling in a creative studio tells everyone who enters that serious and meaningful work happens here.
| Creative Studio Ceiling Feature | How to Implement It |
| Tool storage on joist structure | French cleat system on joist faces |
| High-output LED work lighting | Shop lights mounted between joists |
| Compressed air lines through ceiling | Route during prep before painting |
| Chalkboard section on joist face | Chalkboard paint on wide joist face |
| String lights for ambient mode | Warm LED strings between joist lines |
Common Mistakes to Avoid with an Exposed Basement Ceiling
An exposed basement ceiling project has several common pitfalls that homeowners encounter when approaching the project without adequate preparation or knowledge. Understanding these mistakes before starting allows you to avoid them entirely and achieve a result that looks professionally done and genuinely beautiful.
source: @htzdesignbuild
The most common mistake is inadequate preparation before painting. Starting to paint without first organizing wiring, securing loose pipes, removing unnecessary elements, and cleaning all surfaces produces a messy, unsatisfying result.
The second most common mistake is using the wrong paint sheen. Glossy or satin paint on an exposed ceiling highlights every imperfection and makes the ceiling look messier than it actually is. Always use flat or matte finish. A third mistake is insufficient lighting planning. The exposed ceiling needs good lighting to look its best. Planning lighting as an afterthought rather than an integral part of the design always shows in the result.
| Common Mistake | How to Avoid It |
| Inadequate preparation before paint | Organize, clean, and secure everything first |
| Using glossy or satin paint | Always use flat or matte finish only |
| Poor lighting plan | Design lighting as integral to ceiling design |
| Not addressing moisture first | Fix all water issues before painting |
| Leaving abandoned wiring in place | Remove all unused wiring during prep |
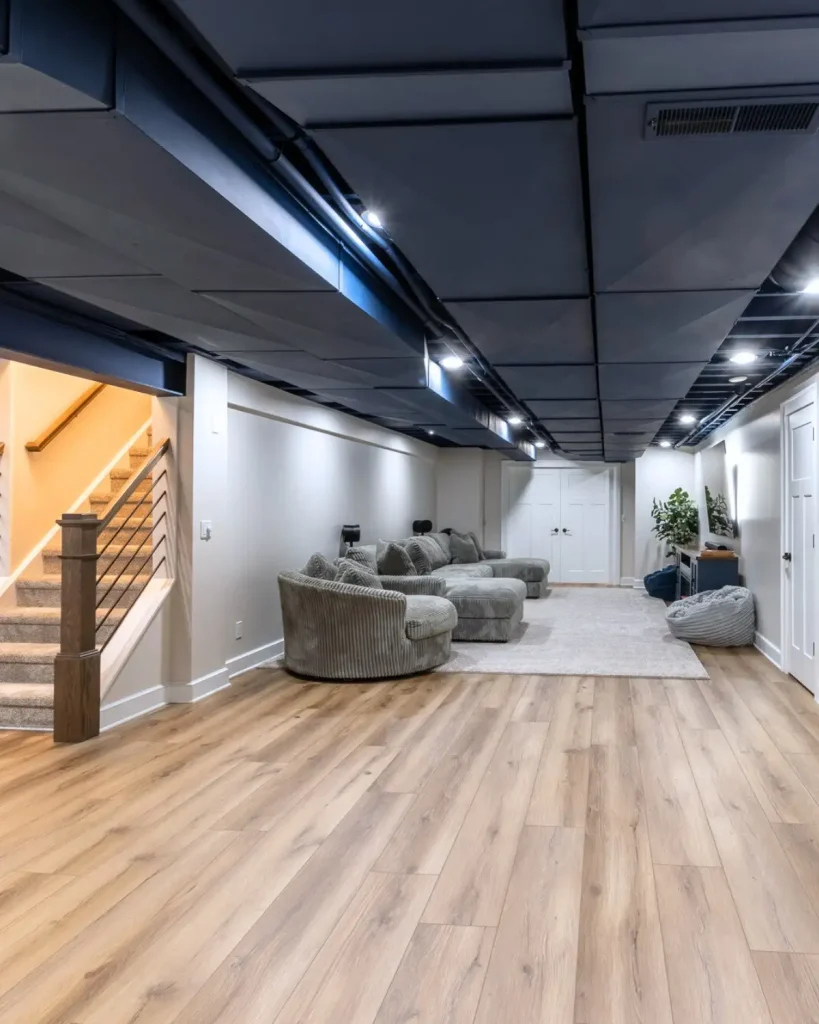
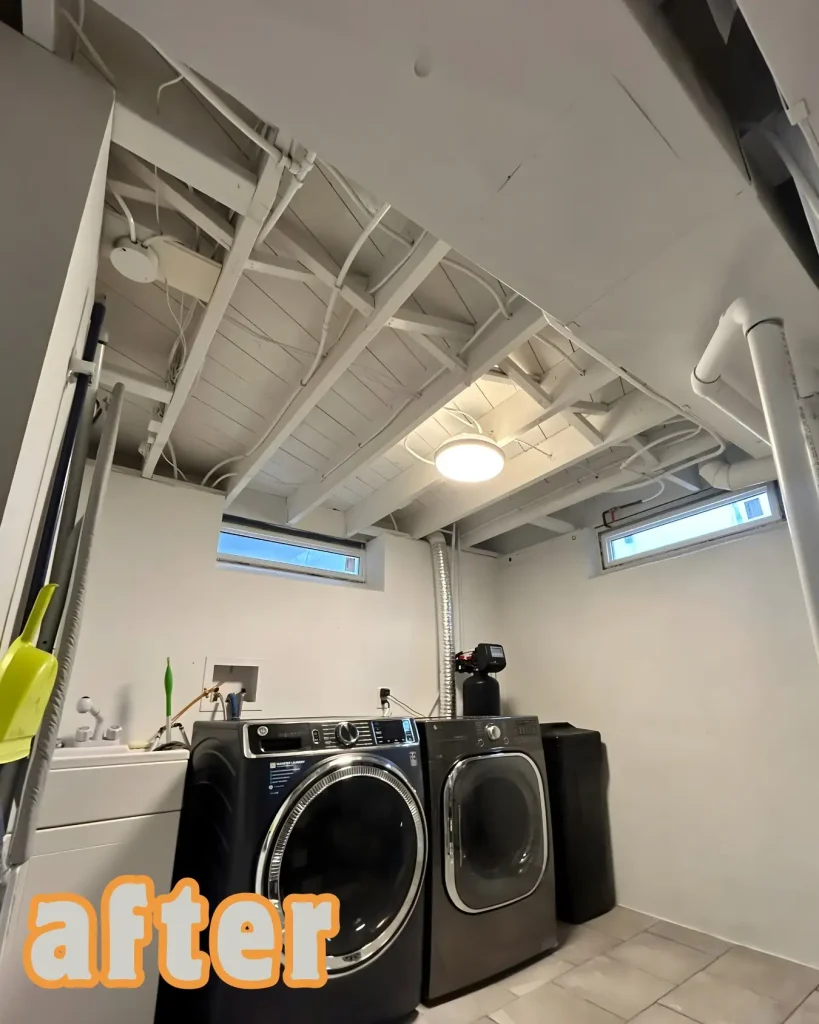
Before and After: Transforming a Basement with an Exposed Ceiling
Understanding the full transformation that an exposed basement ceiling delivers helps you visualize the end result and commit to the project with confidence. The before and after contrast is typically one of the most dramatic improvements available in any basement renovation project.
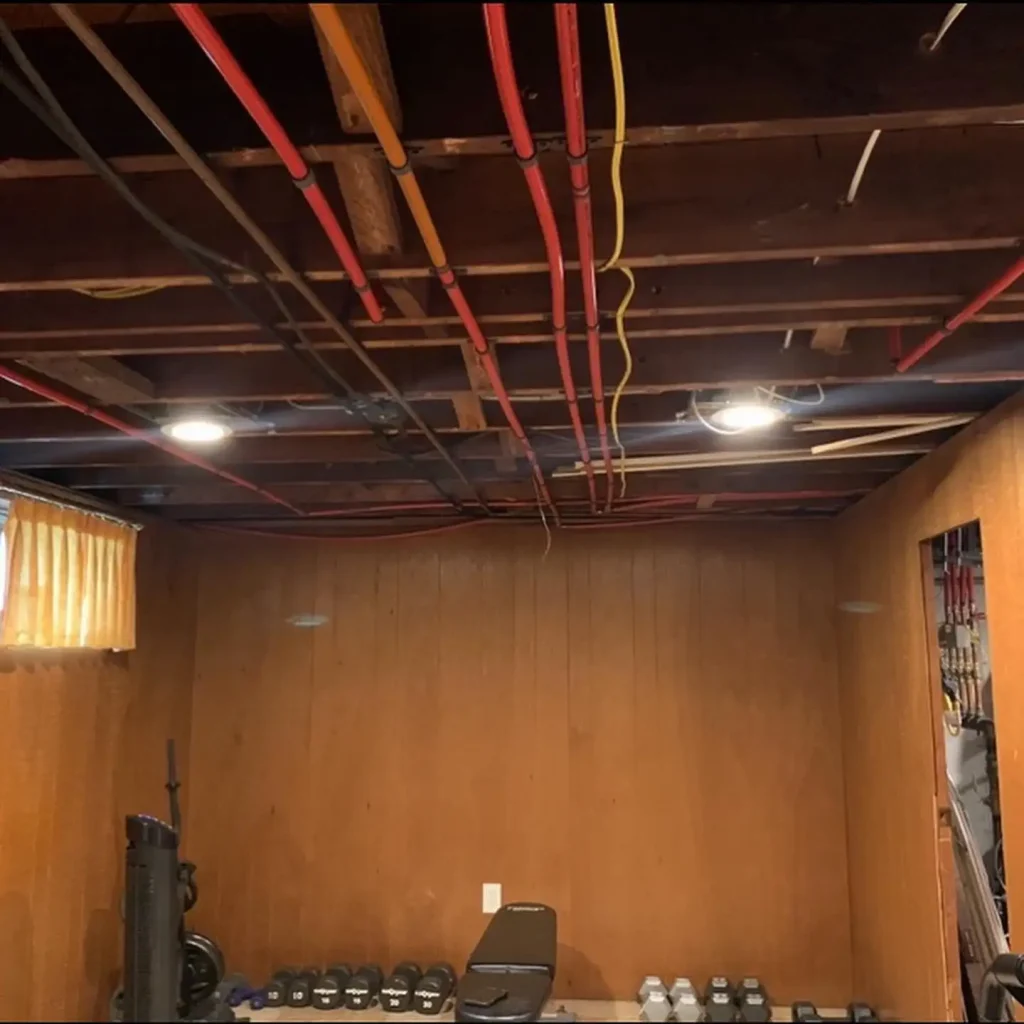
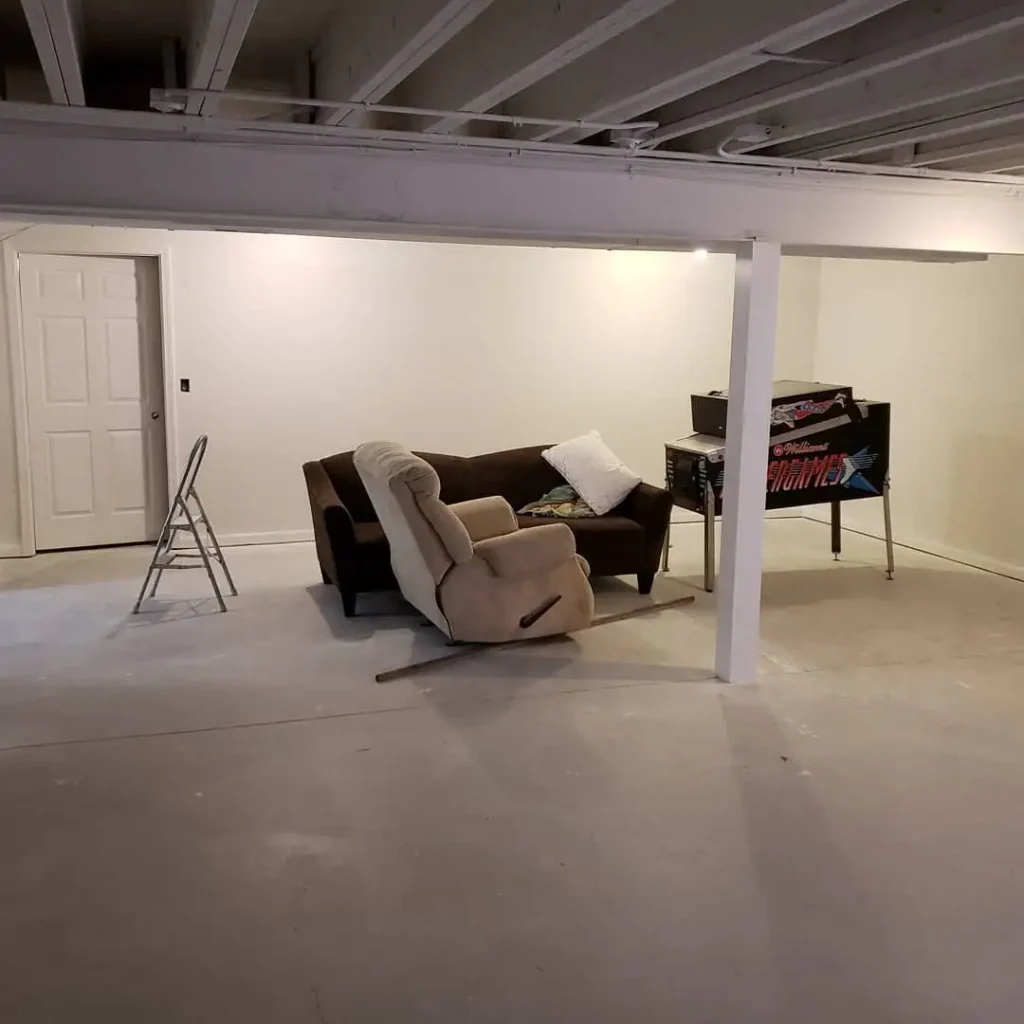
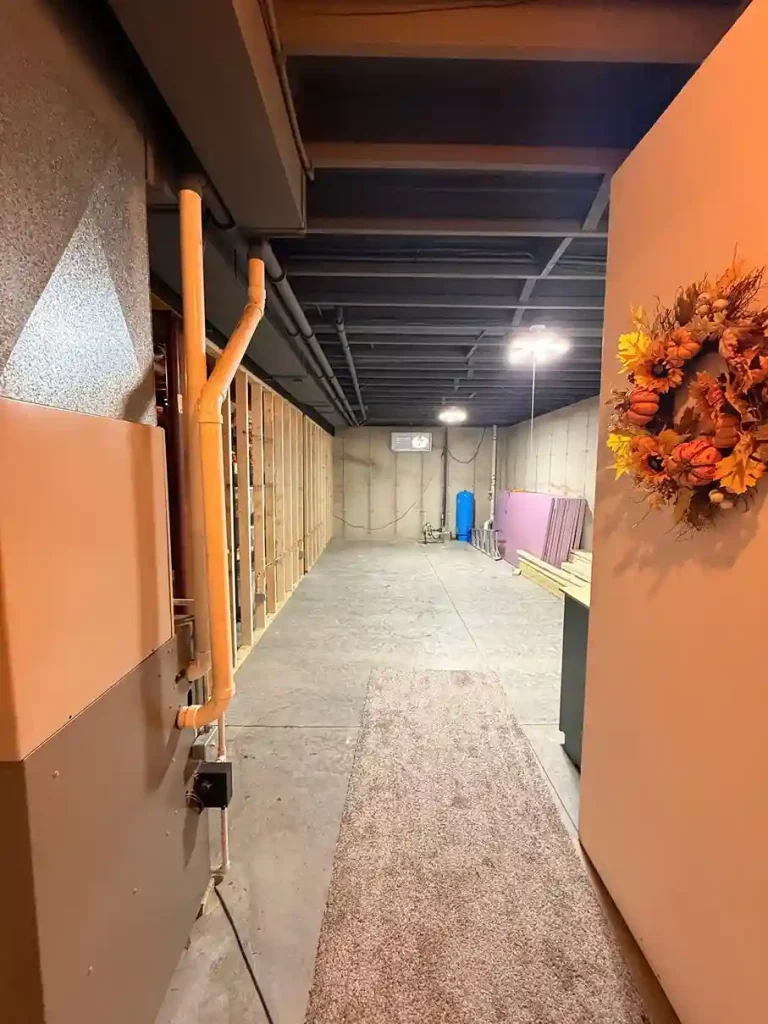
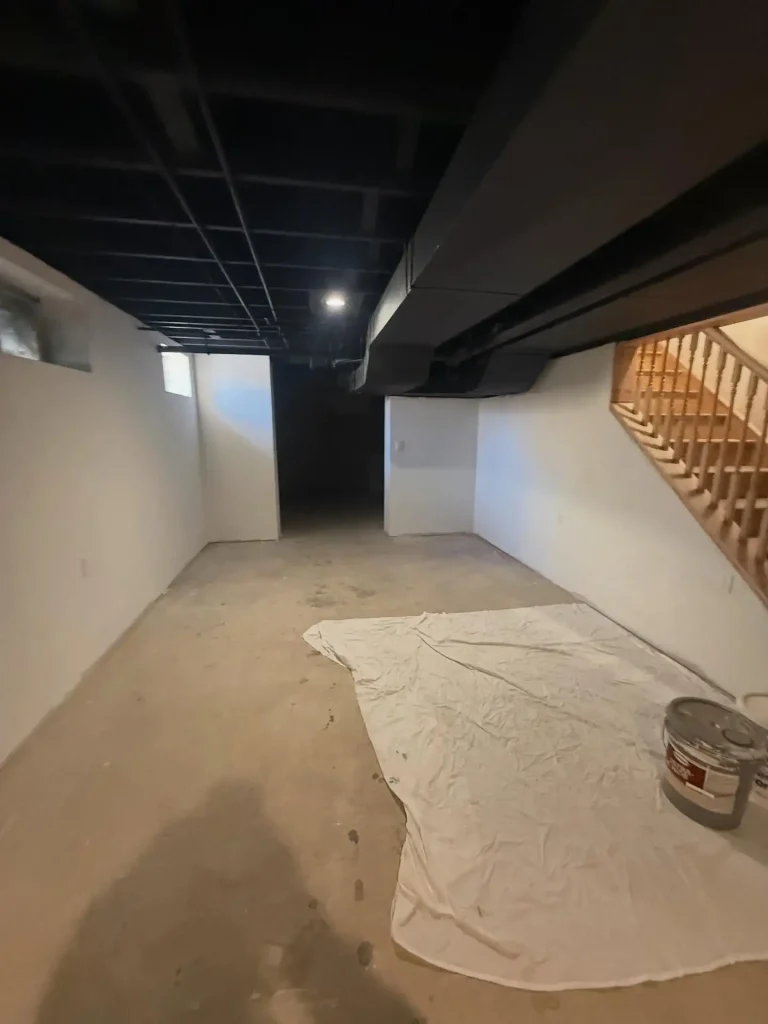
Before the exposed ceiling treatment, a typical basement with a drop ceiling feels low, dark, and institutional. The ceiling tiles are often stained, sagging, and visually oppressive. The space underneath feels like a utilitarian afterthought rather than a genuine living area.
source: @jjmfg_contracting
After the exposed ceiling treatment, the same basement often feels twice as tall. The consistent dark paint color creates a unified overhead composition with genuine architectural character. The lighting, now thoughtfully designed and installed directly into the joist structure, creates a warm and inviting atmosphere. The entire space feels purposeful, cool, and genuinely worth spending time in. The transformation is real, meaningful, and achieved at a fraction of the cost of any alternative ceiling approach.
| Before Exposed Ceiling | After Exposed Ceiling |
| Low oppressive drop ceiling tiles | Full ceiling height, open and dramatic |
| Stained or sagging tiles visible | Unified clean painted composition |
| Institutional basement feeling | Industrial character, genuine cool factor |
| Poor lighting on ceiling grid | Thoughtful integrated lighting design |
| Expensive renovation needed | Dramatic result at minimal paint cost |
Frequently Asked Questions About Exposed Basement Ceilings
Q1: Is an exposed basement ceiling a good idea?
An exposed basement ceiling is an excellent idea for many homeowners and basement uses. It saves significant money compared to finished ceiling alternatives, preserves maximum ceiling height, keeps all mechanical systems accessible for maintenance, and delivers a genuinely cool industrial aesthetic that suits casual, recreational, and creative basement uses beautifully. It suits home gyms, home theaters, home bars, rec rooms, workshops, and creative studios particularly well. It is less ideal for formal living spaces and bedrooms where a more residential ceiling finish is preferable.
Q2: What is the best color to paint an exposed basement ceiling?
Matte black is consistently the most successful and most popular color for an exposed basement ceiling. It unifies all the disparate elements overhead into a single cohesive composition, makes the ceiling appear to recede upward creating a greater sense of height, hides any remaining imperfections in the coverage, and creates a high-contrast backdrop that makes any lighting fixtures installed in the ceiling look dramatic and intentional. Flat white is the second most popular choice for basements where maximum brightness is the priority. Both should always be applied in a flat or matte finish, never glossy or satin.
Q3: How much does it cost to paint an exposed basement ceiling?
The material cost for painting an exposed basement ceiling is primarily the cost of paint and any primer needed. A typical one thousand square foot basement ceiling requires approximately three to five gallons of paint for two coats, costing fifty to one hundred and fifty dollars in materials. If using a spray painter, rental costs add another sixty to one hundred dollars for a day. Professional painting of an exposed basement ceiling typically costs five hundred to fifteen hundred dollars in labor depending on the complexity of the ceiling and local labor rates. Total DIY cost is typically one hundred to three hundred dollars. This compares to three thousand to fifteen thousand dollars for finished ceiling alternatives.
Q4: Do I need a permit to expose my basement ceiling?
In most jurisdictions, simply painting an existing exposed basement ceiling requires no permit. However, if your renovation involves removing an existing finished ceiling, rerouting or modifying any mechanical systems, adding new electrical circuits or fixtures, or changing the use of the basement in ways that affect egress or fire safety requirements, a permit is very likely required. Basement bedrooms have specific code requirements that an exposed ceiling typically cannot meet. Always contact your local building department before starting any basement renovation project to confirm what permits are required in your specific location and jurisdiction.
Q5: How do I make an exposed basement ceiling look good?
Making an exposed basement ceiling look genuinely good requires three things above all others. First, thorough preparation before painting, which means organizing all wiring neatly against the joists, securing all loose pipes, removing any abandoned mechanical elements, and cleaning every surface thoroughly. Second, using the right paint in a flat or matte finish applied in two full coats for complete and even coverage across all elements. Third, designing the lighting as an integral part of the ceiling rather than as an afterthought. Track lighting, pendant lights, LED strips, and recessed fixtures all work beautifully with exposed ceilings when planned deliberately. These three elements together consistently produce a result that looks intentional, professional, and genuinely impressive.
Conclusion
An exposed basement ceiling is one of the most honest, characterful, and cost-effective design choices available to any homeowner finishing or renovating a basement space. It embraces the true nature of the structure rather than hiding it behind conventional finishes.
It saves thousands of dollars that can be redirected into better flooring, lighting, furnishings, and the details that make a basement space genuinely beautiful and enjoyable.
It preserves every inch of ceiling height that the basement has to offer. And when executed with proper preparation, the right paint, and thoughtful lighting, it produces a result that looks deliberately designed, unmistakably cool, and genuinely impressive.
The 30 ideas and principles in this guide give you everything you need to plan, prepare, execute, and style an exposed basement ceiling that transforms your basement completely.
Start with the preparation, commit to the right paint color for your space, plan your lighting deliberately, and then stand back and enjoy the transformation. Your basement is about to become the most surprising and most admired room in your entire home. HomeFixTrends is here to inspire and guide every step of your home improvement journey. See ideas for small apartment to decorate it well.