
Your supplies are scattered everywhere. The dining table doubles as a craft station. Nothing has a proper home. You lose tools constantly and creativity suffers because of it.
A dedicated craft room fixes all of that. It gives every supply a place. It keeps creativity flowing without the chaos. These 26 craft room ideas help you design a craft room that truly works.

Wallpaper Backed Built Ins With Dowel Rod Storage
Craft rooms live or die on storage, and this one hides a smart trick behind a pretty face.

The shelving unit has a patterned wallpaper backing that adds warmth and color without paint.
Below the open shelves, dowel rods run across a section of the wall, holding rolls of paper and vinyl at eye level so you can see what you have.
A long counter runs underneath with drawers and cabinets for the rest.
Blue Built In Shelves With Yarn and Paper Storage

A wall of built in shelves painted the same blue as the walls blends into the room instead of shouting for attention. Books, framed art, and a few sculptural pieces share space with real craft supplies.
Baskets and wooden bowls hold yarn and fabric at the bottom, which keeps the pretty things high and the heavy things low. A floral rug and dark wood floor warm up all that blue.
Choose the Right Worktable for Your Craft
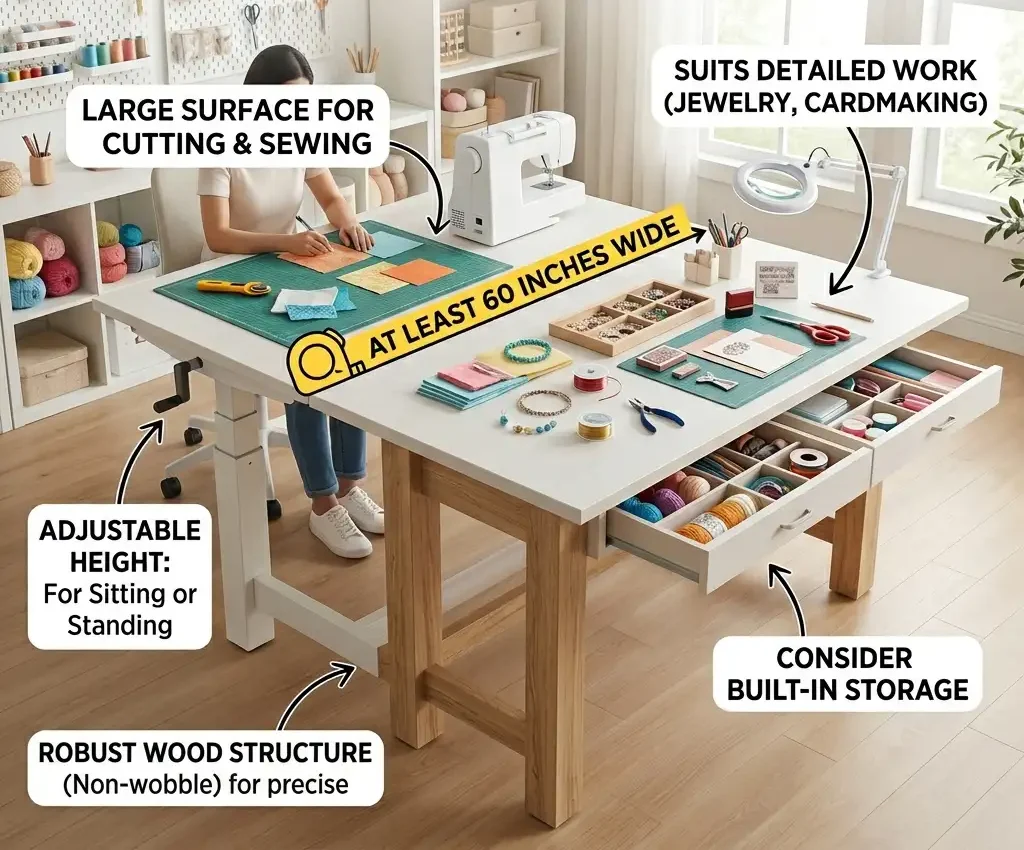
Worktable size matters more than most people think.
A surface under 60 inches wide gets crowded fast once a cutting mat, a sewing machine, and a tray of tools are all out at once. Look for a table that is solid enough not to wobble when you press down with a rotary cutter.
Adjustable height is a bonus if you switch between sitting and standing. Built in drawers help, but only if they are shallow enough to actually find things in.
For complete craft room storage inspiration, explore these craft room storage ideas covering every organisational approach for any size craft space.
Closet Nook Pegboard Wall With Color Coded Bins
A closet that nobody uses is one of the best craft rooms waiting to happen.

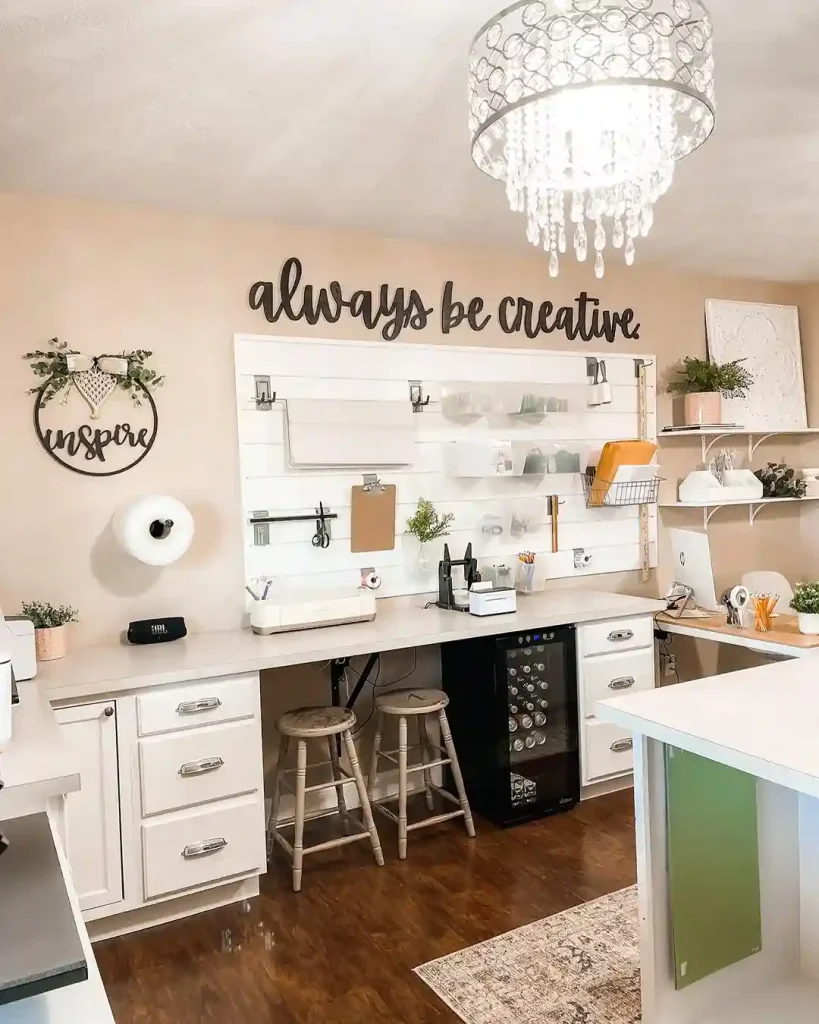
This one drops a slim desk into the opening and covers the back wall with pegboard and dotted wallpaper.
Above the desk, two shelves hold white boxes and plastic bins sorted by color, with pink, orange, and yellow doing the heavy lifting.
Pegboard hooks below keep tape, pens, and small tools off the surface and in plain sight.
Use Open Shelving to Display Supplies as Decor
Craft supplies are beautiful. Coloured thread, ribbon, paper, and yarn all look stunning on open shelves. Display them proudly instead of hiding them in drawers.

Arrange supplies by colour for a visually striking effect. The rainbow organisation method is popular and genuinely useful. It also makes finding the right colour instantly easy.
Open shelving keeps inspiration constantly visible. Seeing your supplies reminds you to create. A beautiful supply display motivates daily crafting.
Full Wall Fabric Cubby With Color Blocked Stacks
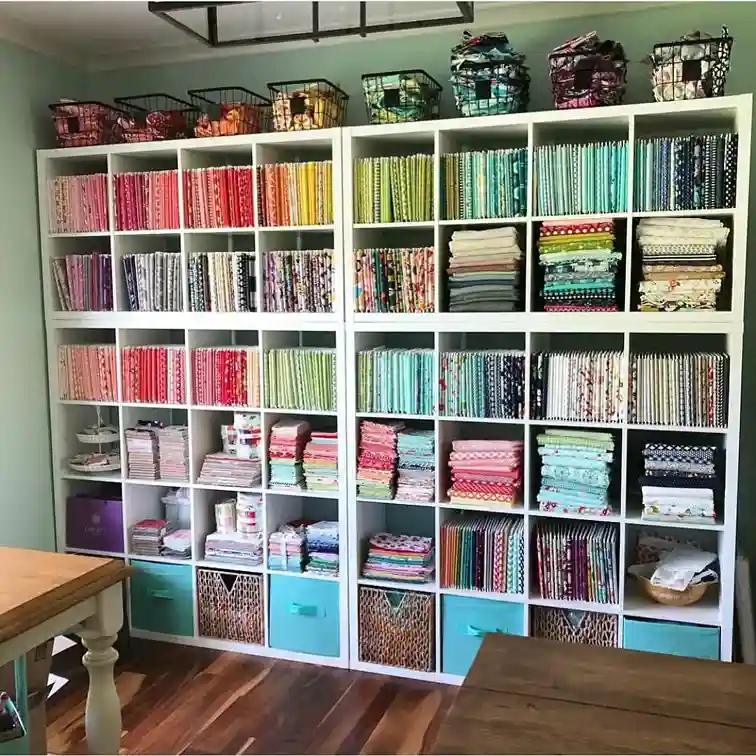
If fabric is your main supply, give it a full wall. This cubby unit has dozens of small squares, and each one holds folded fabric standing upright so you can flip through it like records.
The stacks are grouped by color and print, which turns storage into a display. Wire baskets sit on top for scraps and offcuts, and the bottom row uses bins and drawers for tools that do not need to be seen.
Folding fabric upright in small cubbies means you can see every print without pulling the whole stack apart.
Install Good Lighting Throughout
Poor lighting ruins craft work. It causes eye strain and colour distortion. Good lighting makes every project easier and more accurate.
Use daylight-spectrum bulbs throughout the room. They show true colours without warm or cool distortion. A 5000 Kelvin bulb is ideal for craft spaces.
Add a dedicated task lamp directly above the main worktable. Adjustable arm lamps direct light exactly where it is needed. Good lighting is a productivity investment, not a luxury.
Create a Vintage Craft Room Aesthetic
A vintage craft room feels warm, inspiring, and deeply personal. Old furniture, antique tins, and found objects create layers of character. Nothing feels sterile or corporate.
Use a painted dresser as supply storage. Old mason jars hold brushes and scissors beautifully. Lace, doilies, and floral prints complete the vintage atmosphere.
Warm Corner Desk With an Inspiration Board

Not every craft room needs a whole wall of storage. This corner uses a small desk tucked next to an antique armoire, with a cork board covered in swatches, notes, and photos.
A brass lamp lights the work area, and a soft rattan chair with a corduroy cushion turns a tight corner into a place you actually want to sit. Amber curtains cut glare in the afternoon and warm the whole space after dark.
For complete vintage craft room inspiration, these vintage craft room ideas cover every element of creating a beautifully nostalgic creative space.
Add a Cutting Mat and Rotary Cutter Station
A dedicated cutting station saves enormous time. A self-healing cutting mat protects the table surface. A rotary cutter produces perfectly straight cuts consistently.
Mount a mat directly to the table surface with non-slip backing. Keep rulers, rotary cutters, and scissors within immediate reach. A cutting station that is always ready encourages daily use.

Add a small wall-mounted ruler holder beside the cutting area. All rulers stay visible and accessible. The cutting zone becomes the most efficient area in the room.
Use a Rolling Cart for Mobile Storage
A rolling cart adds flexible storage that moves wherever you need it. Pull it beside the table during a project. Roll it away when finished.

Design a Sewing Corner Within the Craft Room
A dedicated sewing corner organises all sewing supplies in one zone. The sewing machine sits permanently ready for use. No setup or teardown is needed for each session.
Store thread on a wall-mounted thread rack beside the machine. Keep scissors, pins, and measuring tools in a small caddy on the table. A good sewing corner makes starting a project effortless.
Sewing Station With Thread on Wall Rails

A sewing corner works better when thread lives on the wall instead of in a drawer. This setup uses a wooden rail system with rows of pegs, sorted light to dark so you can find a match at a glance.
The sewing machine sits on a solid wood table at the window, with a cutting mat on the right side for trimming. A small swing arm lamp clips to the table for close work. A tin bucket holds scissors and marking tools, and the chair tucks all the way in when you are done.
Matching Binder Wall With Year Labels

Paper clutter is the hardest thing to tame in a craft room, and binders solve it better than boxes. This build uses two matching white bookcases turned into a binder wall, with each spine labeled by year or category.
Decorative baskets and small plants break up the rows so the shelves do not look like an office. The best part is the top shelf, which holds framed photos, a wooden cubby, and a few small pieces that make the wall feel personal.
1. One binder per year or per project type.
2. Label the spine, not the front cover, so you can read it standing up.
3. Line them up left to right in date order, newest closest to your work area.
Yarn Wall Made From Cube Storage

For knitters and crocheters, yarn takes over fast. This craft room uses a full wall of clear cube storage, and every cube is packed with yarn sorted by color.
The clear fronts mean you can see every skein without opening a bin. The wall is painted deep teal, which makes the yarn colors read bright against it. Wall mounted pegs on the right hold extra cones and specialty yarn.
A slim desk and drawers keep the floor plan open.
Pink Craft Room With Floral Wall Decor
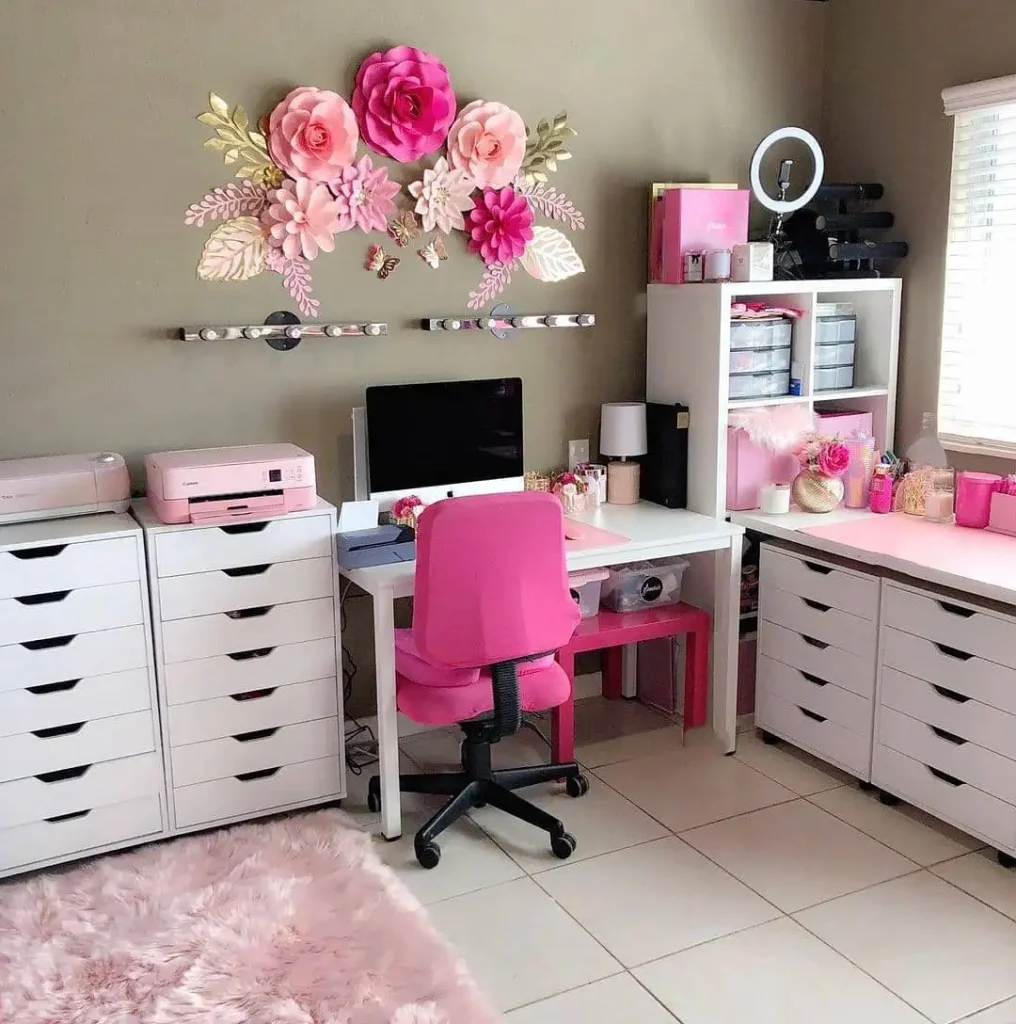
A bold color scheme can carry a whole room if you commit to it. This setup uses white drawer units and a white desk as a base, then layers pink in through the chair, the rug, the printers, and the wall flowers.
The paper floral arrangement above the desk adds height and texture without a shelf. A ring light on the side cabinet hints that this space doubles as a content studio.
Rolling drawer carts tuck under both sides of the desk.
⚠️ Watch Out
Paper floral decor near a heat source or bright window can fade fast. Keep it away from direct sun if you want the color to hold.
For painted ceiling and wall colour inspiration that transforms any creative room, explore these painted ceiling ideas for colour approaches that make craft rooms feel special and designed.
Use a Bookshelf as a Room Divider
A tall bookshelf placed perpendicular to a wall divides a larger room into a craft zone. It creates enclosure without building a wall. The division makes the craft space feel dedicated and private.

Fill the shelves with supplies on the craft room side. Use the back of the shelving unit for a small desk or storage area. A bookshelf divider adds significant storage while creating valuable spatial definition.
- Place the shelf perpendicular to the longest wall for best division
- Secure tall shelves to the wall to prevent tipping hazards
- Use the room-facing side for attractive book and decor display
- Keep the craft-facing side for functional organised storage
- A divider creates a psychological shift into “creative work mode”
Add a Comfortable Chair for Planning and Inspiration
Every craft room needs a comfortable chair. It is where you plan projects, read patterns, and find inspiration. A chair transforms the craft room from a workspace into a creative sanctuary.

Choose a chair that supports your back for extended sitting. Add a small side table beside it for a drink and a notebook. A floor lamp provides reading light without overhead glare.
A comfortable chair also makes the room more inviting. You will spend more time in the space when it feels genuinely pleasant. More time in the space means more creating.
Organise Small Supplies in Clear Containers
Small supplies disappear in large containers. Tiny buttons, beads, sequins, and findings need dedicated small containers. Clear containers allow immediate visual identification of contents.

Stack small containers in drawer units or on shelves. Label every container clearly on the front and top. A label maker produces professional-looking labels quickly and affordably.
Create a Dedicated Wrapping and Ribbon Station
A gift wrapping and ribbon station makes wrapping gifts a genuinely enjoyable activity. Rolls of ribbon stored on a dowel rod allow easy length cutting. Wrapping paper stands upright in a tall bin or mounted holder.
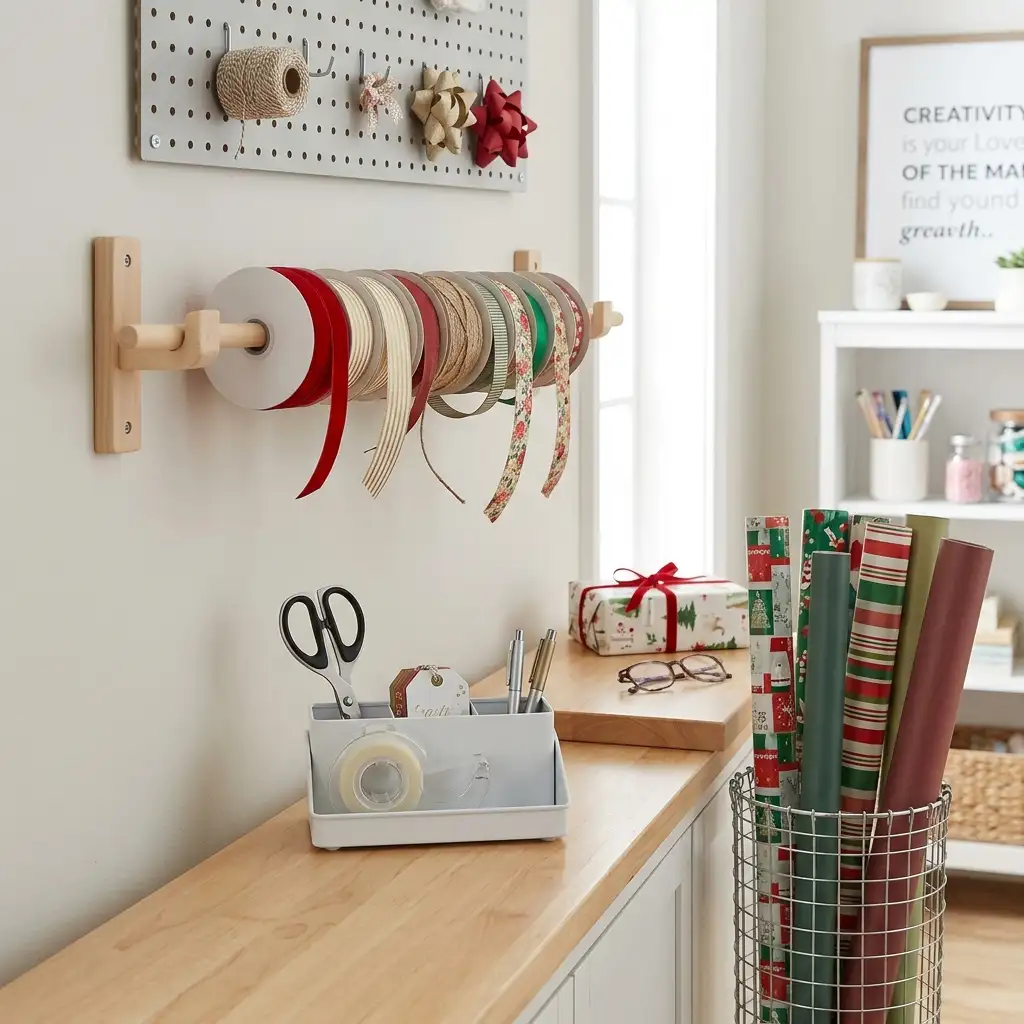
Mount a wooden dowel rod horizontally between two wall brackets. Thread multiple ribbon rolls onto the rod. Pull the end of any ribbon and cut the length needed without removing the roll.
Add a small scissors, tape, and tag caddy beside the station. Everything needed for wrapping sits together in one place. A dedicated station means beautiful wrapping happens consistently rather than occasionally.
Design a Craft Room in a Small Space
A small craft room works beautifully with the right approach. Compact furniture, vertical storage, and smart organisation maximise every inch. A small dedicated space beats a large shared space every time.

A fold-down wall desk creates a full worktable that disappears when not in use. Wall-mounted shelving holds all supplies without consuming any floor space. A rolling cart provides mobile storage that tucks away easily.
For small space design strategies that maximise every square foot of a compact room, explore these small apartment ideas for techniques that apply directly to a small craft room setup.
Add a Pegboard Inspiration Board
An inspiration board beside the desk collects ideas, colour swatches, and project references. Pin magazine clippings, fabric samples, and project sketches to it. The board keeps creativity flowing and ideas accessible.
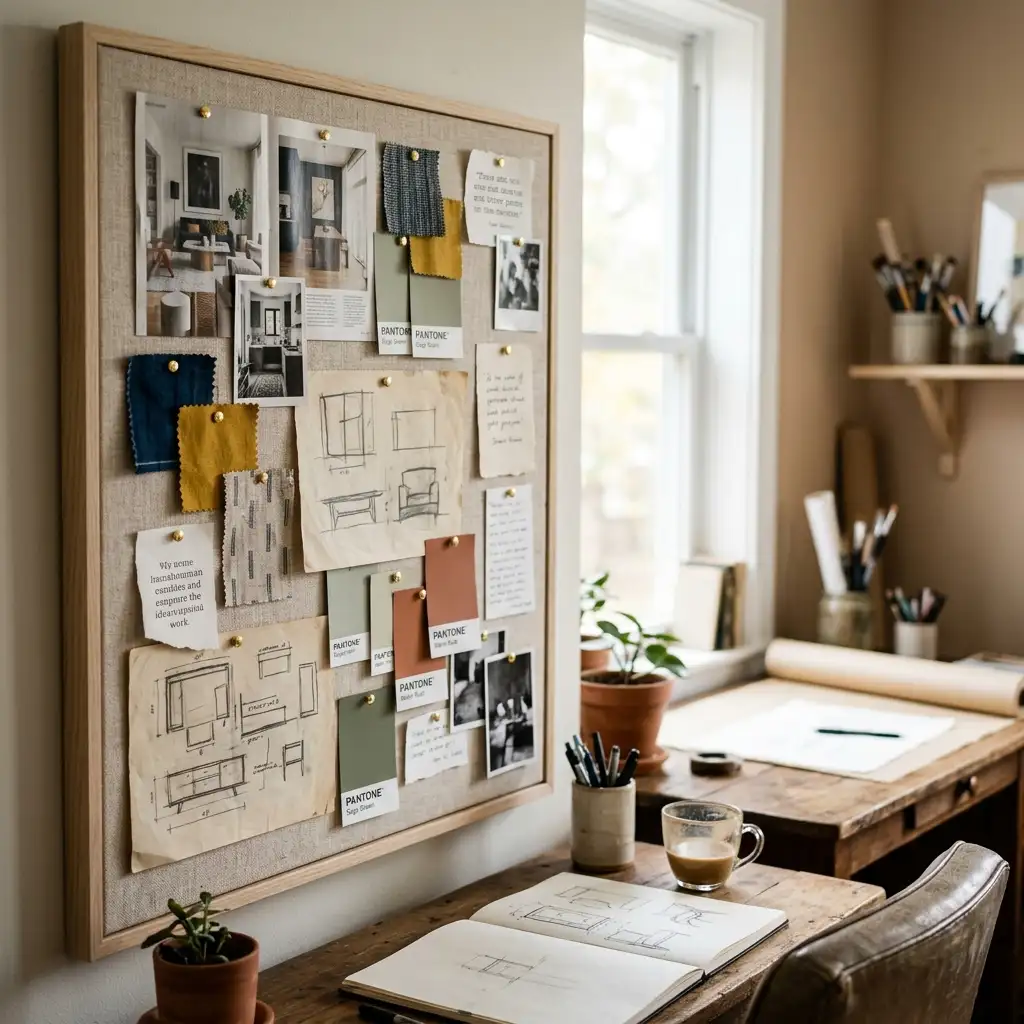
A framed corkboard works perfectly. Cover it with linen fabric for a softer, more attractive look. Pin items with brass pins for a more polished appearance.
Change the inspiration board contents regularly. Fresh images and ideas prevent creative stagnation. An active inspiration board reflects an active creative mind.
Install a Slanted Ceiling Craft Room
A slanted ceiling in a craft room creates a cosy, attic-like atmosphere. The angled walls add architectural character that flat ceilings lack. Many crafters find the enclosing feel deeply inspiring.
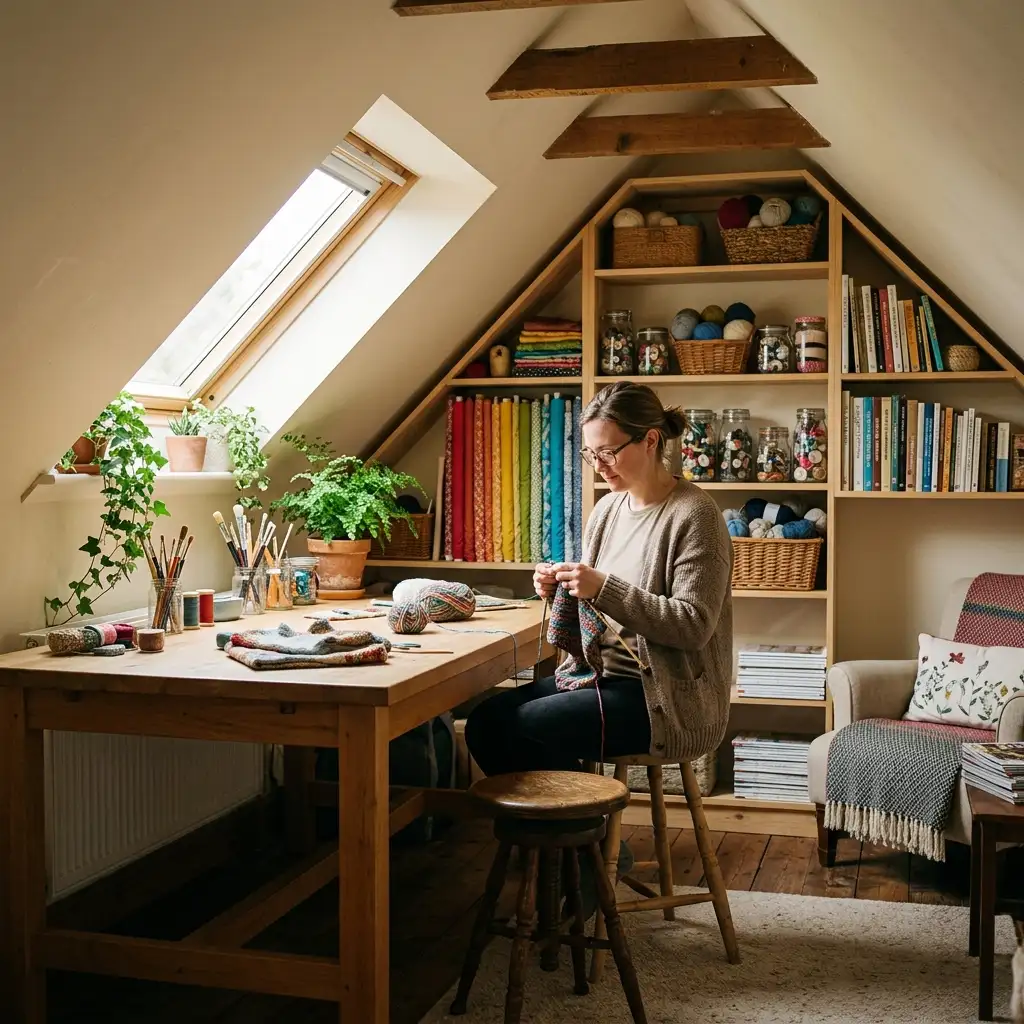
Use the lower ceiling sections for shelving and storage. Reserve the highest section for the main worktable where standing clearance is needed. The slanted ceiling creates natural zoning within the room.
For slanted ceiling design ideas that maximise the character and function of an angled room, these slanted ceiling bedroom ideas offer layout and storage approaches that translate directly to a craft room with a similar ceiling.
Create a Kid-Friendly Craft Corner
A craft corner designed for children needs durability, accessibility, and easy cleanup. Supplies must be reachable at child height. The surface must withstand paint, glue, and marker marks.
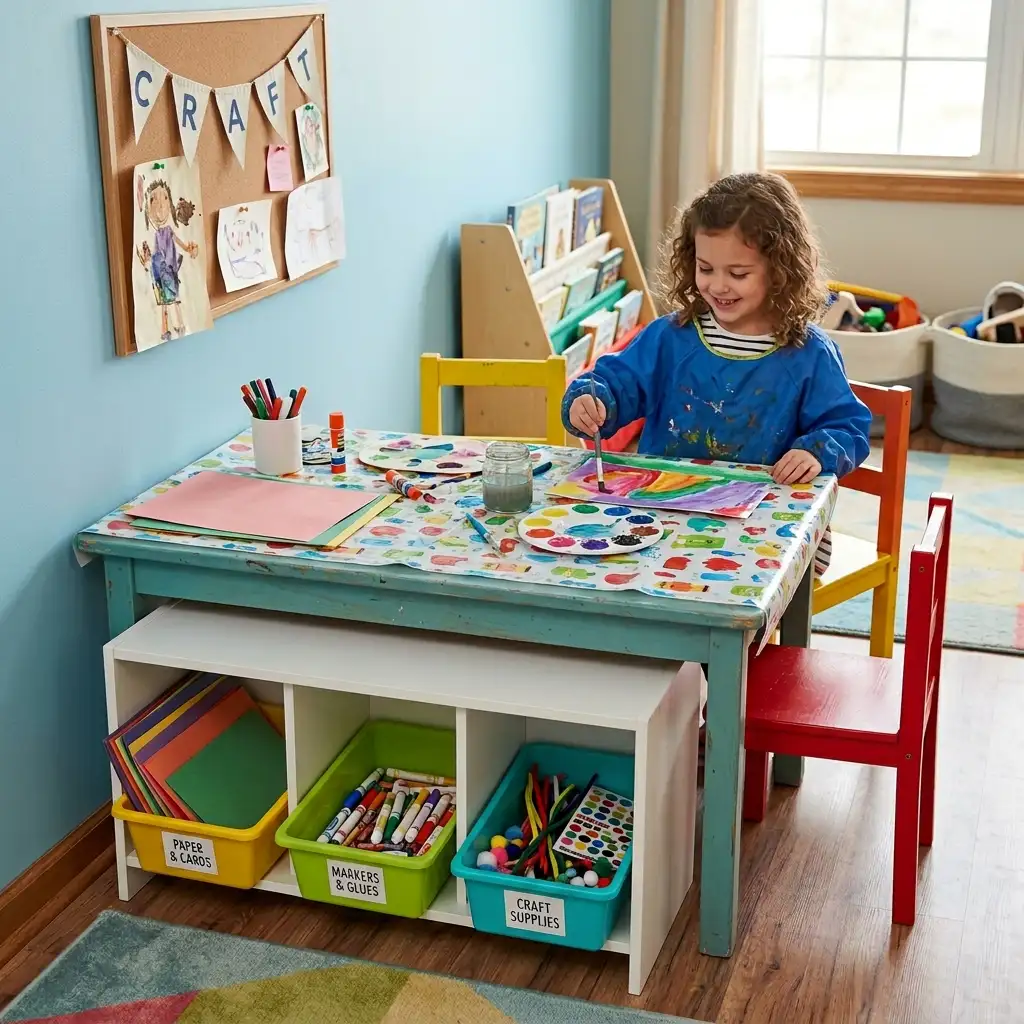
Use a low table suited to the child’s height. Store supplies in open bins at child level. A plastic tablecloth over the work surface makes cleanup effortless.
- Keep child craft supplies separate from adult supplies
- Use non-toxic, washable supplies in the children’s zone
- Label bins with pictures for pre-reading children
- A small step stool accesses higher shelves safely
- Washable wall paint in the craft corner handles inevitable marks
Use a Hobby Room Design Approach
A craft room designed with a full hobby room approach supports multiple creative disciplines simultaneously. Sewing, painting, and papercrafting all coexist in a well-planned hobby room. The key is dedicated zones for each discipline.
Each craft zone has its own storage, lighting, and workspace. Moving between zones requires no major reorganisation. Multiple creative interests are supported without compromise.
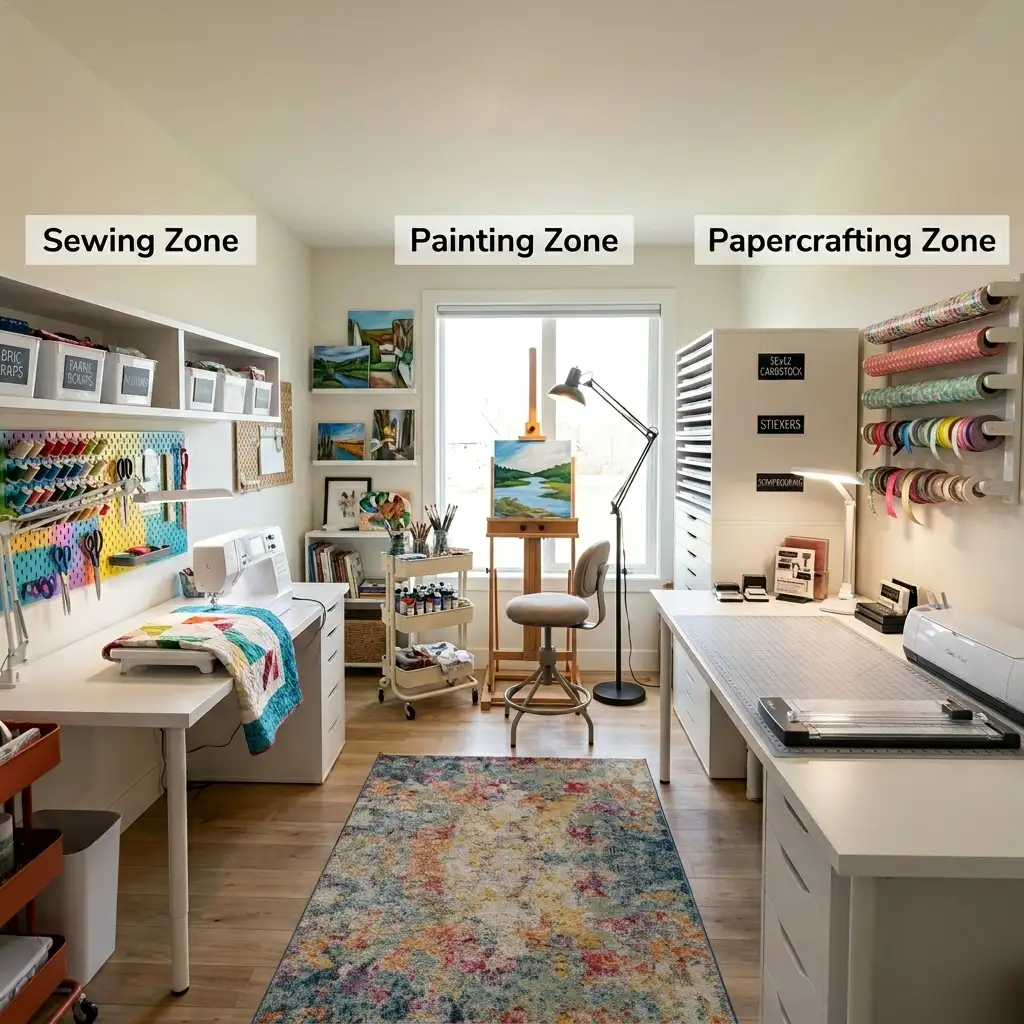
For complete hobby room design ideas covering multi-discipline creative spaces, explore these hobby room design ideas for layouts and organisation systems that support every creative interest in one room.
| Hobby Zone | Minimum Size | Essential Furniture | Storage Priority |
|---|---|---|---|
| Sewing zone | 6×8 ft | Sewing table, ironing board | Thread, fabric |
| Painting zone | 6×6 ft | Easel or wide desk | Paints, brushes |
| Paper crafting zone | 5×6 ft | Wide flat desk | Paper, adhesives |
| General craft zone | 4×6 ft | Worktable | Mixed supplies |
Add a Sink to the Craft Room
A sink in the craft room is one of the most practical upgrades possible. Paint cleanup, glue removal, and dye rinsing happen without leaving the room. The sink saves countless trips to the bathroom or kitchen.

A simple utility sink costs $80–$150 and installs in a cabinet base. Connect it to existing plumbing if the craft room sits near the bathroom or kitchen. A sink transforms a craft room into a genuinely professional creative studio.
Add a small counter beside the sink for wet project staging. A drying rack mounted above the sink drips onto the counter rather than the floor. The sink area becomes the most practical zone in the entire room.
Design the Craft Room Around Natural Light
Natural light is the best light for craft work. It shows true colours without distortion. It reduces eye strain during long creative sessions.
Position the main worktable directly in front of or beside the main window. Morning light from an east-facing window is ideal for most craft work. Avoid positioning the table where direct sunlight creates screen glare or shadow.

Add a sheer curtain to diffuse harsh direct sunlight without blocking it. The diffused light creates even, shadow-free illumination across the work surface. Natural light combined with good artificial lighting creates the ideal craft room lighting environment.
Keep the Craft Room Organised With a Regular Tidying Routine
An organised craft room is more inspiring than a cluttered one. A consistent tidying routine maintains the organisation that took effort to create. Even fifteen minutes of tidying after each session makes a significant difference.
Return every supply to its designated place after each use. Clear the work surface completely before leaving the room. A clean surface at the start of each session reduces the barrier to beginning a new project.

Review and reorganise the craft room every three to six months. Remove supplies you no longer use and make space for new interests. An evolving craft room that reflects your current creative passions always feels fresh and inspiring.
| Tidying Task | Frequency | Time Required | Impact |
|---|---|---|---|
| Clear work surface | After every session | 5 minutes | Very High |
| Return supplies to place | After every session | 10 minutes | Very High |
| Wipe down surfaces | Weekly | 10 minutes | High |
| Reorganise one zone | Monthly | 30 minutes | High |
| Full room review | Every 6 months | 2–3 hours | Very High |
Frequently Asked Questions (FAQs)
Q1: How do I organise a craft room on a small budget?
Start with pegboards, clear bins, and labelled containers — all available for very little. IKEA KALLAX shelving units offer excellent storage at low cost. Repurpose old furniture with paint and new hardware. Free printable labels and DIY organisation solutions stretch any craft room budget significantly.
Q2: What is the most important piece of furniture in a craft room?
The worktable is the most important piece. It must suit the specific crafts you do most. It needs adequate surface area, a stable non-wobble construction, and the right height for comfortable sitting or standing work. Everything else in the room supports what happens on that table.
Q3: How much space do I need for a craft room?
A functional craft room works in as little as a 6×8 foot spare room or a large closet. A comfortable craft room needs 10×10 feet or more for multiple zones. Even a dedicated corner of a larger room with the right storage creates a proper crafting space when floor space is genuinely limited.
Q4: How do I stop my craft room from becoming cluttered?
Return every item to its designated home after each use. Purge unused supplies regularly. Follow the one-in-one-out rule for new purchases. A place for everything and everything in its place is the only system that permanently prevents craft room clutter from accumulating.
Q5: What lighting is best for a craft room?
Daylight-spectrum LED bulbs at 5000 Kelvin colour temperature show the most accurate colours for craft work. Combine an overhead ceiling fixture with a dedicated adjustable task lamp above the worktable. Natural light from a nearby window is ideal as the primary light source during daytime crafting sessions.
Conclusion
A craft room works when the room follows the craft, not the other way around. Fabric needs cubbies you can flip through. Thread needs a rail at eye level. Paper needs binders with labels. Vinyl needs a dowel rod, not a drawer.
Start with the one supply that causes you the most daily friction. Give it a dedicated home that you can see and reach without moving anything else. That single fix usually changes how the whole room feels.
Save this to your craft room ideas board so it is ready when you plan your next refresh.