
Learn how to plan a perfect kitchen layout using the Work Triangle Method in 2026. Discover expert tips, layout types, distance guidelines, cost breakdowns, and where to shop across the U.S. for your dream kitchen.
The kitchen is the heart of every American home. It’s where morning coffee gets brewed before the school run, where family dinners come together on a weeknight, and where holiday meals turn into lifelong memories. But here’s the truth most homeowners in cities like Chicago, Phoenix, and Los Angeles don’t realize until after a remodel: a kitchen that looks beautiful but functions poorly will frustrate you every single day.
That’s exactly why kitchen layout planning matters more than countertop colors, cabinet styles, or appliance brands. And at the center of every well-planned kitchen is one of the most time-tested principles in interior design history — the Kitchen Work Triangle Method.
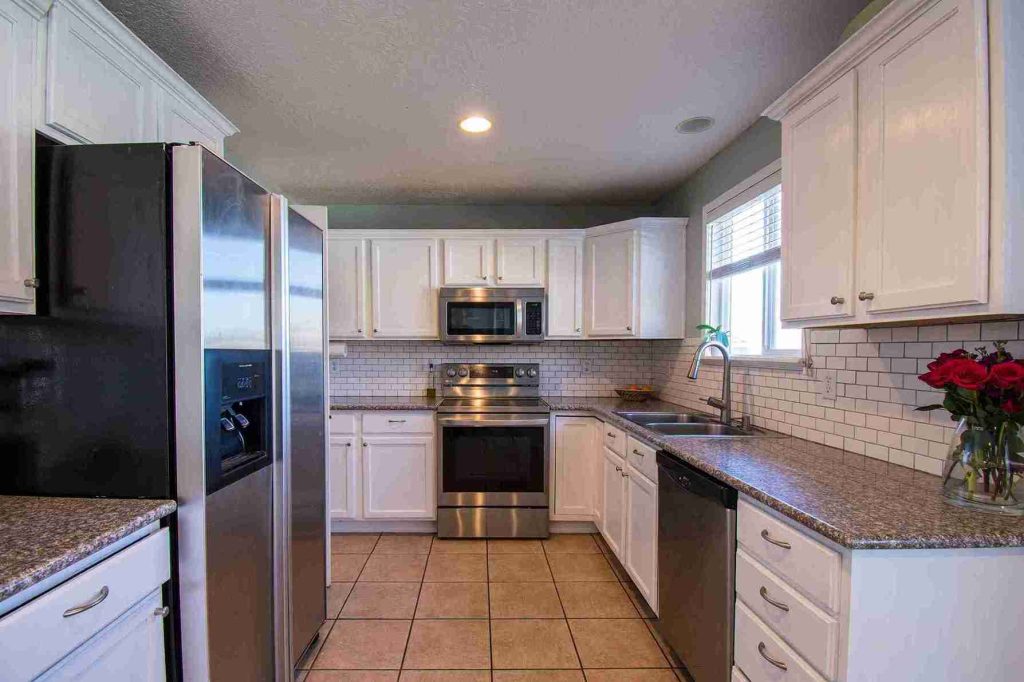
This 2026 guide breaks it all down. Whether you’re starting a full kitchen renovation, reconfiguring your existing space, or simply trying to understand why your current kitchen feels awkward to work in, this is the most complete, practical kitchen layout guide you’ll find.
What Is the Kitchen Work Triangle Method?
The Kitchen Work Triangle is a design principle developed by researchers at the University of Illinois School of Architecture in the 1940s. The concept is elegantly simple: the three most-used stations in any kitchen — the sink, the stove (or cooktop), and the refrigerator — should form a triangle that allows the cook to move efficiently between all three.
These three points are called the primary work zones, and the distance between them directly determines how efficient, comfortable, and enjoyable your kitchen is to work in every single day.
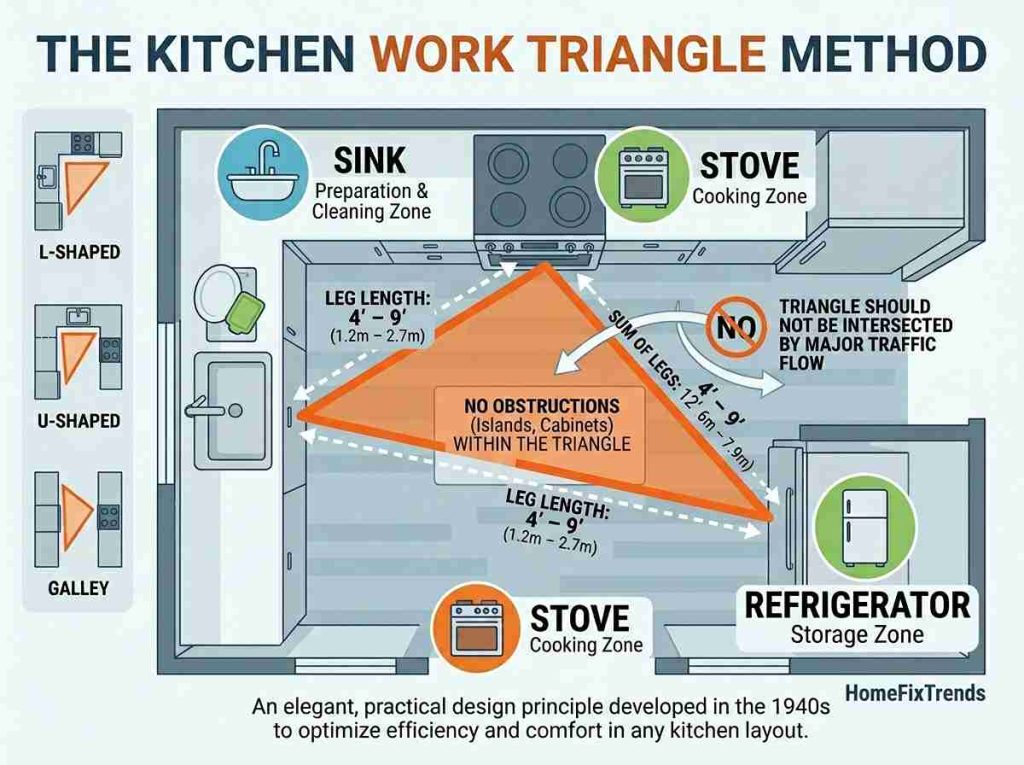
The Work Triangle isn’t just interior design theory. It’s a practical, measurable framework that professional kitchen designers, architects, and contractors across the United States use as the starting point for virtually every kitchen layout — from compact galley kitchens in New York City apartments to sprawling open-plan kitchens in Denver suburban homes.
Why the Kitchen Work Triangle Still Matters in 2026
You might be wondering — is a design principle from the 1940s still relevant in 2026? Absolutely. In fact, it’s more relevant than ever.
Modern kitchens have grown more complex. Open floor plans, kitchen islands, double ovens, beverage stations, and smart appliances have all added new variables. But the fundamental truth hasn’t changed: the more efficiently a cook can move between the sink, stove, and refrigerator, the less time and energy is wasted during meal preparation.
According to the National Kitchen and Bath Association (NKBA), the kitchen is the most expensive room to renovate in the average American home, with remodels ranging from $15,000 to $150,000 depending on scope and location. That kind of investment makes it absolutely essential to get the layout right before the first cabinet is ordered or the first tile is laid.
A poorly planned kitchen layout doesn’t just feel annoying — it costs you time every single day. Studies in residential ergonomics show that a well-designed kitchen can reduce the time spent on meal preparation by up to 30% compared to an inefficiently laid out space. Over the course of a year, that adds up to dozens of hours returned to your life.
The Ideal Kitchen Work Triangle Dimensions
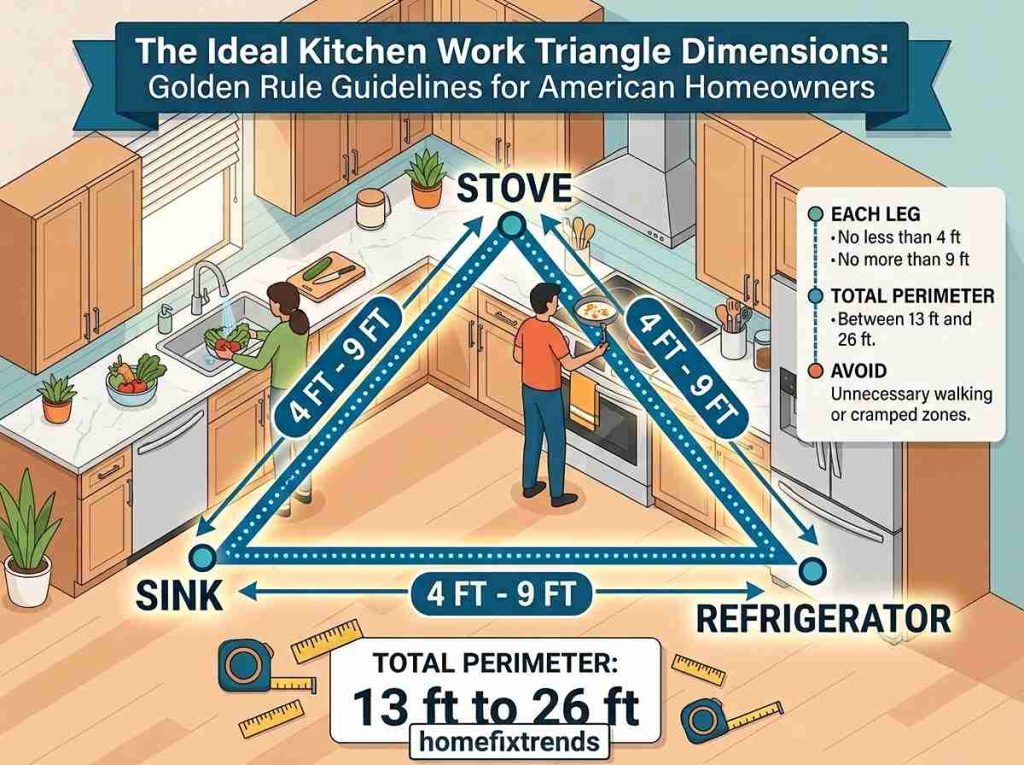
Not all triangles are created equal. The Work Triangle Method comes with specific measurements that define whether a kitchen layout is ergonomically efficient or not. Here’s what every American homeowner needs to know:
The Golden Rule of the Work Triangle:
- Each leg of the triangle (sink to stove, stove to refrigerator, refrigerator to sink) should be no less than 4 feet and no more than 9 feet
- The total perimeter of all three legs combined should fall between 13 and 26 feet
- No single leg should be so long that it requires unnecessary walking, or so short that the work zones feel cramped
Why these numbers?
- Under 13 feet total: The kitchen feels cramped. Cook and helper constantly bump into each other. Movement is restricted.
- Over 26 feet total: Too much walking between stations. Fatigue increases. Efficiency drops. This is common in poorly planned large kitchens in suburban homes across Phoenix and Denver.
- 13–26 feet: The sweet spot. The cook can take 2–4 steps between each station — enough room to work comfortably, not so much that every meal prep feels like a cardio session.
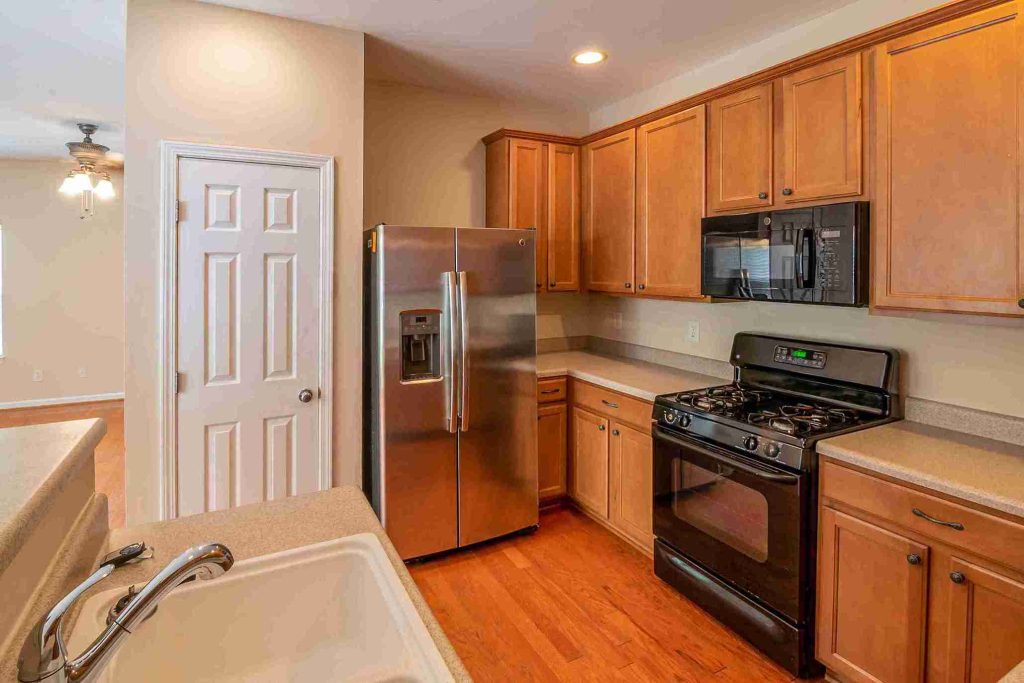
Pro Tip: Ideally, no traffic paths through the home — hallways, dining room walkways, or entry paths — should cross through the work triangle. This is especially important in open-plan kitchens, which are now the dominant layout style in American new construction.
The 5 Main Kitchen Layout Types Explained
The Work Triangle applies differently depending on the shape and layout of your kitchen. Understanding which layout type you have — or are planning — is the essential first step.
1. The Galley Kitchen Layout
A galley kitchen features two parallel countertop runs facing each other with a walkway in between. It’s one of the most space-efficient layouts ever designed and is extremely common in apartments across New York City, Chicago, and San Francisco, as well as older homes throughout the Northeast.
In a galley layout, the sink and stove typically sit on one wall, while the refrigerator sits on the opposite wall. The work triangle is naturally compact and efficient. The main challenge is ensuring the aisle between the two runs is at least 42 inches wide for a single cook and 48 inches wide if two people will regularly cook together.
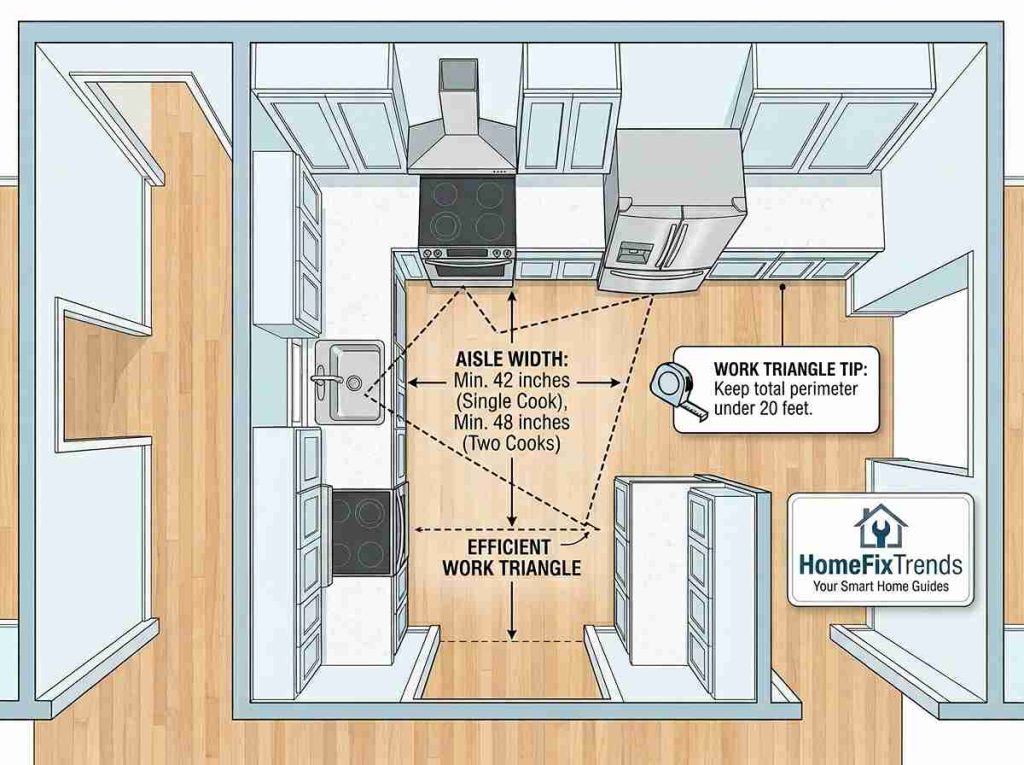
Work Triangle Tip for Galley Kitchens: Keep the total triangle perimeter under 20 feet. Galley kitchens that are too long become linear hallways rather than efficient cooking spaces.
2. The L-Shaped Kitchen Layout
The L-shaped layout uses two adjacent walls, with countertops and cabinets forming an “L” shape. It’s one of the most popular layouts in American homes, particularly in mid-sized homes across the Midwest, South, and Mountain West regions.
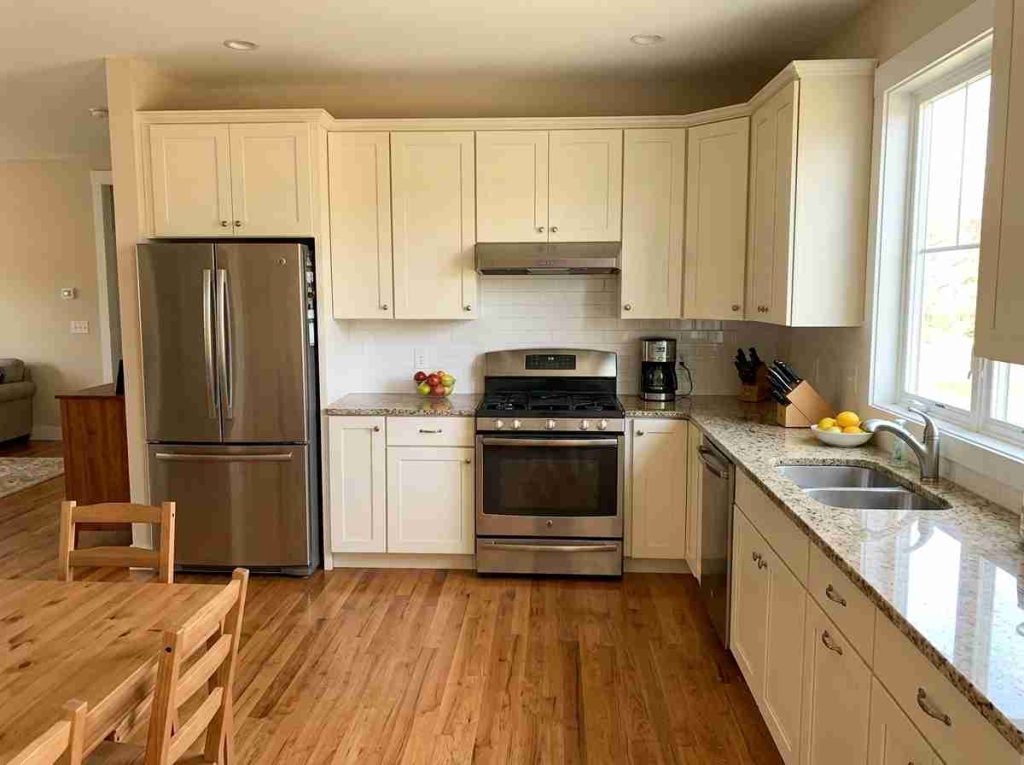
The L-shape naturally accommodates the work triangle well, with each of the three primary stations placed along the two walls. It also leaves the remaining floor space open for a dining table, kitchen island, or family seating area — making it ideal for open-plan living spaces.
Work Triangle Tip for L-Shaped Kitchens: Avoid placing the refrigerator at the very end of one leg of the “L.” This creates an overly long leg in the triangle. Instead, position it near the corner where the two walls meet to keep all three zones within comfortable reach.
3. The U-Shaped Kitchen Layout
The U-shaped layout uses three walls of cabinets and countertops, forming a “U” shape with an open end facing the dining area or living space. It’s the preferred choice for serious home cooks and is particularly popular in larger suburban homes in cities like Los Angeles, Denver, and Phoenix.
U-shaped kitchens offer the most counter space and storage of any layout type. The work triangle is naturally contained within the three walls, making it highly efficient. The main risk is creating a triangle that’s too small — especially in narrower U-shapes where the opposing walls are less than 5 feet apart. This layout is best for farmhouse kitchen where you have enough area.
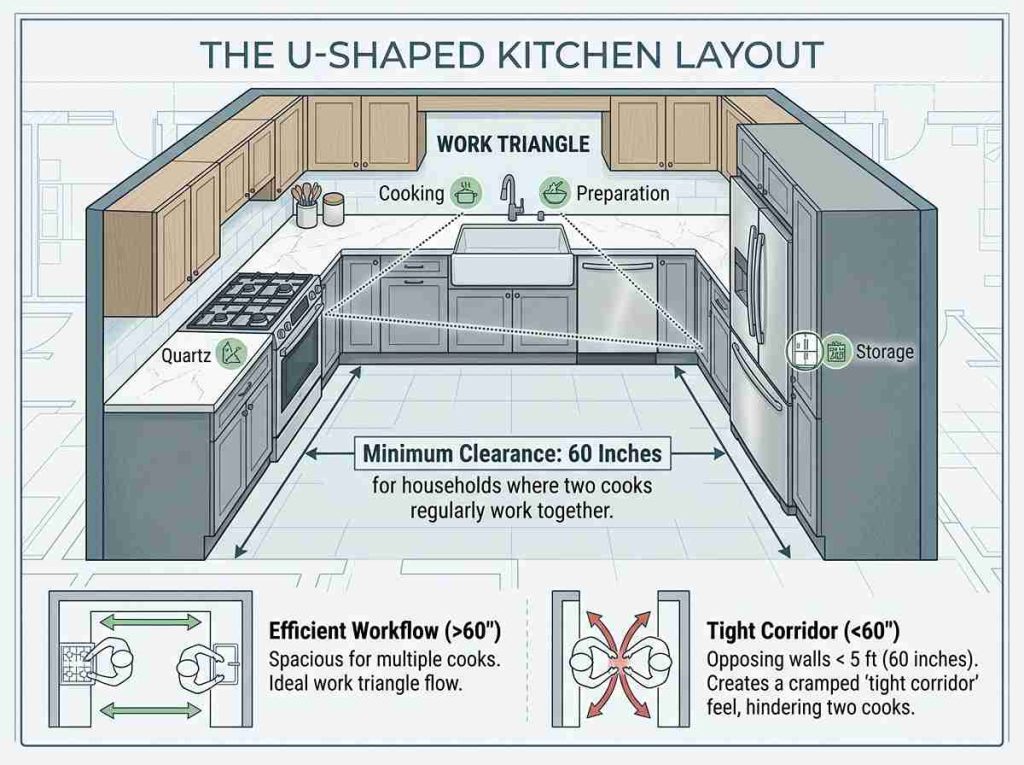
Work Triangle Tip for U-Shaped Kitchens: The minimum clearance between opposing countertops should be 60 inches for households where two cooks regularly work together. Below this, the kitchen feels like a tight corridor rather than a functional workspace.
4. The One-Wall Kitchen Layout
Also called a single-wall or Pullman kitchen, this layout arranges all cabinets, appliances, and countertops along a single wall. It’s most common in studio apartments, tiny homes, and loft spaces in cities like Seattle-Tacoma, San Francisco, and New York.
Technically, a one-wall kitchen doesn’t form a true triangle — all three work zones are arranged in a straight line. The goal here is to minimize the total distance between all three stations while maintaining enough countertop workspace between each one.
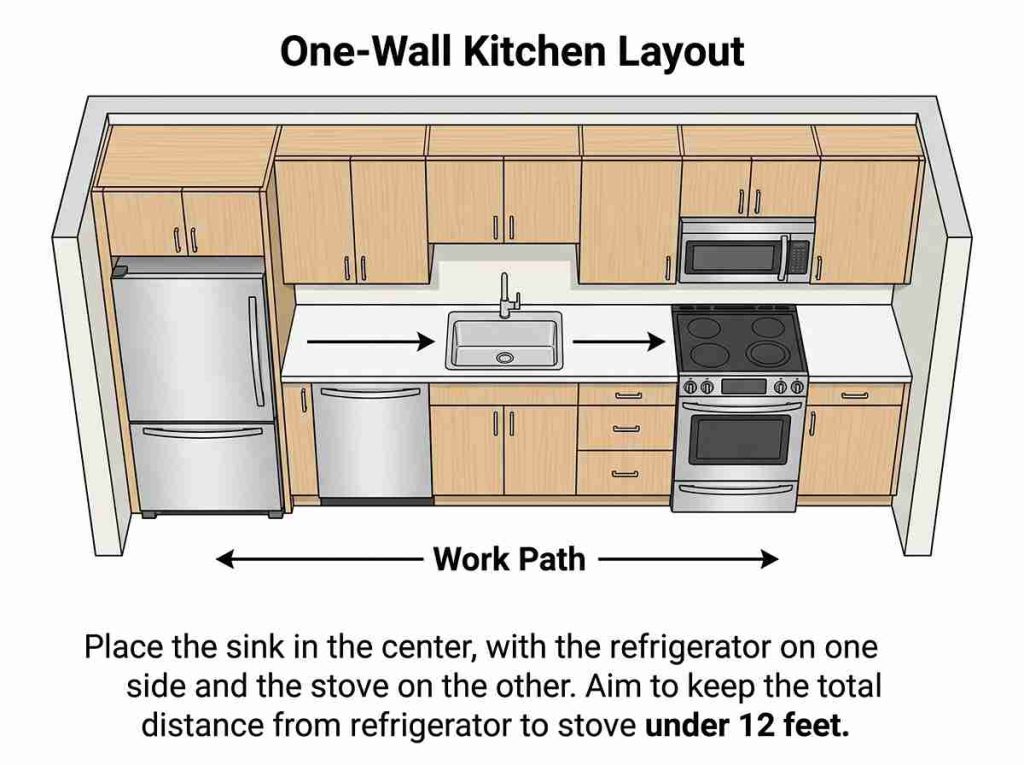
Work Triangle Adaptation for One-Wall Kitchens: Place the sink in the center, with the refrigerator on one side and the stove on the other. Aim to keep the total distance from refrigerator to stove under 12 feet. Counter space between stations is critical — aim for at least 18 inches of prep space on each side of the sink.
5. The Island Kitchen Layout
The kitchen island layout adds a freestanding or built-in island to an existing L-shaped or U-shaped kitchen. In 2026, the kitchen island is the single most requested feature in American kitchen renovations — from starter homes in Phoenix to luxury properties in Los Angeles and Chicago.
Islands add prep space, seating, and storage. But they also introduce complexity to the work triangle. If an island is positioned in the wrong place, it blocks the natural flow between the sink, stove, and refrigerator — turning an efficient work triangle into an awkward obstacle course.
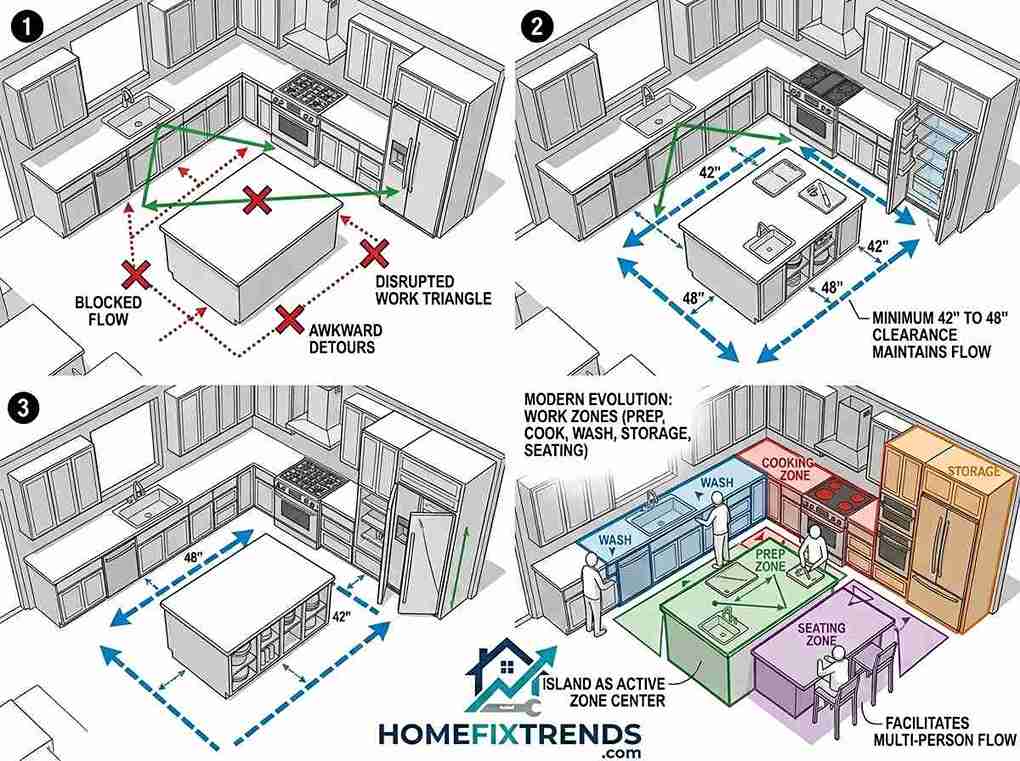
Work Triangle Tip for Island Kitchens: Leave a minimum of 42 to 48 inches of clearance between the island and surrounding countertops. If the island includes a sink or cooktop, it essentially creates a second work zone — which leads us to the modern evolution of the Work Triangle.
The Modern Work Zone Approach: Beyond the Classic Triangle
In 2026, many kitchen designers and architects are expanding the classic Work Triangle into what’s now called the Work Zone Approach — a more flexible framework that accounts for the complexity of today’s modern kitchens.
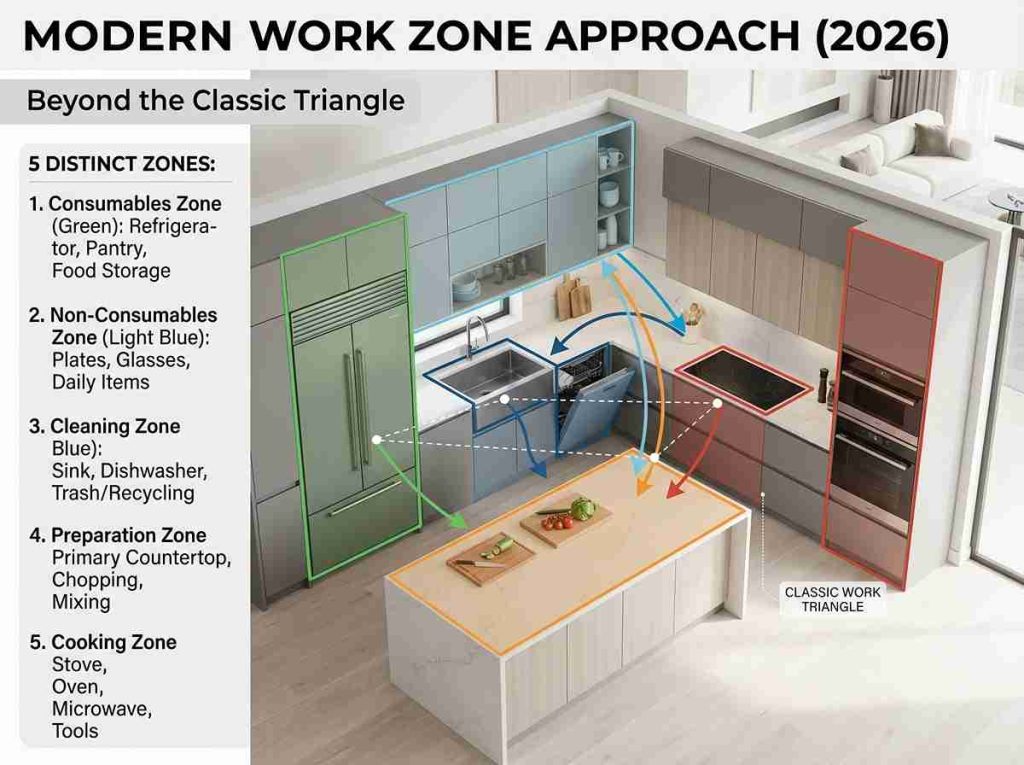
Instead of focusing only on three points, the Work Zone Approach identifies five distinct zones in a fully equipped modern kitchen:
- Consumables Zone — Refrigerator, pantry, and food storage
- Non-Consumables Zone — Cabinets for plates, glasses, and everyday items
- Cleaning Zone — Sink, dishwasher, and trash/recycling
- Preparation Zone — Primary countertop workspace for chopping and mixing
- Cooking Zone — Stove, oven, microwave, and cooking tools
The classic Work Triangle remains the backbone of this approach — it simply gets layered with additional zones to create a kitchen that works for how Americans actually cook and live in 2026.
How to Measure Your Own Kitchen Work Triangle
You don’t need to be an architect or a professional designer to measure your kitchen’s work triangle. Here’s exactly how to do it yourself in about 15 minutes:
Step 1 — Identify Your Three Primary Points Locate the center front of your sink, the center front of your stove or cooktop, and the center front of your refrigerator door handle. These three points are your triangle vertices.
Step 2 — Measure Each Leg of the Triangle Using a measuring tape, measure the straight-line distance (not the walking path around cabinets or islands) between each pair of points:
- Sink to Stove = ___ feet
- Stove to Refrigerator = ___ feet
- Refrigerator to Sink = ___ feet
Step 3 — Add Up the Total Perimeter Add all three measurements together. This is your Work Triangle perimeter.
Step 4 — Evaluate Your Results
- Total under 13 feet → Kitchen is too cramped. Consider repositioning one or more appliances.
- Total between 13–26 feet → Your kitchen is ergonomically efficient.
- Total over 26 feet → Too much walking between stations. Reorganizing the layout will significantly improve daily function.
Step 5 — Check Individual Leg Lengths Each individual leg should fall between 4 and 9 feet. A leg under 4 feet creates crowding. A leg over 9 feet creates unnecessary travel distance. Adjust appliance or fixture placement where possible to bring outlier measurements into range.
Common Kitchen Layout Mistakes to Avoid in 2026
Even with the Work Triangle in mind, American homeowners make these layout errors more often than you’d think:
Placing the refrigerator in a corner — Opening a refrigerator door into a corner restricts access and forces awkward maneuvering. Always allow at least 15 inches of clearance beside the refrigerator handle side for the door to swing fully open.
Putting the stove directly beside the refrigerator — Heat from the stove forces the refrigerator to work harder, increasing energy consumption and potentially shortening appliance life. Maintain at least 15–24 inches of counter space between the two.
Ignoring traffic flow in open-plan kitchens — In open layouts — common in newer homes across Denver, Phoenix, and the suburbs of Los Angeles — foot traffic from other parts of the home frequently cuts through the kitchen work area. If this traffic path bisects the work triangle, efficiency drops and safety risks increase.
Skipping the landing space — Every major appliance needs adjacent counter space for setting down items. Dishwasher needs 21 inches. Oven needs 15 inches on each side. Refrigerator needs 15 inches beside it. Skipping these “landing zones” makes the kitchen frustrating to use regardless of how good the triangle dimensions are.
Under-lighting the work zones — Poor lighting over the sink, stove, and prep areas is one of the most common complaints in American kitchen renovations. Every work zone needs dedicated task lighting — not just overhead ambient lighting.
Kitchen Layout Planning for Different Home Sizes
Not every American home has the same kitchen footprint. Here’s how the Work Triangle principle scales across different home sizes:
Small Kitchens (Under 100 sq ft) — Common in apartments across New York City, Chicago, and San Francisco. Focus on a compact triangle under 18 feet total. Prioritize vertical storage and multi-functional surfaces. A galley or one-wall layout works best. See more small kitchens and organization.
Medium Kitchens (100–200 sq ft) — The most common size in American single-family homes. An L-shape or U-shape layout works perfectly. Target a triangle between 15–22 feet. An island can be added if clearance allows.
Large Kitchens (Over 200 sq ft) — Common in newer construction in suburban markets like Phoenix, Denver, and the greater Dallas area. A U-shape with an island or a double-island layout works well. Create multiple work zones with a secondary triangle if two cooks regularly use the space.
Budget Breakdown: Kitchen Layout Planning and Renovation Costs in 2026
Understanding how much a kitchen renovation costs in 2026 is essential before making any layout decisions. Here’s a realistic cost breakdown for American homeowners:
| Renovation Level | Estimated Cost (U.S.) | What’s Included |
|---|---|---|
| Minor Refresh | $5,000 – $15,000 | New paint, hardware, lighting, minor appliance updates |
| Mid-Range Remodel | $15,000 – $45,000 | New cabinets, countertops, flooring, appliances, layout adjustments |
| Major Renovation | $45,000 – $100,000+ | Full gut renovation, custom cabinets, high-end appliances, structural changes |
| Luxury Kitchen | $100,000 – $250,000+ | Custom everything, smart appliances, premium materials, architectural changes |
Budget Fact #1: According to Remodeling Magazine’s 2025–2026 Cost vs. Value Report, a major mid-range kitchen remodel in the U.S. costs an average of $79,982 and recoups approximately 85–90% of its value at resale — making it the single highest-ROI home renovation project in America.
Budget Fact #2: Homeowners in high-cost metros like San Francisco, New York City, and Seattle-Tacoma can expect to pay 30–50% above the national average for the same kitchen renovation scope. In San Francisco specifically, a mid-range kitchen remodel can easily exceed $75,000–$100,000 due to elevated labor costs, permit requirements, and material markups.
Where to Buy Kitchen Layout and Renovation Supplies in the U.S.
Once your layout is planned, knowing where to source materials and fixtures makes a significant difference in both quality and cost. Here are the best options for American homeowners in 2026:
IKEA — America’s most popular destination for affordable, well-designed kitchen cabinets. IKEA’s SEKTION cabinet system is highly customizable, durable, and available at stores in major cities including Los Angeles, Chicago, and the greater New York area. Their free kitchen planning tool makes layout visualization easy.
The Home Depot — Offers semi-custom cabinet lines, countertops, appliances, flooring, and lighting all under one roof. Free kitchen design consultations are available in-store at locations across Phoenix, Denver, Seattle-Tacoma, and throughout the country.
Lowe’s — Strong selection of kitchen cabinets, countertops, and appliances. Particularly competitive on in-stock tile and flooring. Available nationwide with reliable delivery and installation services.
IKEA, RTA Cabinet Store, and Lily Ann Cabinets — Excellent online options for ready-to-assemble (RTA) cabinets that significantly reduce cost while maintaining quality. Ideal for DIY-savvy homeowners looking to stretch their renovation budget. See more IKEA kitchens for your home.
Ferguson Bath, Kitchen & Lighting Gallery — The go-to destination for mid-to-high-end plumbing fixtures, sinks, and faucets. Trusted by professional designers and contractors in major metros including Chicago, Los Angeles, New York, and Denver.
Sub-Zero, Wolf, and Viking Showrooms — For homeowners investing in premium appliances, visiting a dedicated appliance showroom provides hands-on experience with products before making a significant purchase. Showrooms are located in most major American cities.
Hiring a Kitchen Designer vs. DIY Planning
Planning a kitchen layout isn’t something most homeowners need to outsource entirely — but knowing when professional help adds value is important.
DIY Planning Works Well When:
- You’re working with an existing layout and only updating surfaces and appliances
- Your kitchen is a straightforward galley, L-shape, or U-shape without structural complications
- You’re using an online kitchen planning tool (IKEA Planner, RoomSketcher, or Homestyler)
- Your total budget is under $20,000
Hire a Professional Kitchen Designer When:
- You’re moving walls, plumbing, or electrical — any structural change requires professional design and permitting
- Your kitchen budget exceeds $30,000 and you want to maximize the investment
- You have a complex or unusual floor plan
- You want a truly custom result with cohesive material and finish selection
Professional kitchen designers typically charge $100–$300 per hour, or a flat fee of $1,500–$5,000 for a full kitchen design package. In cities like San Francisco, Los Angeles, and New York, hourly rates at top-tier design firms can exceed $350–$500 per hour.
The value a good designer brings — avoiding costly mistakes, maximizing space, and creating a cohesive design — almost always justifies the fee on renovations over $30,000.
Smart Kitchen Technology and the Work Triangle in 2026
One of the most exciting developments in kitchen design in 2026 is the integration of smart technology into the primary work zones. American homeowners are increasingly incorporating:
- Smart refrigerators with interior cameras that let you check contents from the grocery store
- Induction cooktops with precise temperature control and faster boil times than gas
- Voice-activated faucets that dispense precise water volumes on command
- Under-cabinet LED lighting that adjusts color temperature based on the time of day
- Smart ovens that can be preheated remotely via smartphone
These technologies don’t change the fundamental logic of the Work Triangle — they enhance it. A smart kitchen that’s also well-designed around the Work Triangle principle delivers the best of both worlds: cutting-edge functionality within an ergonomically optimized space.
FAQ: Kitchen Layout and the Work Triangle Method
What is the ideal kitchen work triangle measurement?
The ideal Kitchen Work Triangle has a total perimeter — the combined distance of all three legs — between 13 and 26 feet. Each individual leg of the triangle (sink to stove, stove to refrigerator, and refrigerator to sink) should measure between 4 and 9 feet. Within this range, the average cook can move efficiently between all three primary work zones with 2 to 4 natural steps, minimizing fatigue and maximizing productivity during meal preparation. If your kitchen’s total triangle measurement falls outside this range, reorganizing one or more of the primary appliances or fixtures will make a noticeable difference in how your kitchen functions every day.
Which kitchen layout is best for a small home or apartment?
For small kitchens — particularly those in apartments across New York City, Chicago, and San Francisco — the galley layout is the most efficient option. Two parallel runs of cabinets and countertops create a naturally compact and functional work triangle, maximize wall storage, and keep all work zones within easy reach. The L-shaped layout is the second-best option for slightly larger small kitchens, as it opens one corner of the room for dining or additional floor space. Both layouts benefit significantly from vertical storage, pull-out cabinet organizers, and under-cabinet task lighting to maximize both function and visual space.
Can I plan my kitchen layout myself without a professional designer?
Yes — and millions of American homeowners do it successfully every year. Free online tools like IKEA’s Kitchen Planner, RoomSketcher, and Houzz’s room design tool make it easier than ever to visualize and plan a kitchen layout without professional help. Start by measuring your kitchen precisely, mapping out plumbing and electrical locations, and identifying your three primary work zone positions. Apply the Work Triangle principle to evaluate and adjust your layout. For straightforward kitchens under $25,000 that don’t involve moving walls or plumbing, DIY planning is entirely manageable. For larger, more complex renovations, a certified kitchen designer’s fee is well worth the investment to protect your budget and ensure the result is exactly what you envisioned.
Conclusion
A beautiful kitchen starts with a brilliant layout — and the Kitchen Work Triangle Method remains the most reliable, time-tested framework for getting that layout right. From compact galley kitchens in Chicago apartments to sprawling open-plan kitchens in Phoenix and Denver suburbs, the same core principle applies: when your sink, stove, and refrigerator work together as a cohesive, efficiently distanced triangle, everything about cooking becomes easier, faster, and more enjoyable.
Measure your triangle, evaluate your layout against the 13–26 foot guideline, identify what needs to shift, and use the resources in this guide to plan your renovation with confidence. Whether you tackle it as a weekend DIY project or invest in a full professional renovation, the result will be a kitchen that doesn’t just look stunning — it works perfectly, every single day.