
We went back and forth on our driveway for probably three years.
Our existing one was cracked asphalt, heaved up in two places by tree roots, and had developed this particular shade of tired grey that made the whole front of our property look a bit defeated. We knew it needed to go. But the replacement options — poured concrete, new asphalt, pavers — all came in at prices that made us close the browser tab and go make a cup of tea and think about something else for a while.
Then we started looking seriously at gravel.
And what we found surprised us. Not because gravel was perfect — it is not — but because the gap between what we assumed gravel driveways were like and what they can actually be was considerable. We had written it off as a lesser option. It turned out to be the right option for us.

This guide covers everything we learned through our own process plus everything I have gathered since from conversations with contractors, landscape professionals, and a frankly obsessive amount of reading. Whether you are replacing an existing driveway or starting from scratch on a new build, this should help you make a genuinely informed decision.
What is a Gravel Driveway, Exactly?
This sounds like a question that does not need answering and it mostly is not — you know what gravel is. But there is an important distinction worth making early.
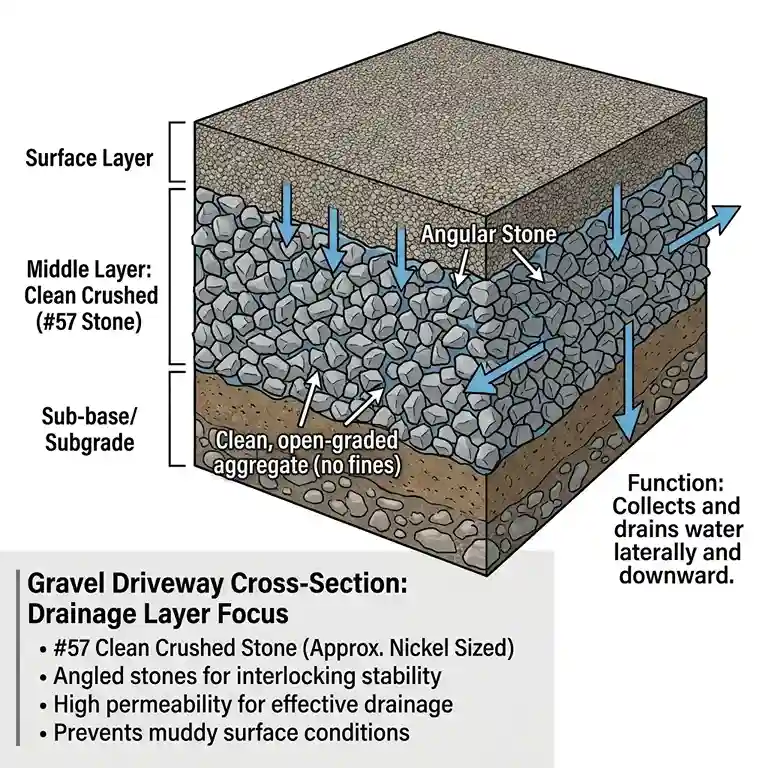
A properly installed gravel driveway is not just gravel poured onto dirt. A well-installed gravel driveway is a layered system with an excavated base, a compacted sub-base material, landscape fabric or other weed control, a middle layer of crushed angular stone, and a top layer of the finish gravel you actually see. That entire layered system is what determines whether your gravel driveway stays where you put it, drains properly, and holds up under daily vehicle traffic for years or decades.
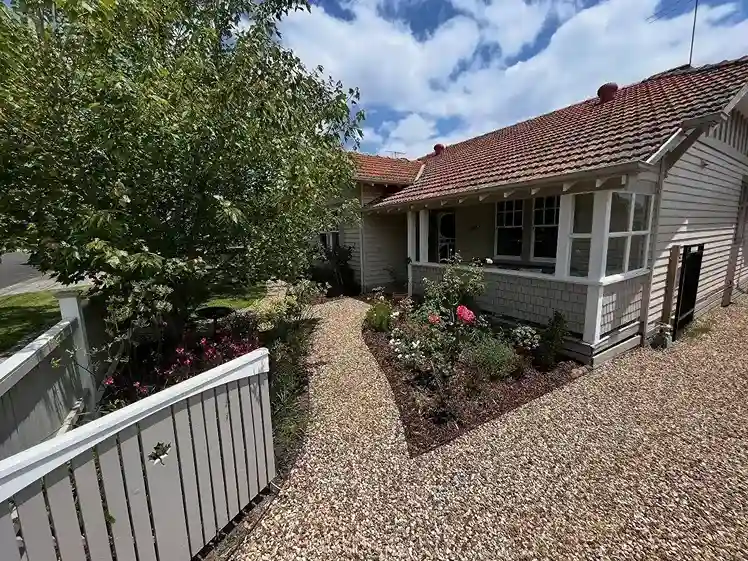
The gravel driveways that give gravel a bad reputation — rutted, muddy when wet, scattered all over the lawn, full of weeds — are almost always driveways that skipped some or all of this layered system. They are not a reflection of what gravel driveways can be. They are a reflection of inadequate installation.
Keep that in your mind as you read. The quality of the installation determines almost everything about the long-term performance of a gravel driveway.
Gravel vs. Concrete vs. Asphalt: The Honest Comparison
Before committing to gravel, understand where it actually sits in comparison to the other main options. I am not going to tell you gravel is always the right choice — it is not. But I will tell you the honest comparison.
Cost
This is where gravel wins most clearly and most consistently.
Poured concrete driveways cost, on average, somewhere between $6 and $12 per square foot installed depending on your location, the complexity of the pour, and finish choices. For a standard two-car driveway of around 600 square feet, you are looking at $3,600 to $7,200 at a minimum.

Asphalt is less expensive than concrete but still carries significant cost — typically $3 to $7 per square foot installed, or $1,800 to $4,200 for the same 600 square foot example.

A properly installed gravel driveway typically costs between $1 and $3 per square foot for the materials, with installation bringing the total to somewhere between $1,500 and $3,000 for the same footprint. In areas with local stone availability, costs can be even lower.

The ongoing cost picture is more nuanced. Gravel requires periodic replenishment — typically every one to three years depending on traffic and maintenance — and occasional regrading. Concrete and asphalt require sealing, crack repair, and eventually full replacement. Over a 20-year period, well-maintained gravel and well-maintained concrete often come out remarkably close in total cost. But the upfront investment difference is real and significant.
Drainage
Gravel wins here too, and this matters more than people initially realize.
Impermeable surfaces — concrete and asphalt — redirect all rainwater. It runs off the driveway surface and has to go somewhere: into storm drains, toward the house foundation, across the yard, or into the street. This creates drainage challenges, contributes to basement moisture issues, and in some municipalities creates regulatory complications for new installations.
Gravel is permeable. Water passes through the stone and into the ground beneath. This is better for groundwater recharge, better for the health of nearby trees and plantings, and means that the area immediately around your driveway does not turn into a small river every time it rains heavily.

In areas with strict stormwater management regulations, gravel’s permeability is not just a benefit — it can determine whether a certain driveway size and configuration is legally permissible.
Durability and Maintenance
Here is where it gets honest.
Concrete, when properly installed, is the most durable driveway surface. It can last 30 to 50 years with basic maintenance. It does not rut. It does not scatter. It does not require periodic replenishment. Its failure modes — cracking from freeze-thaw cycles, heaving from tree roots, surface scaling from salt use — are real but slow.
Asphalt is less durable than concrete — typically 15 to 30 year lifespan — but is more forgiving of minor movement and easier to patch.
Gravel’s durability is a different concept. The stone itself essentially lasts forever. What degrades is the system — gravel migrates from high-traffic areas, ruts form in soft spots, fine particles wash away. The maintenance required to keep a gravel driveway looking good and functioning well is ongoing but each individual maintenance task is minor. Annual regrading. Replenishment of surface gravel every few years. Addressing any significant rut formation before it becomes a drainage problem.

If you find the idea of occasional maintenance preferable to a large upfront cost, gravel makes sense. If you want to install and forget, concrete is probably your answer even at the higher cost.
Appearance
This is subjective, but I will say this: a gravel driveway done well, with the right stone, good edging, and proper installation, is genuinely beautiful in a way that standard concrete and asphalt are not. Stone has warmth and texture that poured materials cannot replicate. A gravel driveway feels like it belongs to the landscape rather than sitting on top of it.

The caveat is that a neglected gravel driveway looks considerably worse than a neglected concrete or asphalt driveway. The gap between maintained and unmaintained gravel is wider than for other materials.
Types of Gravel for Driveways: Which One Should You Choose?
This is the question I see most often asked in an imprecise way. People ask “which gravel is best for a driveway” when what they actually need to know is which gravel is best for each layer of the driveway system. The answer is different for the base, the middle layer, and the surface.
Base Layer: Crushed Stone with Fines (#4 or #3 Stone, or Quarry Process)
The base layer is never seen once installation is complete, but it is the most structurally important part of the system. You want crushed angular stone — not rounded river pebbles — that has been processed to include a range of particle sizes from larger pieces down to fine stone dust. This mixture, called quarry process or crusher run in different regions, compacts into a dense, stable layer that gives the upper layers something solid to sit on.

Do not use rounded stone for the base. Rounded stones roll against each other and never compact into a stable mass. Only crushed angular stone with jagged faces that interlock when compacted works properly for this application.
Middle Layer: Clean Crushed Stone (#57 Stone)
The middle layer — sometimes called the drainage layer — is typically #57 crushed stone, which is clean angular stone roughly the size of a nickel with no fine particles. Its job is drainage. Water that penetrates the surface layer collects in the air gaps of the #57 stone and drains laterally and downward. This layer is what keeps the surface from getting muddy in wet conditions.
Surface Layer: Your Finish Gravel
The surface layer is what your driveway looks like. This is where both aesthetics and practical considerations come into play. There are a lot of options and they genuinely differ from each other in important ways.
Crushed Granite — One of the most popular and most practical choices. Crushed granite compacts well, stays in place reasonably, comes in warm grey and tan tones that look beautiful, and is widely available across most of the country. It is not the cheapest option but it is not expensive, and its combination of appearance and performance is hard to beat.

Pea Gravel — Small, rounded, smooth stones in warm natural tones. Pea gravel is beautiful and often the first thing people picture when they imagine a gravel driveway. The problem is that rounded stones do not lock together. Pea gravel shifts and scatters under tires, migrates to the edges, and can be extremely frustrating to maintain as a primary driveway surface. It works beautifully in low-traffic areas and pathways. For a regularly used driveway it requires either accepting significant ongoing maintenance or a containment system like honeycomb grid pavers.

Crushed Limestone — Common in regions where limestone is locally quarried and therefore affordable. Crushes to sharp angular pieces that interlock well and compact into a solid surface. Tends toward white and cream tones that can look quite bright and formal. Weathers and mellows nicely over time.

Crushed Concrete (Recycled Concrete Aggregate) — Ground and processed old concrete. Very affordable, often the cheapest option available, and performs surprisingly well as a driveway surface. The appearance is more utilitarian — grey-white, somewhat irregular. Good choice when budget is the primary consideration and appearance is secondary.

River Rock — Smooth rounded river stones in larger sizes. Beautiful in certain landscape contexts but essentially nonfunctional as a driveway surface for the same reasons as pea gravel, amplified by the larger size. Not recommended for driveways under regular vehicle use.

Decomposed Granite (DG) — Ground granite that breaks down into a gritty, sand-like material that compacts almost like a soft pavement. Popular in dry climates, particularly the southwest United States. Looks elegant, almost like a fine sand pathway. Erodes significantly in heavy rain without stabilizer added. Works beautifully in the right climate; can be frustrating in wet regions.

Marble Chips — White marble chipped into small pieces. Gorgeous. Very expensive. Very high maintenance because the bright white shows every bit of dirt and debris. More commonly used for decorative paths than for functional driveways, and probably rightfully so.

| Gravel Type | Best For | Concerns |
|---|---|---|
| Crushed granite | Most driveways, all climates | Slightly higher cost than some options |
| Pea gravel | Paths, decorative areas | Rolls and scatters under vehicle traffic |
| Crushed limestone | Midwest and Southeast, budget-conscious | Can be very light/bright in color |
| Recycled concrete | Budget primary concern | Utilitarian appearance |
| Decomposed granite | Dry climates | Erodes in heavy rain |
How to Install a Gravel Driveway: The Full Process
This section assumes you are either installing yourself or want to understand exactly what a contractor should be doing. Either way, knowing the correct process protects you.
Step 1: Planning and Marking
Mark the driveway footprint with spray paint or stakes and string. Standard driveway width is 10 to 12 feet for a single car, 18 to 24 feet for two cars side by side. Include any turning areas, additional width at the garage entrance, and any curves or bends in the layout.
Check for underground utilities before any excavation begins. In the United States this means calling 811, the free national call-before-you-dig service. In other countries there are equivalent services. This is not optional — hitting a buried utility line is expensive, dangerous, and legally your responsibility if you did not call before digging.
Step 2: Excavation
Excavate the entire driveway footprint to a depth that accommodates your layer system plus a small buffer. For a standard residential driveway with reasonable traffic loads, this typically means digging 8 to 12 inches below finished grade.
The excavation should slope very slightly — 1 to 2 percent grade — across the width of the driveway to encourage water to run off the edge rather than pool in the center. This is called cross-slope and it is an important drainage detail.
Remove all excavated material from the site. This can be a significant quantity depending on your driveway size — disposing of it is something to plan for before you start digging.
Step 3: Grading and Compacting the Subgrade
Once excavated, the native soil at the bottom of the trench is your subgrade. Grade it to your intended drainage slope and compact it with a plate compactor or hand tamper. Any soft spots — areas where the soil deflects noticeably under the compactor — need to be addressed now. Options include removing and replacing soft soil with compactible fill, or installing geogrid fabric to span weak areas.
Do not skip subgrade compaction. Soft spots in the subgrade lead directly to ruts and depressions in the finished driveway surface.
Step 4: Install Landscape Fabric or Geotextile
Lay landscape fabric or geotextile across the compacted subgrade. This serves two purposes: it separates the base stone layer from the native soil below, preventing fines from migrating up into the stone and reducing the structural properties of the base over time, and it inhibits weed growth up through the gravel.
Use a heavy-duty woven geotextile rather than thin landscape fabric if you can source it. It is more permeable, more durable, and does a better job of soil separation under load. Overlap seams by at least 12 inches.
Step 5: Install and Compact the Base Layer
Spread your base material — quarry process or crusher run — to a depth of 4 to 6 inches across the entire driveway footprint. Spread it evenly with a rake. Compact with a plate compactor making multiple passes in different directions until the surface is firm and does not deflect under foot traffic.
Add material and compact in layers of 3 to 4 inches rather than all at once if you need significant depth. Attempting to compact a 6-inch layer in one pass does not compact the material evenly — the bottom of the layer remains loose.
Step 6: Install and Compact the Middle Layer (Optional but Recommended)
In regions with significant rainfall, adding a 2 to 3 inch layer of #57 clean crushed stone above the compacted base significantly improves drainage performance. Compact lightly — this layer does not need heavy compaction since its drainage function depends on the air gaps between stones.
Step 7: Install Edging
Before the surface layer goes down, install your edging. Edging contains the surface gravel, defines the driveway boundary cleanly, and dramatically reduces the ongoing maintenance required to keep the gravel where it belongs.
Options include:
- Landscape timbers or timber edging — affordable, natural looking, works well for curved driveways
- Steel or aluminum edging — clean and precise, best for straight or gently curved edges, very long-lasting
- Concrete edging — most permanent and most labor-intensive, essentially a miniature poured concrete curb
- Plastic edging — affordable and flexible for curves, less durable than metal or concrete
Install edging so it sits just at or slightly above the finished surface level of your top gravel. Edging that is too low disappears under the gravel and stops working. Edging that is too high becomes a trip hazard and looks odd.
Step 8: Spread and Level the Surface Layer
Spread your surface gravel to a depth of 2 to 3 inches. Rake evenly. The surface should be slightly higher than the surrounding grade — not level with it — because it will compress under traffic over the first weeks of use.
If you have a large driveway, a landscaping rake or box blade attachment for a tractor makes this step much faster. For smaller driveways, a standard rake is perfectly adequate.
Step 9: Compact the Surface (Optional)
Light compaction of the surface gravel with a plate compactor helps it settle and interlock more quickly. Do not over-compact — you want some looseness in the surface material so vehicles have traction. One or two passes with the compactor is sufficient.
Step 10: Address the Driveway Entrance
The first 6 to 8 feet of driveway at the road connection is the highest-traffic and highest-wear area. Consider using a heavier, more angular stone here than your primary surface material. Some people pour a small concrete or paver apron at the street edge where vehicle turning forces on the gravel are highest. This is not always necessary but it significantly extends the life of the entrance area.
Drainage: The Detail That Makes or Breaks a Gravel Driveway
I keep coming back to drainage because it is genuinely the most important technical aspect of a gravel driveway installation. A beautiful gravel driveway that drains poorly will develop ruts, soft spots, and weed problems within a season or two regardless of how good the stone looks.
There are three drainage considerations worth understanding.
Surface Drainage — water that falls on the driveway needs to run off the surface rather than pool. This is achieved through the cross-slope mentioned in the installation section — that 1 to 2 percent slope across the driveway width that directs water to one side. The surface should never be perfectly flat or higher at the edges than the center.
Subsurface Drainage — water that penetrates the surface material needs to pass through the base and exit laterally or vertically. This is what the middle layer of #57 stone facilitates. If the subgrade beneath your driveway has poor permeability — heavy clay is the most common culprit — you may need to install perforated drainpipe at the base of the system to carry water away. This adds cost and complexity but solves a genuine drainage problem that will otherwise make your driveway miserable in wet conditions.
Culverts and Drainage Crossings — if your driveway crosses a natural drainage swale or low point where water flows during rain events, you need a culvert — a pipe installed beneath the driveway that allows water to flow under it rather than washing it away. Culvert sizing is important. Too small and it will back up and overflow in significant rain events. Your county or municipality may have regulations about culvert sizing for private driveways.
If you are uncertain about the drainage situation on your property, this is the part of the project most worth consulting a professional about. Getting drainage wrong creates problems that are expensive to fix after installation is complete.
Edging and Containment: More Important Than Most People Think
I mentioned edging in the installation section but it deserves a more direct conversation because it is the most underestimated element of gravel driveway maintenance.
Without proper edging, gravel migrates. Vehicles turning pull stone to the outside of curves. Snowplows push it to the edges. Foot traffic scatters it onto adjacent lawn or beds. Within one or two seasons, a gravel driveway without edging has thin spots in the center and piles of gravel in the surrounding lawn.
Good edging contains the gravel, defines the driveway boundary cleanly, and reduces the annual maintenance burden significantly. The small additional cost of proper edging installation pays for itself quickly in reduced topping-up and regrading requirements.
If you have an existing gravel driveway that is scattering and you cannot afford to redo the entire thing right now, adding or improving the edging is the single highest-return maintenance investment you can make.
Gravel Driveway Maintenance: What to Expect
One of the most common frustrations with gravel driveways comes from people who were not told honestly what maintenance to expect. Here is the honest picture.
Annual Tasks
Regrading — once per year, typically in spring, rake or blade the surface gravel to redistribute it from where it has accumulated at the edges back toward the center and any thin or rut-prone areas. For a short driveway this takes an hour with a rake. For a longer driveway you want a box blade for a riding mower or tractor.
Edging maintenance — check that edging has not shifted or heaved. Reset any sections that have moved. This usually takes 30 minutes to an hour.
Weed management — regardless of whether landscape fabric was installed, some weeds will establish in the surface gravel. Hand pulling while small is the most practical approach. Avoid herbicides if the driveway drains toward any garden beds, lawn areas, or waterways, as many are not selective. Corn gluten meal applied in early spring provides some pre-emergent weed control through an organic mechanism.
Every 3 to 5 Years
Gravel replenishment — surface gravel compresses, some fine particles wash away, and the depth gradually decreases. Adding a fresh 1 to 2 inch layer of surface gravel restores the look and function. This is inexpensive — typically a few hundred dollars for a standard two-car driveway — and takes a half day to spread and level.
Pothole and rut repair — significant ruts or soft spots need to be addressed before they get larger. The repair process is essentially re-excavating the soft area, adding additional base material, compacting, and resurfacing. Catching problems while small makes repair significantly easier.
What Actually Indicates a Problem vs. Normal Wear
Normal: slight rut formation in high-traffic areas over time, some gravel migration to edges, minor weed growth, gradual reduction in surface depth.
Problem: significant rutting that collects standing water, soft spots that deflect under vehicle weight, large-scale erosion after rain events, persistent muddy areas.
Problems that persist indicate a drainage or base layer issue rather than a surface maintenance issue. Repeatedly regrading and replenishing gravel over a problem area without addressing the underlying drainage is a losing battle.
The Cost Breakdown: What You Are Actually Paying For
I want to give you a realistic cost framework because the range of quotes people receive for gravel driveways is surprisingly wide and it helps to understand what drives the variation.
The variables that most affect the cost of a gravel driveway installation are:
Size — the obvious one. More square footage means more material and more labor.
Depth of existing material removal — if you are replacing an existing asphalt or concrete driveway, the removal and disposal of that material adds significant cost. Cutting and removing existing asphalt typically costs $1 to $2 per square foot on top of the new installation cost.
Excavation depth required — deeper excavation for poor subgrades or significant drainage requirements means more excavation time and more material hauled away.
Local stone pricing — gravel costs vary enormously by region based on what stone is locally available. In areas near quarries, crushed stone is inexpensive. In areas where it must be transported significant distances, it is proportionally more expensive.
Drainage requirements — culverts, perforated drainpipe, and significant grading work add cost that varies with the specific site conditions.
Edging choice — poured concrete edging costs more than landscape timber which costs more than basic plastic edging.
A rough framework for planning purposes:
| Driveway Size | DIY Material Cost | Professional Installation |
|---|---|---|
| Small (300 sq ft) | $400–$900 | $1,200–$2,500 |
| Medium (600 sq ft) | $800–$1,800 | $2,200–$4,500 |
| Large (1,000 sq ft) | $1,300–$3,000 | $3,500–$7,000 |
| Very large (1,500+ sq ft) | Variable | $5,000–$12,000+ |
These numbers assume no significant drainage infrastructure and no removal of existing driveway material. Add 20 to 40 percent for driveways requiring culverts, perforated drain systems, or existing surface removal.
DIY or Hire a Contractor?
This is a genuinely variable answer depending on the scale of the project and your equipment access.
A small gravel driveway — say, 300 square feet or less — is very achievable as a DIY project if you have access to a rented plate compactor, are comfortable with a wheelbarrow and rake, and can source materials through a local stone yard or landscape supply company. Materials can often be delivered directly to your site. Labor is significant but manageable over a weekend.
A medium to large gravel driveway — 600 square feet and above — benefits considerably from equipment. A skid steer or compact tractor for excavation and grading, a dump truck for material delivery and placement, and a riding tractor with a box blade for spreading and final grading make the project dramatically faster and produce better results. If you do not own or have access to this equipment, the rental cost starts to approach contractor pricing quickly.
Complex driveways — those with significant grade changes, drainage infrastructure requirements, curves, or large areas — are generally better left to an experienced contractor. The drainage design decisions in particular benefit from someone who has seen what goes wrong on similar sites in your specific region.
If you are getting contractor quotes, ask specifically:
- What is the total depth of excavation?
- What base material will be used and to what depth?
- Will landscape fabric be installed?
- What surface stone will be used and what thickness?
- What edging is included?
- What drainage provisions are included?
A contractor who cannot clearly answer these questions should probably not be building your driveway.
Common Gravel Driveway Problems and How to Fix Them
Problem: Ruts forming repeatedly in the same spots
This almost always indicates a drainage or base layer problem at that location. The subgrade is soft — either because it is inherently poor soil, because water is collecting there, or because the base layer is inadequate. Surface gravel replenishment alone will not solve it. The area needs to be excavated, the drainage problem addressed, additional base installed, and then resurfaced.
Problem: Gravel washing into the road after heavy rain
The driveway entrance is sloping toward the road and channeling runoff that is carrying surface stone with it. Solutions include regrading to direct flow away from the entrance, installing a small berm or channel to redirect water, or paving the first 6 to 8 feet of the entrance with a more stable material.
Problem: Muddy surface in wet weather
Indicates that the surface gravel has compressed or washed away to the point where the base material below is being exposed, or that the base layer itself is failing. Fresh surface gravel is a temporary fix. If the problem persists, the base layer needs assessment.
Problem: Weeds establishing aggressively
Landscape fabric may have degraded or not been installed. Adding surface gravel smothers some weeds short-term. For a significant weed problem, removal of surface gravel, replacement of landscape fabric, and resurfacing is the proper solution.
Problem: Surface gravel consistently thin in the center and piled at the edges
This is normal gravel migration and is addressed through annual regrading. It indicates that the edging may not be working effectively or may need to be higher to contain the material better.
Frequently Asked Questions
How long does a gravel driveway last?
A properly installed gravel driveway lasts indefinitely with maintenance. The stone itself does not degrade. What requires periodic attention is the surface depth — replenishment every 3 to 5 years — and the drainage system. Many gravel driveways that were properly installed decades ago are still performing well with routine maintenance. The question is really about the cost and effort of ongoing maintenance rather than a finite lifespan.
Is gravel a good driveway surface in cold climates with heavy snow?
Gravel performs reasonably well in cold climates with some specific considerations. Snowplowing requires care — plow blades should be set to ride just above the gravel surface rather than scraping it, which a good plow operator knows instinctively. Gravel does not heave from freeze-thaw cycles the way concrete can, which is actually an advantage in cold climates. Ice management without salt is more challenging on gravel than on concrete — sand is the practical alternative for traction. Overall, gravel is a common and perfectly functional driveway surface in cold climates across North America.
Can I install a gravel driveway over existing asphalt?
Technically, gravel can be spread over existing asphalt, but it is generally not recommended as a proper approach. Existing asphalt creates drainage issues beneath the gravel and provides an unstable base that moves differently from compacted stone under the weight of the gravel and vehicles. If the existing asphalt is being removed anyway, a fresh gravel installation is significantly better. If budget requires layering, be aware that long-term performance will be compromised.
What depth of gravel is needed for a driveway?
The surface gravel layer should be 2 to 4 inches of finished depth. The full driveway system — base layer plus middle drainage layer plus surface layer — should total 8 to 12 inches of depth below finished grade. The base layer is the most important for structural performance and should be at least 4 to 6 inches of compacted quarry process stone.
How do I stop gravel from spreading onto the lawn?
Proper edging is the primary solution — a steel or aluminum edging flush with the gravel surface contains migration effectively. Annual regrading that redistributes accumulated gravel from the edges back to the center also helps. For severe migration problems, a slightly higher edging profile or a concrete curb at problem edges may be necessary.
A Few Things Worth Saying Plainly
A gravel driveway is genuinely good for a lot of situations. It is not good for every situation.
If you have very heavy vehicle traffic — commercial vehicles, large trucks regularly — gravel will rut and degrade more quickly than for standard residential use. A more stable surface is worth the investment.
If you live somewhere with minimal annual maintenance time or interest — no spring regrading, no attention to weed management — a gravel driveway will gradually look and perform worse than it did at installation. It is not impossible to maintain, but it does require showing up for it once or twice a year.
If your driveway has a very steep grade, gravel is a challenging surface. Steeper than about 12 to 15 percent and gravel migration becomes very difficult to manage. Paving is a better answer on steep slopes.
If local ordinances in your neighborhood or HOA prohibit gravel driveways, obviously that conversation happens before anything else.
But for the large middle ground — standard residential property, reasonable traffic, someone willing to give the driveway an hour of attention once or twice a year — gravel is often the best combination of cost, drainage, appearance, and performance available. It was the right answer for us. It might be the right answer for you too.
Looking for more outdoor improvement ideas? Our guide on covered patio ideas covers everything you need to know about creating outdoor living spaces that work year-round, and our fire pit landscaping ideas piece has some genuinely beautiful approaches to backyard gathering spaces that would pair perfectly with a new gravel driveway.