
A poorly planned craft room layout kills creativity before it starts.
Getting the layout right from the beginning — or fixing it now — changes everything about how the room feels and functions.

This complete guide covers everything you need to know about planning a craft room layout that actually works.
What Makes a Good Craft Room Layout?
A good craft room layout puts the right things in the right places. It positions your primary work surface in the best light. It stores frequently used supplies within arm’s reach. It keeps mess contained, traffic flowing freely, and every zone clearly defined.

The best craft room layouts are built around how you actually work, not how a room looks in a magazine photograph. Your specific crafts, your specific body, and your specific workflow determine the ideal layout for your space. Understanding the principles in this guide will help you make the right decisions for your unique situation.
Zone Planning: The Foundation of Every Good Layout
Every functional craft room is divided into distinct activity zones. Without zones, everything blurs together into an undifferentiated mess. With zones, every activity has a home and every supply lives where it is used.

The five primary craft room zones are the primary work zone, the storage zone, the cutting zone, the inspiration zone, and the cleanup zone. Not every craft room needs all five. But understanding each zone helps you decide which ones your specific crafts genuinely require.
| Craft Room Zone | Primary Function |
|---|---|
| Primary work zone | Main crafting, creating, assembling |
| Storage zone | Supply organization, accessibility |
| Cutting zone | Cutting, trimming, measuring |
| Inspiration zone | Mood board, color references, ideas |
| Cleanup zone | Sink, drying, waste management |
How to Assess Your Room Before Planning the Layout
Before moving a single piece of furniture, spend time studying the room itself. Walk around it at different times of day. Notice where natural light falls and where shadows accumulate. Identify where the electrical outlets are positioned and where the door swings.

These fixed physical elements of the room — the windows, the door, the outlets, and any alcoves — form the non-negotiable constraints your layout must work around. The most common layout mistakes come from ignoring these fixed elements and placing furniture in positions that fight against the room’s natural characteristics.
| Room Assessment Checklist | Why It Matters |
|---|---|
| Window position and light direction | Determines work surface placement |
| Door swing direction | Affects furniture placement near entry |
| Electrical outlet locations | Determines tool and appliance zones |
| Alcoves and recesses | Prime built-in storage opportunities |
| Load-bearing walls | Cannot be removed or modified |
The Most Important Layout Decision: Where to Put the Work Surface
Your primary work surface is the anchor of the entire craft room layout. Every other decision — storage, lighting, traffic flow — organizes itself around where the main worktable sits. Getting this placement right is the single most impactful layout decision you will make.

Position the primary work surface to receive natural light from the side rather than directly in front or behind you. Light from the side illuminates your work evenly without creating glare on the surface or shadows from your own body. A north-facing window provides the most consistent, even light throughout the day for detailed crafting work.
| Work Surface Light Direction | Quality |
|---|---|
| Side light (best) | Even, glare-free, consistent |
| North-facing window | Consistent throughout day |
| South-facing window | Bright but variable, some glare |
| Behind you (poor) | Creates shadow on work |
| In front of you (worst) | Direct glare, eye strain |
Correct Work Surface Height: The Detail Most People Get Wrong
Work surface height is one of the most frequently overlooked craft room layout considerations. A surface that is too high causes shoulder and neck strain during long creative sessions. A surface that is too low causes back pain and poor posture. The right height makes extended crafting genuinely comfortable.

For seated crafting, the work surface should sit approximately 5 to 8 centimeters below your resting elbow height when seated. For standing crafting — cutting, papercrafting, and textile work — the surface should be approximately 5 to 10 centimeters below your standing elbow height. Many crafters benefit from having both a seated and a standing work surface within the same room.
| Work Position | Ideal Surface Height |
|---|---|
| Seated at chair | 5–8 cm below elbow height seated |
| Standing for cutting | 5–10 cm below elbow standing |
| Sewing machine work | Keyboard height, typically 68–75 cm |
| Detail hand work | Slightly higher than elbow seated |
The L-Shaped Layout: Best for Most Craft Rooms
The L-shaped layout is the most practical and most popular craft room layout for rooms with enough space for it. It positions work surfaces along two adjacent walls creating a corner workspace that allows you to swivel between different tasks without standing up. The corner space itself becomes one of the most functional zones in the entire room.

Place your primary work surface along the longer wall and a secondary cutting or computer surface along the shorter wall. The corner point between the two walls is ideal for a monitor, a design software setup, or a reference material station. This layout keeps everything within close reach while creating a natural separation between different crafting activities.
| L-Shape Layout Advantage | Practical Benefit |
|---|---|
| Swivel access to two surfaces | No standing between tasks |
| Natural task separation | Each surface has a function |
| Corner space utilization | Maximizes awkward corner area |
| Storage wall available | Third wall free for storage |
The U-Shaped Layout: For Serious Crafters With Enough Space
A U-shaped layout wraps work surfaces around three walls of the room creating the maximum possible work surface area within one space. This layout suits serious crafters with multiple active projects, large-format crafts, and those who require simultaneous access to many different tools and materials.

The U-shaped layout requires a minimum room size of approximately 3.5 by 3.5 meters to feel comfortable rather than cramped. The center of the U becomes the primary working position from which all three surfaces are accessible. Avoid filling all three walls with deep furniture — keep at least one wall surface relatively clear to maintain a sense of openness.
| U-Shape Layout | Minimum Room Dimension |
|---|---|
| Compact U-shape | 3.5 x 3.5 meters |
| Comfortable U-shape | 4 x 4 meters |
| Spacious U-shape | 4.5 x 5 meters or larger |
The One-Wall Layout: For Small Rooms and Shared Spaces
A one-wall layout concentrates all craft room functions along a single wall. It is the only viable option for very small dedicated rooms, converted alcoves, and craft spaces that share a room with another function. This layout requires the most discipline in organization because everything must fit in a linear arrangement.

In a one-wall layout, position the primary work surface in the center of the wall with storage on both sides. Add vertical storage above the work surface to maximize storage capacity within the limited footprint. A one-wall layout works surprisingly well when every storage decision is made with maximum efficiency in mind.
Find brilliant small space organization strategies from small kitchen organization ideas that translate directly to a one-wall craft room layout approach.
| One-Wall Zone Order | From Left to Right |
|---|---|
| Option A | Storage, work surface, storage |
| Option B | Cutting, work surface, storage |
| Option C | Storage, work surface, cutting |
Common Craft Room Layout Mistakes to Avoid
Mistake 1: Putting the Work Surface Against the Window
Placing your work surface directly against a window with the window in front of you creates the worst possible working light. You look into the light source which causes eye strain and casts your own shadow onto your work. Always position so light comes from the side.
Mistake 2: Storing Frequently Used Supplies Too Far Away
Any supply used in more than 50 percent of your creative sessions belongs within arm’s reach of your primary work surface. If you have to stand up to get scissors, thread, tape, or your most-used tools during a creative session, they are stored in the wrong place. The layout should keep your most used supplies within a seated arm’s reach at all times.
Mistake 3: Not Planning Electrical Outlets Before Finalizing Layout
Craft rooms typically require more electrical outlets than almost any other room in the house. Heat tools, die cutting machines, laminators, computers, printers, and task lighting all need power. Planning furniture placement before assessing outlet availability forces you into extension cord chaos that becomes a permanent safety hazard.
Mistake 4: Making the Cutting Zone Too Small
The cutting zone needs to accommodate your largest project plus cutting tools and a cutting mat with space to move your arms freely. Most crafters dramatically underestimate how much table space a single cutting project actually requires. A cutting surface of at least 90 by 120 centimeters is the practical minimum for most fabric and paper crafts.
Mistake 5: Ignoring Vertical Space
Floor space in a craft room fills up quickly. Vertical storage — shelving, pegboards, and wall-mounted organizers from floor to ceiling — multiplies storage capacity dramatically without consuming any additional floor area. The most common craft room layout mistake is treating only the floor level as usable space when the entire wall height is available.
Mistake 6: No Dedicated Cleanup Zone
Without a designated cleanup zone — a sink, a waste bin in the right location, and space for drying painted or wet items — cleanup happens on the work surface itself. This contaminates the work area, creates mess, and makes the transition between different types of crafting messy and inefficient. Even a small designated cleanup area makes an enormous practical difference.
Mistake 7: One Uniform Lighting Level Throughout
A single overhead light source creates problematic shadows on every work surface it does not directly illuminate. Different zones need different lighting — bright directional task lighting at the work surface, even overhead lighting for general navigation, and adjustable lighting for reference and inspiration areas. Planning lighting as part of the layout is essential, not optional.
Mistake 8: Designing for Display Rather Than Function
Craft rooms styled purely for Instagram photographs with beautifully labeled matching containers that are impractical to access during actual crafting are frustratingly nonfunctional in real use. Design the layout for how you actually work first and worry about aesthetics second. A functional ugly craft room beats a beautiful nonfunctional one every time.
How to Plan Lighting Into the Layout
Craft room lighting requires more careful planning than lighting in almost any other room. Detailed craft work — cutting, stitching, painting fine details — requires high-quality task lighting that eliminates shadows on the work surface. Poor lighting in a craft room causes eye strain, mistakes, and genuinely reduces the quality of finished work.

Plan three levels of lighting in your craft room layout. General overhead lighting provides overall room illumination. Task lighting provides bright, directional light precisely at each work surface. Under-shelf LED lighting illuminates storage areas and prevents the frustration of reaching into dark storage for supplies.
| Craft Room Lighting Level | Recommended Source |
|---|---|
| General overhead | Ceiling-mounted LED panel |
| Primary work surface | Adjustable desk lamp or LED track |
| Cutting surface | Daylight LED task lamp |
| Storage areas | Under-shelf LED strip lights |
| Inspiration board | Directional spot or natural light |
Storage Layout Principles That Actually Work
The most functional craft room storage layout follows one simple principle — store things where you use them. Supplies used at the primary work surface live at the primary work surface. Supplies used at the cutting table live at the cutting table. Supplies used for a specific craft live together regardless of their material category.
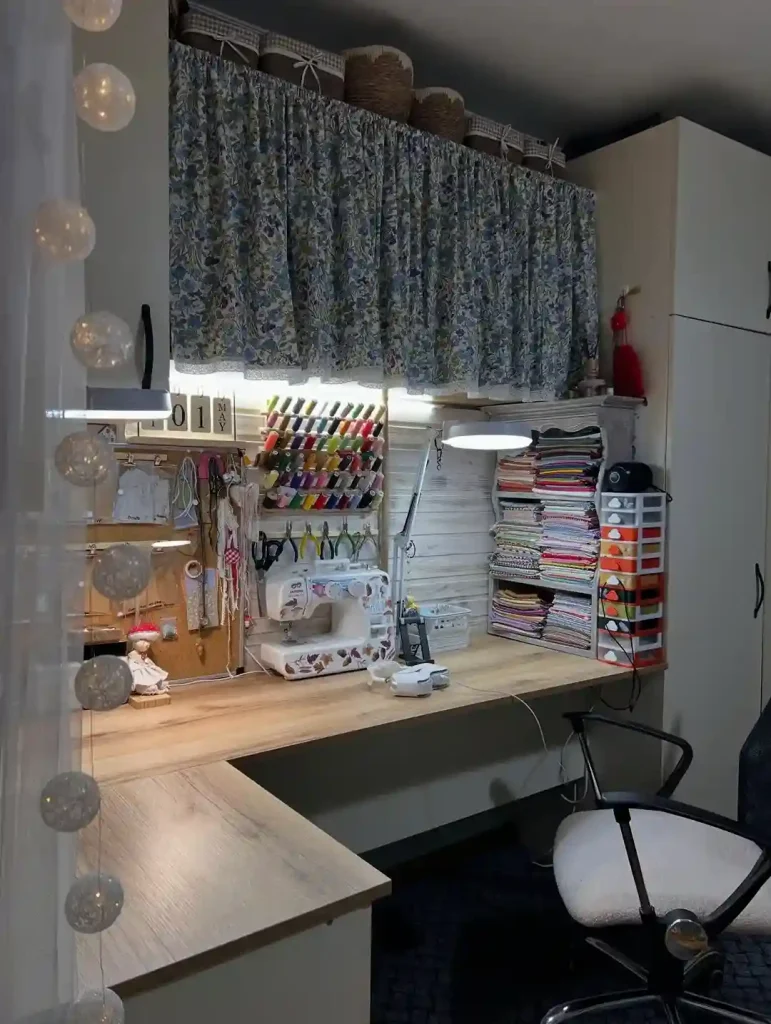
This use-based storage philosophy conflicts with the category-based storage that most organization guides recommend — all paper together, all adhesives together, all tools together. But use-based storage dramatically reduces the time spent searching for supplies during active creating. Store your scissors where you cut, not where all scissors live.
| Storage Principle | Application |
|---|---|
| Store at point of use | Scissors at cutting, not all together |
| Frequency determines accessibility | Daily items within arm’s reach |
| Vertical storage for volume | Floor-to-ceiling shelving where possible |
| Clear containers for visibility | See contents without opening |
| Decant and label everything | Speed up finding and replacing |
The Importance of Clear Floor Space in the Layout
Clear floor space in a craft room is not wasted space — it is functional space. Floor space allows you to spread large projects, lay out fabric before cutting, move freely between zones, and bring in additional work surfaces when a project demands more room. Filling every available floor area with furniture creates a claustrophobic room that limits creative ambition.

Aim to keep at least 30 to 40 percent of your craft room floor area clear of permanent furniture. This percentage sounds high but it makes the room feel dramatically more spacious and accommodates the large-scale project moments that are often the most creatively satisfying experiences in any creative space.
How to Layout a Craft Room for Sewing and Fabric Work
Sewing and fabric-focused craft rooms have specific layout requirements that differ from general craft rooms. The sewing machine position, the ironing station relationship, and the fabric cutting area must work as a continuous efficient workflow rather than independent isolated zones.

Position the sewing machine table first as it is the primary work station. Place the cutting table within two to three steps of the sewing machine — ideally at a 90-degree angle — so cut pieces transfer directly to the sewing position with minimal movement. The ironing board lives within one or two steps of the sewing machine in the opposite direction for the press-and-sew workflow that experienced sewers use constantly.
| Sewing Room Zone Triangle | Relationship |
|---|---|
| Sewing machine | Primary station |
| Cutting table | 90° from sewing, 2–3 steps |
| Ironing station | Opposite side, 1–2 steps |
| Fabric storage | Within view, easy access |
How to Layout a Craft Room for Papercrafting and Scrapbooking
Papercrafting and scrapbooking require large flat work surfaces, extensive paper storage, and numerous small supply categories that need organized, visible, accessible storage. The layout for this craft type prioritizes work surface area and storage capacity over all other considerations.

Position a large flat work table — minimum 90 by 150 centimeters — as the primary surface. Dedicate one full wall to vertical paper storage with shelving or cubby units that store paper standing upright rather than flat to save space. Position a secondary smaller surface for die cutting machines and electronic cutting tools that are too large to share the main work surface comfortably.
Find complete supply organization inspiration from craft room ideas for specifically paper-focused craft room layouts and storage systems.
| Papercrafting Layout Priority | Layout Solution |
|---|---|
| Large flat work surface | 90×150 cm minimum table |
| Paper storage | Vertical cubby wall system |
| Die cutting station | Secondary surface or cart |
| Embellishment storage | Clear drawer units near table |
How to Layout a Shared Craft Room and Guest Room
A dual-purpose craft room and guest room requires the most carefully considered layout of any craft space. The challenge is creating a room that functions fully as both a creative workspace and a comfortable guest bedroom without either function feeling compromised. A Murphy bed is the most effective solution for combining these two functions.

Position the Murphy bed on one wall and build craft storage and the work surface around the remaining walls. When the bed is stored the entire room functions as a craft room. When guests arrive the bed deploys and the craft storage becomes a beautifully organized backdrop to a functional guest room. Keep the craft color scheme calm and neutral so it doubles effectively as a guest room aesthetic.
Get Murphy bed layout inspiration from hidden storage ideas for concealing craft supplies beautifully when the room transitions to guest room function.
| Shared Room Layout Strategy | How to Achieve It |
|---|---|
| Murphy bed wall | Dedicated single wall |
| Craft storage walls | Remaining three walls |
| Work surface position | Folds or rolls away when needed |
| Neutral aesthetic | Works for both functions |
Traffic Flow: The Layout Element Everyone Ignores Until It Frustrates Them
Traffic flow in a craft room determines how comfortably and how efficiently you move between zones during a creative session. Poor traffic flow means constantly squeezing past obstacles, knocking things over when turning, and making your own movement through the room feel like an obstacle course.

Maintain a minimum walking corridor of 90 centimeters between any two pieces of furniture or between furniture and the wall. This 90-centimeter clearance allows comfortable movement even when carrying large projects, bolts of fabric, or wide flat materials like foam board and canvas. Behind your primary work chair, maintain a minimum of 100 centimeters of clearance for chair pullout and standing access.
| Traffic Flow Clearance | Minimum Dimension |
|---|---|
| General walking corridor | 90 cm between furniture |
| Behind primary work chair | 100 cm for pullout and standing |
| In front of storage | 90 cm to open doors/drawers |
| Cutting table clearance | 100 cm on all accessible sides |
Using Pegboards Effectively in the Craft Room Layout
A pegboard wall is one of the most versatile and most space-efficient storage solutions in any craft room layout. It turns an entire wall into visible, customizable, immediately accessible storage for tools, supplies, and accessories. The ability to rearrange pegboard hooks and accessories as needs change makes it perfectly adaptable over time.

Position the pegboard on the wall most immediately accessible from the primary work surface — ideally directly in front of or beside where you sit. This positioning ensures that frequently used tools are accessible without any chair movement whatsoever. A pegboard positioned too far from the work surface loses much of its functional advantage and simply becomes decorative storage.
| Pegboard Placement | Functional Access Level |
|---|---|
| Directly in front of work surface | Reach without moving chair |
| Immediately beside work surface | Minimal chair rotation needed |
| Across the room | Must stand to access |
| On door back | Limited but better than nothing |
How to Layout Storage for Frequently vs Rarely Used Supplies
The storage hierarchy in a craft room layout divides all supplies into three access tiers. Daily-use supplies live within arm’s reach of the work surface — in pegboard holders, desktop caddies, or the top drawers of adjacent storage units. Weekly-use supplies live within easy standing reach — on nearby shelves or in accessible drawers. Monthly-use or seasonal supplies live in harder-to-reach locations — high shelves, deep cabinets, or external storage.

Most craft rooms fail because daily-use supplies are treated the same as monthly-use supplies and stored in the same accessible locations. This means prime storage real estate is wasted on items used rarely while frequently needed supplies are buried in inaccessible locations.
| Supply Access Tier | Storage Location |
|---|---|
| Daily use supplies | Arm’s reach from seated position |
| Weekly use supplies | Standing reach, nearby shelves |
| Monthly use supplies | Any accessible shelf or drawer |
| Seasonal or specialty | High shelves, deep cabinets, external |
Layout Planning for Natural Light and Window Position
Natural light is one of the most precious resources in any craft room. Good natural light reduces eye strain, improves color accuracy, and makes the entire creative experience more energizing. Poor management of natural light through careless furniture placement is one of the most common and most easily avoidable craft room layout mistakes.

Face the work surface at a 90-degree angle to the window — work with the window to your left or right rather than in front of or behind you. Install blinds or sheer curtains that can control light intensity without blocking it entirely. If the room receives harsh afternoon sun, position the cutting zone in the brighter area since cutting accuracy is less affected by variable light than detail painting or color matching work.
| Natural Light Management | Solution |
|---|---|
| Harsh direct sun on work surface | Sheer blind, rotate 90 degrees |
| Window behind work position | Reposition table to side of window |
| No natural light at all | Daylight LED bulbs 5000–6500K |
| Morning only light | Position primary work facing window |
How to Plan a Craft Room Layout in a Small Space
Small craft rooms require every square centimeter to work harder than in a larger space. The layout principles are identical to larger spaces but the tolerances are tighter and the prioritization of what matters most becomes more critical. In a small craft room, function must win every competition with aesthetics.

Use wall-mounted fold-down work surfaces that collapse flat when not in use. Install floor-to-ceiling shelving to maximize vertical storage. Choose furniture on wheels so pieces can be repositioned for different project types. Accept that a small craft room cannot accommodate all crafts equally — decide which craft is primary and lay out for that first, accommodating others secondarily.
| Small Craft Room Strategy | Space Saved |
|---|---|
| Fold-down wall-mounted table | Full floor space when folded |
| Floor-to-ceiling shelving | 3x more storage than waist-high |
| Furniture on wheels | Flexible zone reconfiguration |
| Wall-mounted pegboard | Zero floor storage footprint |
The Layout Planning Process: Step by Step
Step 1 — Measure everything precisely Measure room dimensions including ceiling height, window sill heights, door width and swing direction, and all outlet and switch positions. Draw a scaled floor plan on graph paper or use a free online room planning tool.
Step 2 — List your crafts in priority order Write down every craft you do, ranked by how frequently you practice it. The most frequent craft determines the primary zone layout. Less frequent crafts occupy secondary positions.
Step 3 — List your must-have furniture Write down every piece of furniture the room requires — work table, cutting table, sewing machine table, storage units, chair. Include approximate dimensions of each piece.
Step 4 — Position the work surface first Place the primary work surface in the position that receives the best side natural light. Work all other furniture positions around this anchor decision.
Step 5 — Add storage units to remaining walls Fill remaining wall space with storage appropriate to your supplies. Prioritize the wall most accessible from the work surface for highest-frequency supply storage.
Step 6 — Plan electrical positions Identify where you need power for tools and appliances. If outlets do not exist in the right locations, plan for a licensed electrician to add them before finalizing the layout.
Step 7 — Plan lighting for each zone Assign a lighting solution to each work zone — a task lamp at the primary surface, under-shelf lighting on storage units, general overhead for the room.
Step 8 — Test the traffic flow on paper Draw your own walking path between all zones on the floor plan. Identify any pinch points where the path is narrower than 90 centimeters and adjust furniture accordingly.
Signs Your Current Layout Needs Rethinking
- You regularly get up more than three times per crafting session to retrieve supplies
- The first thing you do when starting a project is rearrange the table surface
- Your back, neck, or shoulders hurt after extended crafting sessions
- You avoid certain crafts because setting up takes too long in the current layout
- Extension cords run across the floor creating trip hazards
- The cleanup process involves carrying items across the entire room
- You feel frustrated or cramped rather than energized when you enter the room
Any three or more of these signs indicate a layout that is working against your creativity rather than supporting it. Addressing the layout solves most of these issues simultaneously.
Frequently Asked Questions
What is the ideal size for a craft room?
The ideal craft room size depends on your specific crafts but a room of approximately 3 by 4 meters allows for a comfortable L-shaped work surface with adequate storage and traffic flow. A minimum workable craft room is approximately 2.5 by 3 meters. Smaller than this requires significant compromise in work surface area and storage capacity. Larger rooms above 4 by 5 meters benefit from a full U-shaped layout.
Should a craft room have a sink?
A sink in a craft room is highly desirable but not essential for most crafters. It is most valuable for those who work with paint, dye, clay, or any water-based materials regularly. A sink dramatically improves cleanup efficiency and prevents cross-contamination of work surfaces with wet materials. If a plumbing rough-in exists nearby, adding a utility sink is one of the most practical craft room investments possible.
What is the best flooring for a craft room?
Vinyl plank, laminate, or smooth tile flooring are the most practical craft room flooring choices. They handle spills, glue, and paint easily without staining and allow rolling furniture and chairs to move freely. Carpet is the worst craft room flooring choice because it absorbs glue, paint, and dye permanently and prevents smooth chair movement. A large washable mat under the work chair adds comfort without the maintenance challenges of full carpet.
How much storage do I need in a craft room?
Most crafters underestimate storage needs by approximately 50 percent when planning a craft room. A practical planning rule is to measure your current supply volume, plan storage for 150 percent of that volume, and expect to fill it within two years. Floor-to-ceiling shelving on the primary storage wall provides the highest storage density. Supplement with pegboard, drawer units, and under-surface storage for maximum total capacity.
How do I layout a craft room in a spare bedroom?
A standard spare bedroom craft room works best with an L-shaped layout using two adjacent walls for work surfaces and storage, and the remaining walls for additional storage. Position the primary work surface under or beside the window for natural light. Install floor-to-ceiling shelving on the windowless walls for maximum storage. If the room must also serve as a guest room, plan a Murphy bed into the layout from the beginning rather than adding it as an afterthought.
Conclusion
A well-planned craft room layout is the difference between a creative space you look forward to entering and one that subtly drains your creative energy every time you use it. The layout principles in this guide — correct work surface placement, use-based storage, proper lighting planning, adequate traffic flow, and zone-based organization — are not complicated but they are genuinely transformative when applied thoughtfully.
Take the time to measure your room, map your workflow, and plan on paper before moving any furniture. The planning stage costs nothing and prevents the expensive, frustrating mistakes that come from trial and error in an already furnished room. Your craft room deserves a layout that genuinely supports your creativity — and with this guide, you now have everything you need to create one.