Your kids are bored in the backyard. They have outgrown the baby swing and the plastic slide sits unused. Store-bought play sets cost thousands of dollars for something that wobbles after two seasons. You want something better but the price tags are impossible to justify.
A DIY jungle gym solves every one of those problems. You build exactly what your children want. You control the quality of every piece of wood and every bolt. You spend a fraction of what a commercial set costs. And when it is done, you have built something your kids will use and love for years.

source: @imagination1station
This complete guide covers every step from planning and materials to construction and safety.
1. Plan the Jungle Gym Before You Buy Anything
Planning is where every successful DIY jungle gym begins. A build without a plan wastes money on wrong materials and creates frustrating rework mid-project. A build with a solid plan goes smoothly from the first post hole to the final coat of sealant.

source: @homefixtrends
Decide what features your children want most. A slide and climbing wall matter more to most kids than a complex rope course they will use twice. List every feature in priority order. Start with the non-negotiables and add features as budget allows. Draw the structure from multiple angles — front, side, and top — before purchasing a single board. You’ll also love to read our guide on shed house plans and ideas.
| Feature | Age Range | Difficulty to Build | Approximate Added Cost |
|---|---|---|---|
| Basic swing set (2 swings) | 3–12 years | Easy | $40–$80 |
| Slide | 3–10 years | Easy-Moderate | $60–$150 |
| Rock climbing wall | 5–14 years | Moderate | $50–$120 |
| Rope ladder | 4–12 years | Easy | $20–$50 |
| Monkey bars | 6–14 years | Moderate | $60–$120 |
| Tire swing | 3–12 years | Easy | $15–$40 |
| Sandbox enclosure | 2–8 years | Easy | $30–$80 |
| Lookout platform | 4–12 years | Moderate | $80–$150 |
2. Choose the Right Location in Your Backyard
Location affects safety, usability, and how long the structure lasts. A poorly chosen location creates drainage problems, excessive shade or sun, and proximity hazards that make the jungle gym less safe and less enjoyable.

source: @junglegymofficial
Choose a flat or gently sloping area with good drainage. Avoid low-lying spots where water collects after rain. Position the structure where you can see it from inside the house — kitchen windows are ideal for passive supervision. Keep the structure at least six feet from fences, walls, trees, and any other objects a child could collide with. Allow a minimum fall zone of six feet on all sides beyond the outermost equipment.
- Flat ground requires no grading — a slight natural slope requires leveling before building
- Position within sightline of the main indoor living area for easy supervision
- Keep at least six feet clearance from fences, walls, and all fixed objects on every side
- Avoid positioning directly under trees — falling branches and sap create ongoing problems
- Confirm no underground utilities cross the build area before digging any post holes
3. Understand Safety Standards Before Building
A jungle gym built without understanding safety standards is a liability and a danger. Children fall from play structures. The structure must be designed to make those falls as safe as possible. Understanding the basic safety principles before designing your build prevents the most common and most serious injury risks.

The Consumer Product Safety Commission publishes free guidelines for home playground equipment. These guidelines cover fall zone dimensions, equipment height limits, entrapment hazard avoidance, and surfacing requirements.
The maximum recommended platform height for home play structures is six feet. All openings between structural elements must be either smaller than 3.5 inches or larger than 9 inches to prevent head entrapment. Hardware must be recessed or capped to eliminate protrusion hazards.
| Safety Requirement | Standard | Why It Matters |
|---|---|---|
| Maximum platform height | 6 feet for home structures | Limits fall injury severity |
| Minimum fall zone | 6 feet beyond all equipment | Protects landing area |
| Opening size rule | Under 3.5 or over 9 inches | Prevents head entrapment |
| Hardware protrusion | Must be capped or recessed | Prevents cuts and snagging |
| Fall surfacing depth | 9–12 inches loose fill | Absorbs impact energy |
4. Choose the Best Wood for Your Jungle Gym
Wood choice is the most important material decision in a DIY jungle gym build. The wrong wood rots, warps, splinters, and fails structurally within a few seasons. The right wood lasts fifteen to twenty years with basic maintenance.

source: @wildhogproducts
Pressure-treated lumber is the most widely recommended choice for structural posts and beams. Modern pressure treatment uses copper-based preservatives that are significantly safer than older formulations. Cedar is a beautiful natural alternative that resists rot without chemical treatment.
It is more expensive than pressure-treated pine but produces a smooth, splinter-resistant surface that is ideal for areas children touch frequently. Avoid creosote-treated wood and old CCA-treated lumber entirely — both contain chemicals unsafe for children’s play areas.
| Wood Type | Rot Resistance | Splinter Risk | Cost Level | Best Use |
|---|---|---|---|---|
| Pressure-treated pine | Excellent | Moderate (sand well) | Low | Posts, beams, frame |
| Cedar | Very Good | Low | Moderate | Decking, rails, touching surfaces |
| Redwood | Excellent | Very Low | High | Premium builds |
| Douglas fir (untreated) | Poor | Low | Low | Interior only |
| Composite lumber | Excellent | None | High | Decking, rails |
5. Gather All Materials and Tools Before Starting
Starting a jungle gym build without all materials on hand causes frustrating delays. A mid-project hardware store run kills momentum and sometimes results in mismatched materials. Create a complete materials list from your finished plan before purchasing anything.

source: @milkbarsa
Standard materials for a basic jungle gym include pressure-treated 4×4 posts, 2×6 or 2×8 beams, 2×4 decking and rails, galvanized hardware throughout, structural screws or bolts, concrete for post footings, and swing hardware rated for the intended load.
Calculate quantities generously — add ten percent to all lumber quantities for cuts, errors, and waste. Buy all hardware at once to ensure consistent galvanization grade throughout the structure.
- Create a cut list from your plan showing every board dimension before ordering lumber
- Buy all hardware in one purchase — mixing galvanization grades causes accelerated corrosion
- Purchase structural screws or bolts rated for exterior use and pressure-treated lumber contact
- Rent a post hole digger for the day rather than digging by hand — it saves hours of effort
- Have all materials delivered if possible — transporting long lumber in a personal vehicle is awkward and risky
6. Dig and Set the Posts Correctly
The posts are the foundation of the entire structure. Incorrectly set posts cause the whole jungle gym to lean, shift, or fail over time. Setting posts correctly takes extra care but the structural stability it creates lasts for the life of the build.
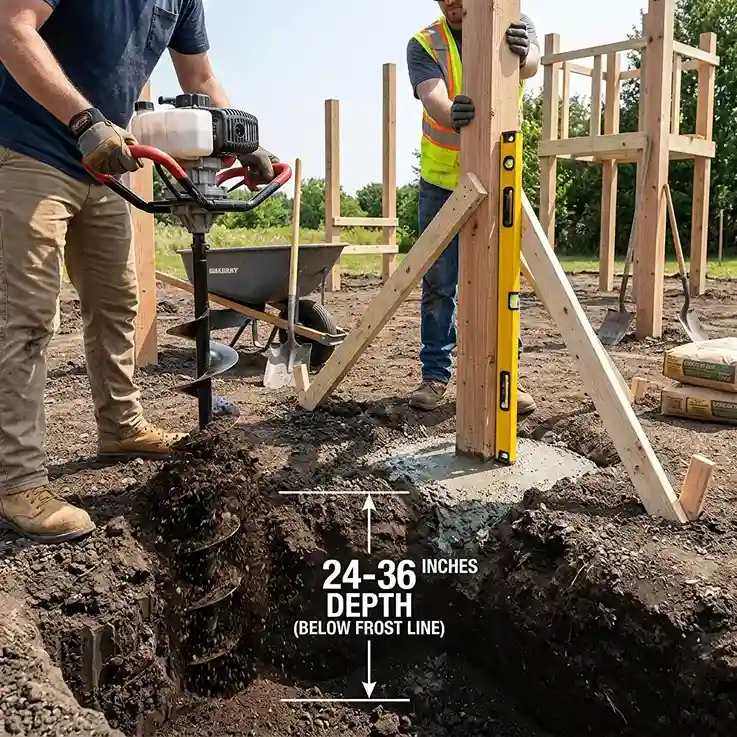
Dig post holes to a depth below the local frost line — typically 24 to 36 inches depending on your climate. Frost heaving pushes incorrectly shallow posts upward over winter, destabilizing the structure. Use a clamshell post hole digger or a rented auger for clean, consistent holes.
Pour concrete around each post, sloping the top of the concrete slightly away from the post to direct water away from the wood. Brace each post plumb in both directions and hold it in position until the concrete sets — typically 24 to 48 hours.
| Post Setting Method | Stability | Best For | Cost |
|---|---|---|---|
| Concrete in ground | Excellent | Permanent structures | Low |
| Post base anchors in concrete | Very Good | Easier replacement | Moderate |
| Gravel tamped base | Good | Temporary, sandy soil | Very Low |
| Surface-mount post base | Good | Concrete pad installation | Moderate |

source: @tubelox
7. Frame the Main Platform Structure
The main platform is the structural core of the jungle gym. Everything else — the slide, the climbing wall, the swings — connects to or hangs from this central frame. A square, level, and properly braced platform frame ensures that every subsequent element installs correctly and performs safely.
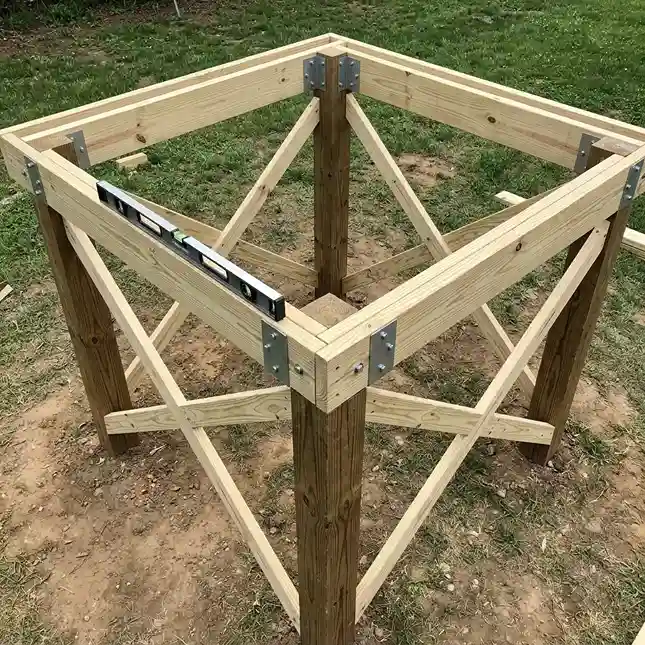
Use 2×8 or 2×10 lumber for the platform frame depending on the span. Larger spans need deeper lumber to prevent bounce and flex. Connect the frame to the posts with structural brackets and carriage bolts — not just screws.
Cross-brace the structure using diagonal boards from post to post to prevent racking under active use. A properly braced jungle gym frame feels completely solid with no perceptible flex even when multiple children are using it simultaneously. Read our guide on mobile home and discover how to beautify living space.
- Use galvanized joist hangers at every joist-to-beam connection for maximum structural integrity
- Verify the frame is perfectly level in all directions before fastening any permanent connections
- Add diagonal knee braces from posts to beams to prevent lateral movement during use
- Double all rim joists — the outer frame boards — for added strength at the platform perimeter
- Pre-drill all bolt holes to prevent wood splitting during tightening
8. Build the Deck Surface and Railings
The deck surface is where children stand, play, and transition between equipment. It must be smooth, splinter-free, and fastened securely enough to handle the dynamic loads of active play. The railings must be strong enough to withstand a child’s full weight leaning against them.

Use cedar or sanded pressure-treated boards for the deck surface. Space boards with a maximum half-inch gap to prevent small feet from catching while allowing drainage. Sand all deck boards before installation — smooth all faces, edges, and ends with 60-grit then 120-grit sandpaper.
Use two screws per board per joist, counter-sunk to prevent raised screw heads. Install railings on all open platform sides where the drop exceeds 30 inches. Space railing balusters no more than 3.5 inches apart.

source: @stewarthouserenovation
| Railing Height Recommendation | Platform Height | Why |
|---|---|---|
| No railing required | Under 20 inches | Low fall risk |
| 29–36 inch railing | 20–48 inches | Standard play structure |
| 36–42 inch railing | 48–72 inches | Maximum recommended height |
9. Install a Slide Safely and Correctly
A slide is the most exciting element of any jungle gym for young children. Installing it correctly ensures both safety and maximum fun. A poorly installed slide wobbles, gaps at the platform transition, or creates a speed and angle that launches children rather than delivering them gently to the ground.

source: @thebunnyhophaven
Purchase a commercial-grade plastic or metal slide of appropriate length for your platform height. The slide angle should fall between 30 and 35 degrees from horizontal for safe, controlled descent. The slide must connect smoothly to the platform with no gap or raised edge at the top transition.
The bottom of the slide must be no higher than 11 inches from the ground to prevent injury on exit. Secure the slide to the structure with bolts through the pre-drilled mounting flanges — never with screws alone.
10. Add a Rock Climbing Wall for Physical Challenge
A climbing wall is one of the most physically beneficial and popular additions to any DIY jungle gym. It develops upper body strength, coordination, balance, and problem-solving skills simultaneously. It suits a wider age range than most other jungle gym elements and remains engaging and challenging for years as children grow.

source: @thebunnyhophaven
Build the climbing wall from a sheet of 3/4-inch exterior-grade plywood cut to the desired width and height. Angle it between 60 and 80 degrees from horizontal — a slight lean outward from vertical makes climbing easier for younger children and more challenging as they develop.
Drill T-nut holes in a grid pattern across the plywood surface. Install T-nuts from behind. Thread commercial climbing holds onto the T-nuts in a route pattern that suits your children’s ability levels. Change hold positions periodically for a fresh challenge without any additional cost.
| Climbing Wall Spec | Recommended Value | Why |
|---|---|---|
| Plywood thickness | 3/4 inch exterior grade | Holds T-nut loads safely |
| Wall angle | 60–80 degrees from horizontal | Appropriate difficulty |
| T-nut grid spacing | 8×8 inches | Flexible hold placement |
| Minimum hold count | 20–30 holds | Enough route variety |
| Hold diameter | 2–4 inches | Suits children’s hand size |
For more boys bedroom and play space design inspiration that pairs with an active outdoor play structure, explore these boys bedroom ideas for creative ways to bring the same adventurous energy indoors.
11. Install Monkey Bars for Upper Body Development
Monkey bars develop grip strength, shoulder stability, and coordination faster than almost any other childhood exercise. They are a challenging but achievable element for most children aged six and above. A well-built set of monkey bars provides years of physical challenge that grows with the child.

Space monkey bars at 12 to 15 inch intervals — closer spacing suits younger and smaller children. The bar diameter should fall between 1.25 and 1.5 inches for a comfortable child’s grip. Set the monkey bar height so that the shortest intended user hangs freely with feet at least six inches off the ground when fully extended.
Use galvanized steel pipe or solid hardwood dowel for the bars — both provide excellent grip and long-term durability. Secure each bar with carriage bolts through pre-drilled side rails.
- Galvanized steel pipe in 1.25-inch diameter is the most durable monkey bar material
- Space bars no wider than 15 inches for children under eight years old
- Install a start platform at the same height as the bars for easier access
- Round all wood bar edges to a minimum 1/4 inch radius to prevent hand injuries
- Test every bar by hanging your full body weight before allowing children to use the structure
12. Add Swings to Complete the Classic Jungle Gym
Swings are the most universally loved jungle gym element across all ages. A properly installed swing set supports years of vigorous daily use without loosening, squeaking, or failing. The swing hardware is the most safety-critical component of the entire structure.

Use a structural lumber beam of at least 4×6 inch section for the swing beam — swings generate significant dynamic load during use. Install heavy-duty galvanized swing hangers rated for at least 300 pounds each — significantly more than the actual user weight to account for dynamic loading.
Space swings a minimum of 24 inches from the structure and a minimum of 12 inches from each other. Use belt swings for children under five. Rubber disc or traditional belt swings suit older children. Install a minimum of two swings for most family builds.
| Swing Type | Age Range | Safety Features | Cost Each |
|---|---|---|---|
| Soft belt swing | 2–5 years | Enclosed seat, soft edges | $15–$30 |
| Standard belt swing | 5–12 years | Flexible, durable | $10–$20 |
| Disc swing | 4–12 years | 360-degree movement | $20–$40 |
| Tire swing | 3–12 years | Large seating, group play | $15–$40 |
| Baby bucket swing | 6 months–3 years | Full back support, leg openings | $20–$40 |
13. Create Safe Fall Zone Surfacing
The surface beneath and around the jungle gym is as important as the structure itself. Most playground injuries occur from falls — not from equipment failure. The right surfacing material absorbs impact energy and dramatically reduces the severity of fall-related injuries. A jungle gym built on hard grass or compacted soil is genuinely dangerous.

source: @ezplaytoys
Wood chips and engineered wood fiber are the most popular and cost-effective fall zone surfacing options. Install a depth of at least nine inches for a platform height of five to six feet.
Maintain this depth year-round — surfacing compacts and decomposes over time. Enclose the fall zone with landscape timber edging to contain the material and prevent it from spreading into the lawn. Replace or top up the surfacing annually before the play season begins.
| Surfacing Type | Depth Needed | Cost per cubic yd | Maintenance |
|---|---|---|---|
| Wood chips | 9–12 inches | $15–$30 | Annual top-up |
| Engineered wood fiber | 9–12 inches | $25–$45 | Annual top-up |
| Pea gravel | 9–12 inches | $20–$35 | Annual top-up |
| Rubber mulch | 6 inches | $60–$100 | Every 5–7 years |
| Sand | 9–12 inches | $15–$25 | Frequent raking |
14. Sand, Seal, and Finish the Lumber
Raw pressure-treated lumber and cedar both benefit enormously from proper finishing. Sanding removes mill marks, surface roughness, and potential splinters. Sealing protects the wood from moisture, UV damage, and accelerated deterioration. A properly finished jungle gym is safer, more attractive, and lasts significantly longer than an unfinished one.

Sand all lumber surfaces with 60-grit sandpaper followed by 120-grit. Pay particular attention to handrails, ladder rungs, deck boards, and all surfaces that children’s hands and skin contact regularly.
Apply a penetrating wood sealer or semi-transparent exterior stain after sanding. Allow pressure-treated lumber to dry for at least three to six months before applying any finish — freshly treated lumber is too wet to accept most sealants effectively.
- Sand in the direction of the wood grain — cross-grain sanding leaves visible scratch marks
- Apply finish on a dry day with temperatures between 50 and 90 degrees Fahrenheit
- Use a brush rather than a roller for penetrating oil-based finishes for deeper absorption
- Re-apply sealant or stain every two to three years for maximum wood protection
- Check all surfaces for raised splinters after the first winter and sand smooth as needed
15. Inspect and Maintain the Structure Regularly
A DIY jungle gym requires regular inspection and maintenance to remain safe throughout its life. Wood expands and contracts with temperature and moisture changes. Fasteners loosen over time under the dynamic loads of active play. A structure that was safe on build day can develop hazards within a single season without ongoing attention.

source: @our.yorkshire.scandihome
Inspect the entire structure at the beginning of every play season and monthly throughout active use periods. Check every bolt and screw for looseness and tighten as needed. Look for cracks, splits, rot, and warping in all lumber. Check all hardware for corrosion and replace any compromised components immediately.
Test the stability of every post by pushing firmly from multiple directions. Look for worn or frayed rope elements. Check all swing hardware connections. A fifteen-minute monthly inspection prevents the majority of jungle gym safety incidents.
| Inspection Item | Frequency | Action If Problem Found |
|---|---|---|
| All bolts and screws | Monthly | Tighten or replace |
| Lumber for cracks or rot | Monthly | Replace affected board |
| Post stability | Seasonally | Re-set in fresh concrete |
| Swing hardware | Monthly | Replace if any wear showing |
| Fall zone surfacing depth | Seasonally | Top up to required depth |
| Surface finish condition | Annually | Re-sand and re-seal |
16. Add Creative Extras for Maximum Fun
Once the core structure is built and safe, creative extras transform a good jungle gym into an extraordinary one. These additions cost very little individually but add enormous play value and keep children engaged with the structure for years longer than a basic build would.
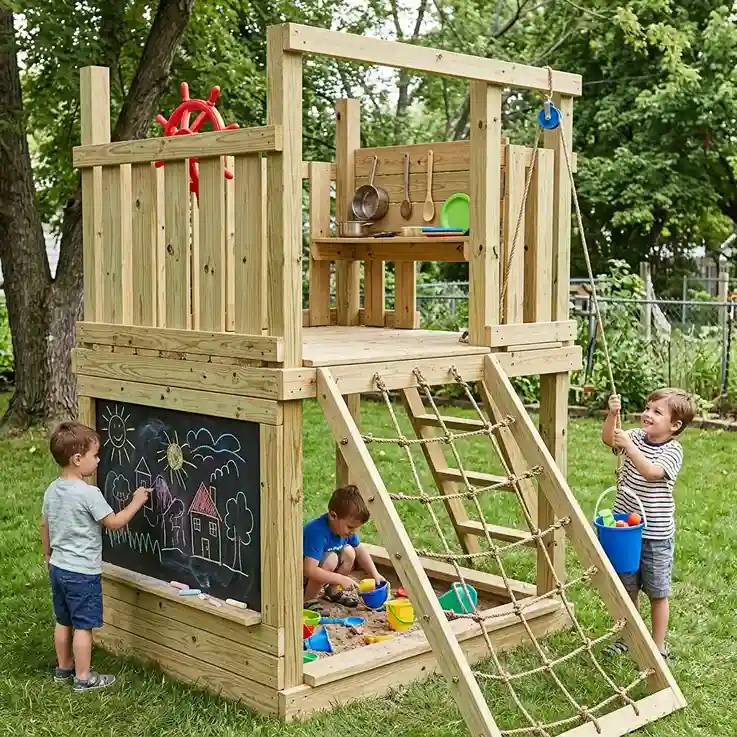
A chalkboard panel mounted on one side of the structure gives children a creative surface for outdoor art and games. A small sandbox enclosed within the structure base combines two beloved play elements in one footprint. A pulley system with a bucket delivers snacks, messages, and toys between the ground and the platform.
Rope netting hung between platform and ground creates a spider web climb. A simple steering wheel and a few repurposed kitchen items create a dramatic play kitchen or ship captain’s station that sparks hours of imaginative play.
17. Design a Jungle Gym for Multiple Age Groups
The most-used jungle gym serves the full age range of your children rather than being optimized for one age at the expense of others. A build that suits a four-year-old bores a ten-year-old. A build that challenges a ten-year-old is dangerous for a four-year-old. Designing for multiple ages requires thoughtful separation of challenge levels within a single structure.

Include easier features at lower heights — a small slide, a short rope ladder, a simple fireman’s pole — suited to younger children. Reserve higher platform areas and more challenging elements — monkey bars, rock climbing wall, higher swings — for older children.
Design clear sightlines so older children can see and avoid younger ones using the lower play area. A multi-age structure gets genuinely daily use across the full span of childhood rather than being outgrown within a few seasons.
| Child Age | Appropriate Equipment | Maximum Safe Height |
|---|---|---|
| 2–3 years | Bucket swing, small slide | 18 inches |
| 3–5 years | Belt swing, slide, simple ladder | 36 inches |
| 5–8 years | Monkey bars, climbing wall, platform | 48–60 inches |
| 8–12 years | All elements, full challenge | 72 inches max |
18. Budget Your DIY Jungle Gym Realistically
A realistic budget prevents the most common DIY jungle gym failure — a half-built structure abandoned when funds run out. Understand all costs before purchasing anything. Include materials, hardware, tools, concrete, surfacing, and finishing in the total estimate.

A basic jungle gym with a platform, slide, two swings, and a climbing wall costs $400–$800 in materials for an owner-builder. A more complex structure with monkey bars, a lookout platform, multiple slides, and a rope bridge costs $800–$2,000.
Professional installation of a comparable commercial structure costs $3,000–$8,000. The DIY saving is substantial at every build level. Add fifteen to twenty percent to your material estimate for waste, errors, and additions discovered during the build.
| Build Level | Features Included | Approximate DIY Cost |
|---|---|---|
| Basic starter | Platform, slide, 2 swings | $300–$600 |
| Standard family | Platform, slide, swings, climbing wall | $600–$1,000 |
| Full feature | All above plus monkey bars, extras | $1,000–$2,000 |
| Premium build | Large multi-platform, all features | $2,000–$4,000 |
19. Make the Jungle Gym Area a Complete Backyard Destination
The jungle gym is more enjoyable when the surrounding area is designed as a complete play destination. A defined, landscaped jungle gym area signals to children that this is their special zone within the backyard. It also contains the fall zone material, improves the appearance of the structure, and makes the whole backyard more attractive.

Border the play area with landscape timber edging to contain the fall zone surfacing. Plant fast-growing shrubs along the back boundary for privacy and wind screening. Add a water station nearby — a simple outdoor tap or a refillable water dispenser — for hydration during active play.
Position a storage box beside the structure for outdoor toys, chalk, and bubbles. A picnic table or simple bench nearby gives parents a comfortable spot to supervise from. The complete play destination gets used more often and provides more enjoyment than a standalone structure surrounded by bare lawn.
For backyard space planning and outdoor living inspiration that makes the whole yard feel designed and purposeful, these warm rustic living room ideas capture the layered, intentional atmosphere that the best outdoor play spaces share with well-designed indoor rooms.
20. Photograph, Document, and Enjoy the Build
Documenting a DIY jungle gym build creates a lasting record of the project and a deeply meaningful family memory. Photograph every stage — the post holes, the framing, the first deck board, the slide installation, and the finished structure on the day your children first use it. These photographs become some of the most treasured in any family’s collection.

source: @jozikids
Share the build process with the children where age-appropriate. Let them choose the paint color or the climbing hold arrangement. Give them a small task on build day — holding boards, painting a surface, handing tools — that gives them genuine ownership of the finished structure.
A jungle gym that children helped build is one they use with particular pride and take care of naturally. The day it is finished and the first child climbs it is one of the most satisfying moments any DIY builder ever experiences.
Frequently Asked Questions (FAQs)
Q1: How long does it take to build a DIY jungle gym?
A basic jungle gym with a platform, slide, and two swings takes most builders two to three weekends to complete. A more complex structure with monkey bars, a climbing wall, and multiple platforms takes four to six weekends. Setting the posts and waiting for concrete to cure accounts for one full day of waiting before framing can begin. Preparation — planning, purchasing materials, and cutting a cut list — adds another weekend before construction starts.
Q2: What is the best wood to use for a DIY jungle gym?
Pressure-treated lumber is the best choice for structural posts and beams. Use cedar for all surfaces that children touch frequently — handrails, deck boards, ladder rungs — as it is naturally smooth and splinter-resistant. Sand all lumber thoroughly before installation regardless of species. Never use untreated pine, old railroad ties, or creosote-treated wood in a children’s play structure.
Q3: How deep should post holes be for a jungle gym?
Post holes should extend at least six inches below the local frost line to prevent frost heaving in cold climates. In most temperate regions this means digging 24 to 36 inches deep. In mild climates without significant frost, 18 to 24 inches in concrete is generally adequate for structures under six feet tall. Check your local building code for the specific frost depth requirement in your area.
Q4: Do I need a permit to build a backyard jungle gym?
Most jurisdictions do not require a permit for a residential play structure under a certain height — typically six feet. However, rules vary significantly by location. Some areas require permits for any permanent structure. Others have specific requirements for structures within certain distances of property lines. Check with your local building department before breaking ground to confirm the requirements for your specific property.
Q5: How do I make a jungle gym safe for toddlers and older children simultaneously?
Design separate activity zones at different heights and challenge levels. Place toddler-appropriate equipment — bucket swings, short slides, simple ladders — at lower heights with more enclosed framing. Reserve higher platforms and challenging elements — monkey bars, rock climbing walls — for older children. Install physical barriers between zones at different heights. Maintain active supervision whenever children of significantly different ages use the structure simultaneously.
Conclusion
A DIY jungle gym is one of the most rewarding outdoor projects any parent can undertake. The finished structure delivers years of daily use, physical development, and genuine joy that no store-bought alternative can match in personal meaning. You built it, your children helped choose it, and every splinter-free board and tightened bolt reflects the care and thought you put into creating something special for the people you love most.
Start with a solid plan. Choose good wood. Set the posts correctly and let the concrete cure properly. Build one element at a time and test each one before moving to the next. Sand everything smooth, seal it well, and inspect it regularly. The jungle gym you build this weekend could be the backdrop for your children’s happiest childhood memories for the next decade. That is a project worth doing right.