The idea of a shed house sounds unconventional. But thousands of people are converting simple shed structures into beautiful, functional homes every year. They cost a fraction of traditional construction.
They build faster than any site-built house. And with the right planning, they look and feel like proper, comfortable homes.
Whether you want a backyard studio, a guest house, a full-time tiny home, or a weekend retreat, a shed house plan is the most accessible path to affordable homeownership or extra living space.

source: @studioshed
This complete guide covers everything — from choosing dimensions and drawing plans to finishing the interior and making it genuinely livable. Every question you have about shed houses is answered here.
1. What Exactly Is a Shed House?
A shed house is a residential structure built using shed construction principles. It starts with the simple, efficient framing of a traditional storage shed and transforms it into a livable space with insulation, plumbing, electricity, windows, and interior finishing. The result is a compact, affordable home that costs dramatically less per square foot than conventional construction.

Shed houses range from tiny 120-square-foot studios to substantial 800-square-foot cottages with multiple rooms. They suit a remarkable variety of uses — permanent tiny homes, guest accommodations, backyard offices, art studios, vacation cabins, and accessory dwelling units. The shed house concept is one of the fastest-growing segments of the alternative housing movement worldwide. You’ll also love to learn about mobile homes with our guide.
| Shed House Use | Typical Size | Complexity | Permit Requirements |
|---|---|---|---|
| Backyard studio or office | 100–200 sq ft | Low | Often none |
| Guest accommodation | 200–400 sq ft | Moderate | Usually required |
| Full-time tiny home | 300–600 sq ft | High | Required |
| Vacation cabin | 400–800 sq ft | High | Required |
| Accessory dwelling unit | 300–800 sq ft | High | Required |

source: @waikatosheds
2. Check Local Zoning Laws and Building Codes First
Before drawing a single line on paper, research your local zoning laws and building codes. This step is non-negotiable. Regulations vary dramatically by location and they determine what you can build, where you can build it, how large it can be, and whether it can be used as living accommodation.
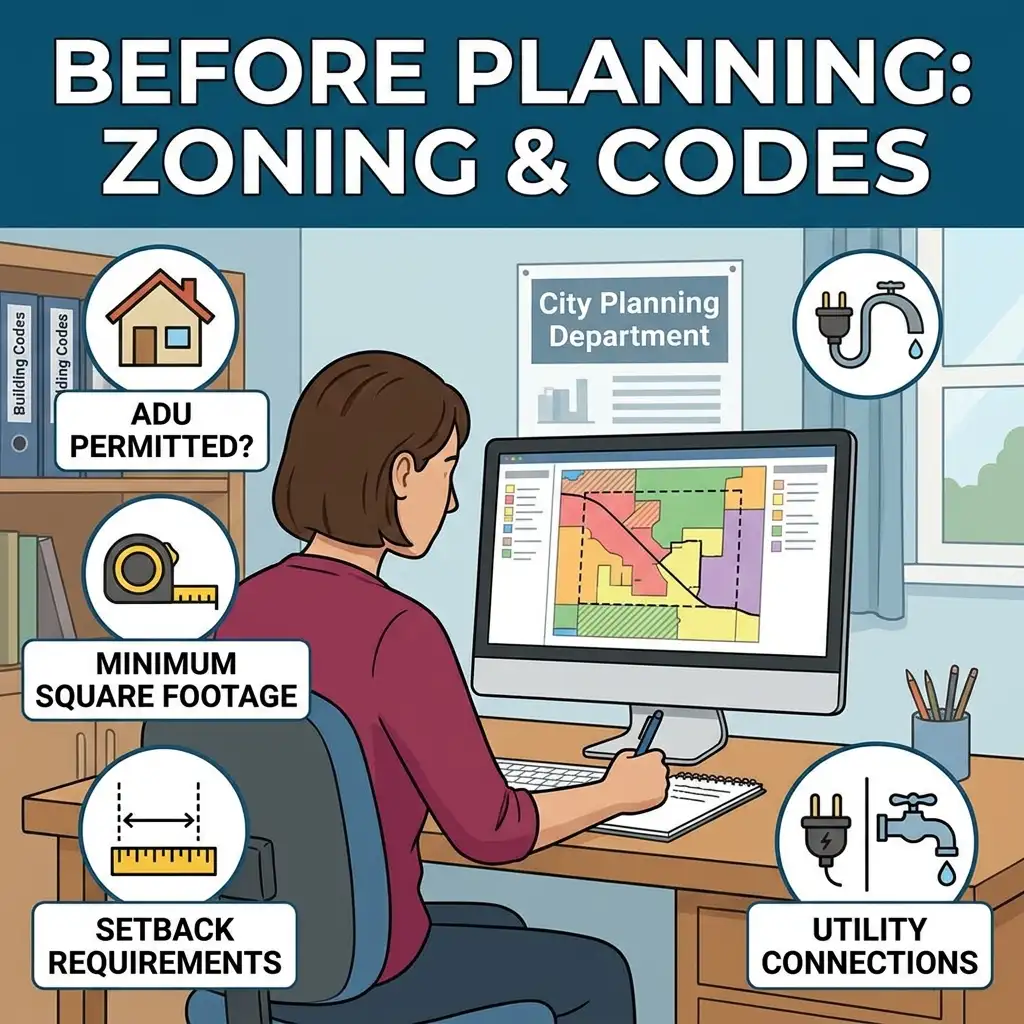
Many areas classify structures under a certain square footage as accessory structures requiring no permit. Others require full residential building permits for any structure used for habitation. Some zones prohibit residential use of shed structures entirely. Knowing your local requirements before you invest in plans, materials, or construction prevents costly violations and structures that cannot be legally occupied. Contact your local planning or zoning department for the definitive answer for your specific property.
- Research local zoning classification for your property before any planning begins
- Ask specifically whether an accessory dwelling unit is permitted on your lot
- Check minimum square footage requirements for habitable structures in your area
- Confirm setback requirements — minimum distances from property lines and other structures
- Ask about utility connection requirements for any structure used as living space
3. Understand Standard Shed House Dimensions
Shed house dimensions are the foundation of every planning decision. Getting the dimensions right means the space feels comfortable, furniture fits properly, and the structure meets code requirements. Getting them wrong means a house that is either wastefully large or frustratingly cramped.

The most common and practical shed house dimensions range from 12×20 feet to 16×40 feet. A 12×24 foot shed house provides 288 square feet — enough for a studio with a sleeping loft, a kitchenette, a bathroom, and a small living area. A 16×32 foot plan provides 512 square feet — enough for a proper bedroom, a full kitchen, a bathroom, and a comfortable living room. Standard dimensional lumber works most efficiently in multiples of four feet, so plan your dimensions accordingly.
| Shed House Size | Square Footage | Best Layout | Suitable For |
|---|---|---|---|
| 10×12 ft | 120 sq ft | Studio only | Office, studio |
| 12×20 ft | 240 sq ft | Studio + loft | Solo living, cabin |
| 12×24 ft | 288 sq ft | Open plan + bath | Couple, tiny home |
| 16×24 ft | 384 sq ft | 1 bed + kitchen + bath | Small family |
| 16×32 ft | 512 sq ft | 2 bed + kitchen + bath | Family, full home |
| 16×40 ft | 640 sq ft | 2–3 bed full home | Comfortable family |
4. Choose the Right Roof Style for Your Plan
The roof style has an enormous impact on the shed house — both visually and functionally. Different roof styles create different amounts of interior headroom, affect how well the structure sheds rain and snow, and determine how complex the construction is. Choose a roof that suits your climate, your skill level, and your interior space goals.

A gable roof is the most popular shed house roof choice. The classic inverted V shape creates maximum headroom at the center ridge. It sheds rain and snow effectively. It is relatively simple to frame and well-understood by builders at every skill level. A shed roof — a single-slope design — is the simplest to build and suits modern aesthetics beautifully. A gambrel roof creates the most interior volume and loft space but is more complex to frame correctly.
| Roof Style | Interior Space | Build Complexity | Best Climate | Visual Style |
|---|---|---|---|---|
| Gable roof | Good center height | Moderate | All climates | Traditional |
| Shed roof (single slope) | Varies by pitch | Simple | Mild to moderate | Modern, minimal |
| Gambrel roof | Maximum volume | Moderate-High | All climates | Barn, rustic |
| Hip roof | Moderate | Complex | High wind areas | Traditional, formal |
| Skillion | High on one side | Simple | Mild climates | Contemporary |
5. Plan the Interior Layout Before Building
The interior layout plan is the most important design document for any shed house project. Every interior planning decision — where the bathroom sits, how the kitchen flows, where the sleeping area is located — should be resolved on paper before a single board is cut. Changes made on paper are free. Changes made during construction are expensive.

Draw the floor plan to scale on graph paper. Use a scale of one quarter inch equals one foot. Mark all exterior walls, door and window openings, and interior partitions. Place major fixtures — toilet, sink, shower, stove, refrigerator, bed, sofa — as scaled cutouts that you can move around until the layout feels right. Walk through the imaginary layout mentally. Open every imaginary door. Move from the kitchen to the bathroom to the bedroom. A layout that works on paper almost always works in reality.
6. Design a Smart Bathroom for a Shed House
The bathroom is the most technically complex element of any shed house. It requires plumbing connections, proper ventilation, moisture-resistant materials, and thoughtful space planning. In a small shed house, the bathroom must work harder than a standard residential bathroom to meet all needs in a fraction of the space.

A standard minimum bathroom for a shed house is approximately 5×7 feet — 35 square feet. This fits a toilet, a small vanity sink, and a compact shower or combination tub-shower. A 3×3 foot corner shower unit is the most space-efficient shower option. A wall-hung vanity rather than a floor-standing one creates the impression of more floor space. Use large-format tiles to minimize grout lines and make the small bathroom feel larger and more seamless.
| Bathroom Size | Fixtures That Fit | Comfort Level |
|---|---|---|
| 4×6 ft (24 sq ft) | Toilet, sink, tiny shower | Minimal |
| 5×7 ft (35 sq ft) | Toilet, vanity, corner shower | Functional |
| 6×8 ft (48 sq ft) | Toilet, vanity, full shower | Comfortable |
| 8×8 ft (64 sq ft) | Toilet, double vanity, full shower | Spacious |
7. Plan the Kitchen Zone Efficiently
A shed house kitchen must be compact, efficient, and completely functional. Every inch of counter space, cabinet space, and appliance placement must be intentional. A poorly planned tiny kitchen frustrates daily life. A well-planned one works beautifully regardless of its size.

A galley kitchen — two parallel countertops facing each other — is the most efficient layout for a narrow shed house. It provides maximum workspace and storage in the minimum floor footprint. A single-wall kitchen works well when the shed house is very narrow. An L-shaped kitchen suits corner positions and creates a natural division between the kitchen and living area. Include at minimum a two-burner stove, a compact refrigerator, a single sink, and adequate counter space on either side of the cooking surface.
- Include at least 18 inches of counter space on each side of the cooking surface
- A compact 24-inch wide refrigerator saves significant kitchen floor space
- Open shelving rather than upper cabinets creates a less claustrophobic kitchen atmosphere
- A kitchen island on wheels adds flexible workspace that can be moved when not needed
- Undermount lighting beneath upper shelves or cabinets dramatically improves kitchen functionality
8. Incorporate a Sleeping Loft for Bonus Space
A sleeping loft is one of the most ingenious features of any shed house plan. It uses the vertical space created by a gable or gambrel roof to add a full sleeping area without consuming any of the main floor footprint. The loft sits above the main living area, reached by a compact stair or a ship’s ladder, and transforms a small floor plan into a genuinely two-level home.

A sleeping loft needs a minimum ceiling height of 3.5 feet at the lowest point for comfortable sleeping. Four feet allows sitting up comfortably in bed. Five feet allows standing in the center of the loft for dressing. Plan the loft floor area to accommodate the mattress size with at least 12 inches of clearance on each accessible side. Integrate storage into the loft knee walls — the triangular spaces beneath the sloped roof on each side — for built-in drawers and shelving that use otherwise wasted space.
| Loft Headroom | Usability | Best Mattress Size |
|---|---|---|
| 3–3.5 ft | Sleeping only | Twin or Full |
| 4–4.5 ft | Sleeping, sitting up | Full or Queen |
| 5–5.5 ft | Sleeping, limited standing | Queen |
| 6+ ft | Full standing room | Any size |
9. Frame the Structure Correctly
Proper framing is the structural foundation that everything else depends on. A correctly framed shed house is strong, square, plumb, and built to last for decades. A poorly framed one develops problems — racking, settling, door and window alignment issues — that become increasingly expensive to correct over time.
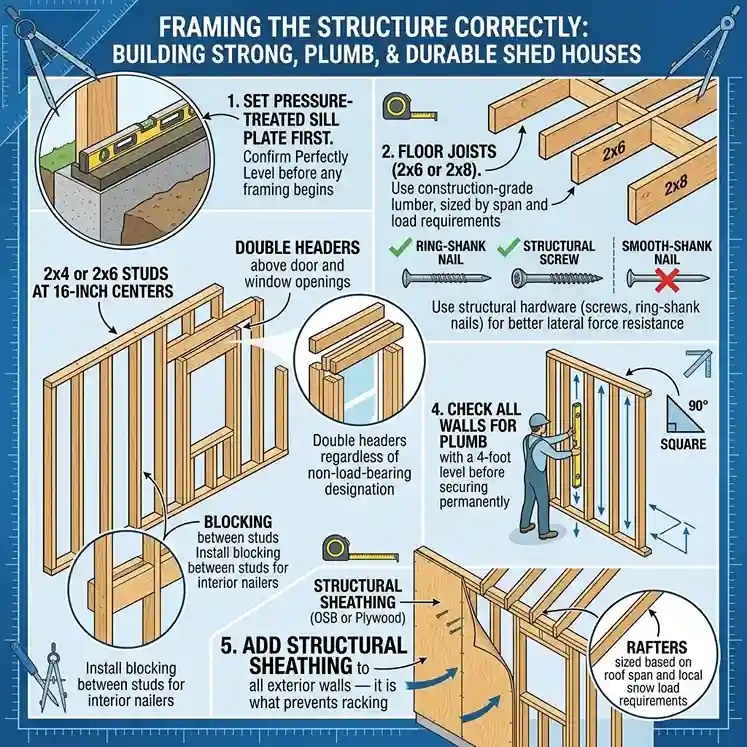
Standard shed house framing uses 2×4 or 2×6 studs at 16-inch centers for walls. Floor joists use 2×6 or 2×8 lumber depending on span length and load requirements. Rafters are sized based on roof span and local snow load requirements. All structural lumber should be construction-grade or better. Use structural screws or ring-shank nails rather than smooth-shank nails for all framing connections — they hold significantly better under the lateral forces that affect small structures.
- Set the pressure-treated sill plate first and confirm it is perfectly level before any framing begins
- Check all walls for plumb with a 4-foot level before securing them permanently
- Add structural sheathing to all exterior walls — it is what prevents the structure from racking
- Double all headers above door and window openings regardless of non-load-bearing designation
- Install blocking between studs at regular intervals to provide nailers for interior finishing
10. Insulate Properly for Year-Round Comfort
Insulation transforms a shed from a seasonal structure into a comfortable year-round home. Without proper insulation, a shed house is unbearably hot in summer and bitterly cold in winter. Energy bills are enormous. The structure is genuinely unlivable for significant portions of the year. Insulation is one of the highest-return investments in any shed house build.

The minimum recommended insulation values for a habitable shed house are R-19 in walls and R-30 in the ceiling or roof. Spray foam insulation provides the highest performance per inch and simultaneously air-seals the structure. Rigid foam board insulation is the most cost-effective option for shed house construction. Fiberglass batts work but must be carefully installed to avoid gaps and compression that significantly reduce their effectiveness.
| Insulation Type | R-Value per inch | Cost Level | Best Application |
|---|---|---|---|
| Spray foam (closed cell) | R-6 to R-7 | High | All surfaces, best air sealing |
| Rigid foam board | R-4 to R-6 | Moderate | Walls, roof, under floor |
| Fiberglass batts | R-3 to R-3.8 | Low | Standard stud cavities |
| Mineral wool batts | R-3.7 to R-4.2 | Moderate | Walls, better fire rating |
| Cellulose (blown in) | R-3.5 to R-3.8 | Low-Moderate | Ceiling cavities |
11. Install Electrical Systems Safely
Electrical work in a shed house requires either a licensed electrician or thorough knowledge of residential electrical code. Incorrectly installed electrical systems are both dangerous and illegal. A proper electrical installation begins with calculating the total electrical load, then sizing the service panel, then planning the circuit layout before running a single wire.
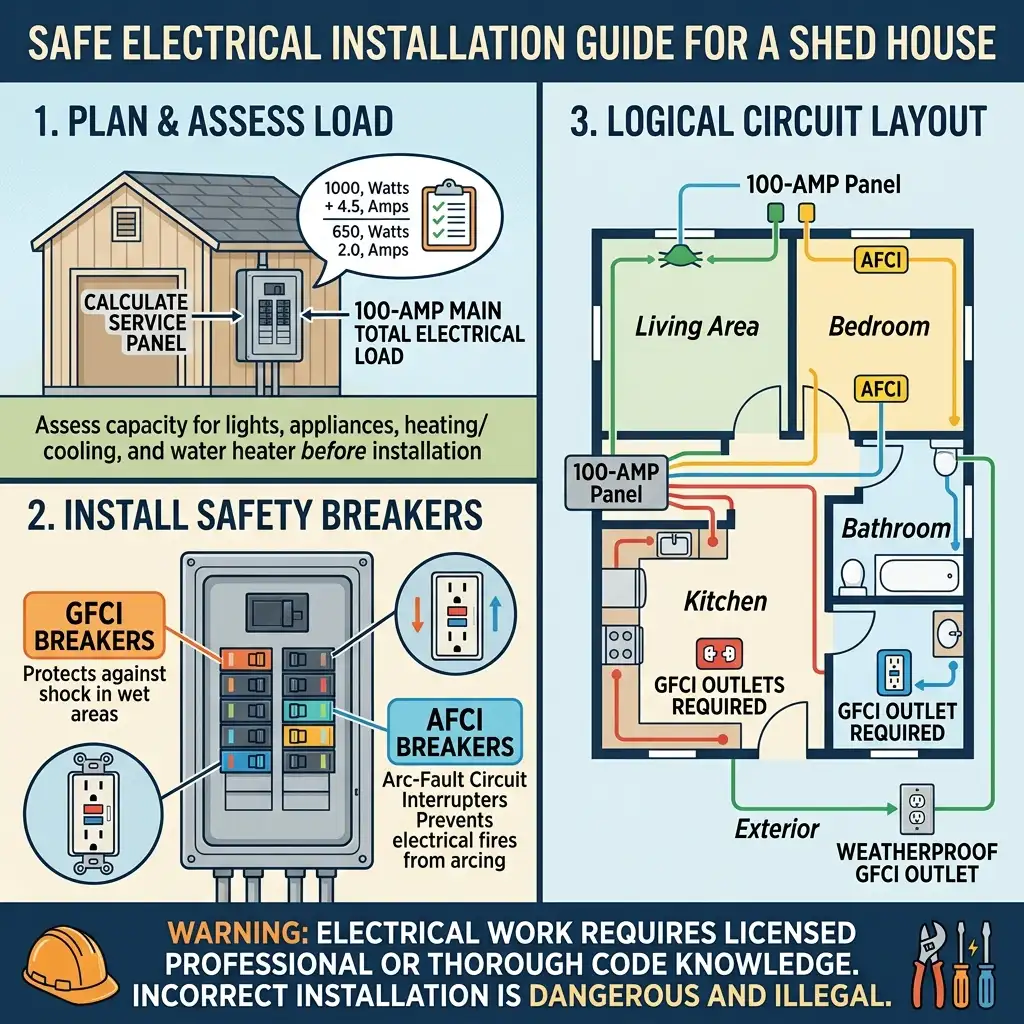
A basic shed house typically needs a 100-amp service panel. This provides adequate capacity for lighting, outlets, kitchen appliances, a heating and cooling unit, and a water heater. Plan circuits logically — kitchen on dedicated circuits, bathroom on a GFCI-protected circuit, bedroom and living areas on separate circuits. All bathroom and kitchen outlets must be GFCI protected. All outdoor outlets must be GFCI and weatherproof. Install arc-fault circuit interrupters on bedroom circuits as required by current electrical code.
- Hire a licensed electrician for the service connection from the utility pole or main panel
- All electrical work inside the structure must meet local residential electrical code
- Install a subpanel inside the shed house rather than running individual circuits from the main house
- Plan outlet locations before drywalling — moving outlets after walls are finished is expensive
- Label every circuit in the panel clearly before closing the wall around it
12. Plumb the Shed House for Running Water
Plumbing transforms a shed from a simple shelter into a genuine home. Running water for drinking, cooking, and bathing is non-negotiable for full-time occupancy. Planning the plumbing layout carefully before construction begins saves significant time, money, and wall-opening later.

Group all wet areas — kitchen and bathroom — on the same wall or back-to-back if possible. This minimizes the length of supply lines and drain pipes required. It also concentrates the areas requiring wall penetrations for pipes. Supply lines run from the main water connection to fixtures through the wall cavities. Drain lines slope downward at a minimum of one quarter inch per foot toward the main drain connection. Install a water heater appropriately sized for the occupancy — a compact tankless unit works well in most shed house applications.
| Plumbing Component | Minimum Size | Code Requirement |
|---|---|---|
| Cold water supply line | 3/4 inch to structure | Required |
| Hot water supply line | 1/2 inch minimum | Required |
| Shower drain | 2 inch minimum | Required |
| Toilet drain | 3 inch minimum | Required |
| Kitchen sink drain | 1.5 inch minimum | Required |
| Vent stack | 3 inch minimum | Required |
13. Choose the Right Foundation for Your Shed House
The foundation supports everything above it. An inadequate foundation causes settling, cracking, door and window misalignment, and structural damage. The right foundation depends on your local soil conditions, frost depth, and whether the structure is permanent or potentially moveable.

Concrete piers at the four corners and mid-spans are the most common and affordable shed house foundation. Each pier is poured in a tube form dug below the local frost line. The piers support a pressure-treated beam that carries the floor frame. This system elevates the floor above grade, improving drainage and pest resistance. A concrete slab is more expensive but provides the most stable, moisture-resistant foundation for a permanent structure. Adjustable steel pier blocks on a gravel pad work for non-permanent structures in mild climates.
14. Design the Exterior for Curb Appeal
A shed house that looks like a temporary structure from the outside undermines everything beautiful happening inside. Thoughtful exterior design transforms a utilitarian shed into an attractive small home that fits comfortably into its neighborhood setting.

Exterior cladding choices have enormous visual impact. Horizontal lap siding in wood or fiber cement creates a traditional cottage appearance. Board and batten vertical siding creates a farmhouse or barn aesthetic. Cedar shingles create a New England cottage look. Metal cladding in standing seam or corrugated panels creates a contemporary, industrial appearance. All exterior cladding must be appropriate for ground contact at the base and must include a proper moisture barrier beneath it.
| Exterior Cladding | Cost per sq ft | Maintenance | Visual Style |
|---|---|---|---|
| Fiber cement lap siding | $3–$6 | Low | Traditional cottage |
| Board and batten wood | $2–$5 | Moderate | Farmhouse, rustic |
| Cedar shingles | $3–$7 | Moderate | New England cottage |
| Metal standing seam | $5–$10 | Very Low | Contemporary |
| Vinyl lap siding | $2–$4 | Very Low | Traditional, budget |
15. Plan Window and Door Placement Carefully
Windows and doors are not just functional openings. They are the primary architectural elements that give a shed house its character and charm. They also determine how much natural light enters, how ventilation flows, and how connected the interior feels to the outdoor environment.

Place windows on multiple walls for cross-ventilation — air enters on the windward side and exits on the opposite side, creating natural cooling. Position the main living area windows to capture the best view and the most natural light. Place the kitchen window above the sink for both light and outdoor connection. Bedroom windows need to meet egress requirements — a minimum opening of 5.7 square feet — for fire escape in addition to light and ventilation. Avoid placing too many windows on the west-facing wall as afternoon sun creates significant heat gain in summer.
- Egress windows in sleeping areas must have a minimum clear opening of 5.7 square feet
- Window height should be consistent throughout the house for a cohesive exterior appearance
- Casement windows provide better ventilation than double-hung windows of the same size
- A single large window creates more visual impact than multiple small ones of the same total area
- Position windows to create views from the main seating and activity areas inside
16. Maximize Interior Space With Smart Design
Every square foot inside a shed house must earn its place. Smart interior design strategies turn a compact floor plan into a space that feels generous, comfortable, and completely livable. The difference between a cramped tiny house and a comfortable one is almost entirely a matter of design decisions rather than actual square footage.

Built-in furniture uses space that freestanding furniture cannot. A built-in window seat with storage beneath serves as seating, a reading nook, and a storage solution in one. Built-in shelving flanking a doorway turns a transitional space into a productive storage wall. A Murphy bed folds into the wall during the day, returning the entire floor of the sleeping area to living use. Multi-functional furniture — a dining table that folds down from the wall, a sofa that converts to a guest bed — doubles the function of every square foot.
| Space Maximizing Strategy | Space Gained | Cost Level |
|---|---|---|
| Murphy bed installation | Full bedroom floor freed | Moderate |
| Window seat with storage | Seating + 20–40 cu ft storage | Low-Moderate |
| Built-in staircase storage | 15–30 cu ft per step | Moderate |
| Fold-down wall table | Full dining area when needed | Low |
| Loft sleeping area | Entire ground floor freed | Low-Moderate |
17. Create a Comfortable Living Area
The living area is where the quality of daily life in a shed house is most experienced. It must accommodate relaxing, socializing, and in many cases working from home. In a small floor plan, every piece of living room furniture must be chosen and positioned with exceptional care.

A compact sofa — 72 to 84 inches rather than a full 90-inch version — fits a shed house living area without dominating it. A loveseat and two accent chairs create more flexibility than a large sectional. A lift-top coffee table provides surface space and hidden storage simultaneously. Float furniture away from the walls — contrary to instinct, furniture pulled toward the center of the room makes the space feel larger. A single large rug anchors the arrangement and defines the living zone within an open plan shed house.
18. Finish the Interior Walls and Ceiling
Interior wall and ceiling finishing transforms a raw framed structure into a home. The finishing material choices affect the atmosphere, the apparent size, and the overall quality feel of every room. Choose materials that are appropriate for the small scale of a shed house interior.

Shiplap is one of the most popular interior wall finishes for shed houses. It adds texture and warmth that painted drywall cannot match. It is lighter than drywall and easier to install in a small DIY project. Drywall creates a smooth, seamless finish that accepts any paint color or wallpaper treatment. Tongue-and-groove pine paneling creates a cabin-like warmth that suits rustic shed house aesthetics beautifully. Whatever finish is chosen, light colors on walls and ceilings are strongly recommended — they make the interior feel larger, brighter, and more open.
| Interior Wall Finish | Weight | DIY Difficulty | Atmosphere |
|---|---|---|---|
| Drywall | Heavy | Moderate | Clean, modern, versatile |
| Shiplap planks | Light | Easy | Farmhouse, warm |
| Tongue-and-groove pine | Light | Easy | Cabin, rustic, cozy |
| Peel-and-stick shiplap | Very Light | Very Easy | Budget farmhouse |
| Plywood (sanded) | Moderate | Easy | Industrial, modern |
19. Install Heating and Cooling for All-Season Living
A shed house without proper heating and cooling is only habitable for a fraction of the year. Full-time shed house living requires a climate control system that keeps the interior comfortable in both summer heat and winter cold. The compact size of a shed house actually works in favor of efficient climate control — small spaces heat and cool quickly with appropriately sized systems.

A mini-split heat pump system is the best all-in-one solution for most shed houses. It provides both heating and cooling from a single system. A 9,000 to 12,000 BTU unit handles most shed houses up to 400 square feet effectively. Installation requires only a small penetration through the wall for the refrigerant line. No ductwork is needed. The system is energy-efficient, quiet, and controllable via smartphone. A wood or pellet stove provides supplemental or primary heating with a beautiful visual element in colder climates.
20. Plan Storage From the Beginning
Storage planning in a shed house must happen during the design phase — not as an afterthought once walls are closed. Retrofit storage solutions are always less effective and more expensive than storage built into the original plan. Every dead space — beneath stairs, above door frames, inside knee walls — is a storage opportunity that must be captured in the plan.

Draw every storage solution onto the floor plan before construction begins. Mark under-stair drawers, knee wall cabinets, loft storage cubbies, built-in wardrobe spaces, and kitchen pantry areas explicitly. Calculate the total storage volume the plan provides and compare it to the storage requirements of the intended occupants. A shed house with inadequate storage feels cluttered and cramped within weeks of occupation. One with thoughtfully planned storage feels organized and spacious regardless of its square footage.
| Storage Location | Storage Type | Volume Gained |
|---|---|---|
| Under stair steps | Pull-out drawers | 15–30 cu ft |
| Loft knee walls | Built-in shelving | 20–60 cu ft |
| Above door frames | High shelf | 2–5 cu ft per door |
| Bed frame | Drawer base | 10–25 cu ft |
| Window seat base | Hinged lid storage | 5–15 cu ft |
| Bathroom wall niche | Recessed shelving | 1–3 cu ft |
21. Choose a Shed House Plan Style That Suits You
Shed house plans come in every architectural style imaginable. The structural simplicity of shed framing is compatible with traditional, modern, rustic, and farmhouse aesthetics. Choosing a style before designing the plan ensures that every detail — from the roof pitch to the window style to the exterior cladding — works together as a cohesive whole.

A modern farmhouse shed house uses board and batten siding, a simple gable roof, black window frames, and a welcoming front porch. A Scandinavian-inspired shed house uses clean lines, minimal trim, large windows, and a monochromatic exterior palette. A rustic cabin shed house uses reclaimed wood siding, exposed interior timber framing, a steep gable or gambrel roof, and a stone or brick chimney. A contemporary shed house uses metal cladding, flat or low-slope roof, floor-to-ceiling glazing, and a minimalist material palette.
22. Decorate the Interior to Feel Like a Proper Home
Decoration transforms a finished construction project into a home. The design principles that apply to any interior — cohesive color palette, layered lighting, appropriate furniture scale, personal touches — apply with even greater importance in the compact interior of a shed house. Every decorating decision has an outsized impact in a small space.

Use a light, cohesive color palette throughout to visually expand the space. Layer lighting across three levels — overhead, task, and ambient — in every room. Choose furniture scaled appropriately to the room dimensions. Introduce texture through rugs, cushions, throws, and natural materials. Display meaningful personal objects — art, photographs, collections — that make the space feel genuinely yours. Add plants for life, color, and air quality. A shed house decorated thoughtfully and personally is always more beautiful than a larger home furnished without intention.
For warm and cozy interior decorating ideas that translate beautifully to a shed house interior, these warm rustic living room ideas capture exactly the layered, intentional atmosphere that makes a small shed house feel like the most welcoming home imaginable.
23. Build a Front Porch to Extend the Living Space
A front porch multiplies the usable living space of a shed house without adding to the conditioned floor area. It creates an outdoor room that functions as a dining area, a reading spot, a social gathering space, and a transitional zone between inside and outside. A porch also dramatically improves the exterior appearance and curb appeal of any shed house.

Even a simple four-foot deep covered porch running the full width of the shed house front adds tremendous value and livability. Add simple posts, a beam, and a roof extension from the main shed roof. Install a simple railing if the porch floor is elevated more than 30 inches above grade. A porch swing, two rocking chairs, and a small side table furnish the porch completely at minimal cost. The porch becomes the most used living space in the entire property on warm evenings and pleasant days.
24. Estimate Costs and Build a Realistic Budget
Shed house costs vary enormously depending on size, material quality, finish level, and whether you build yourself or hire contractors. A realistic budget prevents the project from stalling halfway through when funds run short. Understanding the full cost before starting allows you to make informed decisions about what to include, what to defer, and where to invest most heavily.

A basic DIY shed house shell — foundation, framing, sheathing, roofing, windows, and door — for a 12×24 foot structure costs $8,000–$15,000 in materials. Adding insulation, electrical, plumbing, and HVAC adds another $5,000–$15,000. Interior finishing — drywall or shiplap, flooring, kitchen, bathroom, fixtures — adds $5,000–$20,000. A complete basic shed house built by an owner-builder typically costs $18,000–$45,000 depending on finish quality. Professional construction approximately doubles these material costs.
| Shed House Budget Category | DIY Cost Range | Professional Cost Range |
|---|---|---|
| Foundation | $500–$2,000 | $1,500–$5,000 |
| Framing and sheathing | $3,000–$6,000 | $8,000–$15,000 |
| Roofing | $1,000–$3,000 | $2,500–$6,000 |
| Windows and doors | $1,500–$4,000 | $2,000–$6,000 |
| Insulation | $800–$2,000 | $1,500–$3,500 |
| Electrical | $1,500–$3,500 | $3,000–$7,000 |
| Plumbing | $1,500–$4,000 | $3,500–$8,000 |
| Interior finishing | $3,000–$10,000 | $8,000–$20,000 |
| Total estimate | $13,800–$34,500 | $30,000–$70,500 |
25. Common Mistakes to Avoid in Shed House Planning
Learning from common shed house planning mistakes is one of the most valuable things any first-time builder can do. These mistakes appear repeatedly across build journals, forums, and builder accounts. Knowing them in advance prevents weeks of lost time, thousands of wasted dollars, and the deeply frustrating experience of undoing completed work.

The single most common mistake is beginning construction before verifying permits and zoning compliance. The second most common is underestimating the importance of insulation and ending up with an uncomfortable, expensive-to-heat structure. The third is planning the interior layout poorly — especially bathroom placement — and discovering mid-build that the plumbing cannot run where the fixtures were positioned. Plan thoroughly, permit properly, insulate generously, and sequence the work logically. These four principles prevent the overwhelming majority of shed house building mistakes.
- Never begin construction before confirming permits, zoning approval, and utility connection rights
- Always overestimate insulation — adding more during construction costs very little
- Design plumbing and electrical runs before framing to ensure efficient routing
- Build ten percent larger than you think you need — small spaces always feel smaller than planned
- Budget twenty percent more than your best estimate — shed house projects almost always cost more than expected
- Plan the interior layout with scaled furniture cutouts before finalizing wall positions
- Research your specific climate requirements for foundation depth, insulation values, and roofing
Frequently Asked Questions (FAQs)
Q1: Can I live in a shed house full time legally?
It depends entirely on your local zoning laws and building codes. Many areas permit accessory dwelling units and tiny homes on residential properties. Others restrict habitation to the primary structure only. Some areas have minimum square footage requirements for habitable structures. Always verify your specific local regulations before building any structure intended for full-time human occupation.
Q2: How long does it take to build a shed house?
A motivated owner-builder working on weekends typically completes a basic shed house shell in four to eight weekends. Interior finishing adds another eight to sixteen weekends depending on complexity. A professionally contracted build typically completes a shed house in four to twelve weeks from foundation to occupancy. The permit and approval process often adds weeks or months before construction can begin.
Q3: What is the minimum size for a livable shed house?
Most building codes require a minimum of 120 square feet for habitable space. Practically, a 12×16 foot (192 square foot) shed house is the minimum for comfortable solo occupancy with a sleeping loft, compact kitchen, bathroom, and small living area. A 12×24 foot (288 square foot) plan is more comfortable for a single person or a couple and feels genuinely spacious with a well-designed layout.
Q4: Do shed houses hold their value?
A properly built, permitted, and code-compliant shed house used as an accessory dwelling unit adds measurable value to the primary property. Unpermitted structures typically add little to no appraised value and can create liability issues during property sales. The quality of construction, the finish level, and the permitted status are the primary determinants of value.
Q5: What is the most cost-effective shed house size?
The 12×24 foot (288 square foot) plan offers the best balance of livability, cost, and construction simplicity for most owner-builders. It is large enough to feel comfortable, small enough to build quickly and affordably, and dimensionally efficient with standard lumber sizes. It can be built to a habitable standard by a motivated owner-builder for $20,000–$35,000 in total materials depending on finish quality.
Conclusion
A shed house is one of the most accessible, affordable, and genuinely exciting paths to creating a home that is entirely your own. From the foundation to the rooftop, every decision is yours to make. The planning is thoughtful, the build is rewarding, and the result is a space that no cookie-cutter subdivision home can ever match in personal meaning and character.
Start with research — zoning, codes, and local requirements. Then plan on paper until the layout feels exactly right. Build on a solid foundation, insulate generously, and finish thoughtfully. Decorate with intention and fill the space with things that make it genuinely yours. A shed house built with care becomes far more than a structure. It becomes the most personal, meaningful home you have ever lived in.