Your pantry is a chaotic mess of expired cans, fallen boxes, and forgotten ingredients. You spend ten minutes searching for one simple item every single time you cook. That daily frustration is completely unnecessary and entirely fixable.
A well-organized pantry saves time, reduces food waste, and makes cooking genuinely enjoyable. The right systems and products turn even the most chaotic pantry into a calm, functional space.


These 34 pantry organization ideas will completely transform how your pantry looks and works every single day.
1. Start With a Complete Pantry Purge
You cannot organize a pantry without first removing everything inside it. A full purge reveals what you actually have, what is expired, and what belongs elsewhere. This critical first step makes every subsequent organization decision much easier and more accurate.

Pull every single item out and place it on your kitchen counters and table. Check every expiration date ruthlessly and discard anything past its date. Group similar items together as you sort so you can see exactly what categories you are working with.
| Purge Category | Action to Take |
|---|---|
| Expired items | Discard immediately, no exceptions |
| Duplicates | Keep one, relocate or use others first |
| Wrong location items | Move to appropriate storage area |
| Rarely used items | Relocate to less accessible shelf |
2. Measure Your Pantry Before Buying Anything
Measuring is the most important step most people skip entirely. Buying containers or shelves without measurements leads to wasted money and frustration. Every organization product you purchase must fit your specific pantry dimensions perfectly.

Measure the height, width, and depth of every shelf in your pantry. Note the distance between each shelf so you know the vertical clearance available. Measure any awkward corners, door widths, and floor space for potential cart or bin placement.

| Measurement to Take | Why It Matters |
|---|---|
| Shelf depth | Determines container size limit |
| Shelf height clearance | Determines maximum bin height |
| Total pantry width | Guides shelf and rack planning |
| Door width clearance | Ensures door racks fit properly |
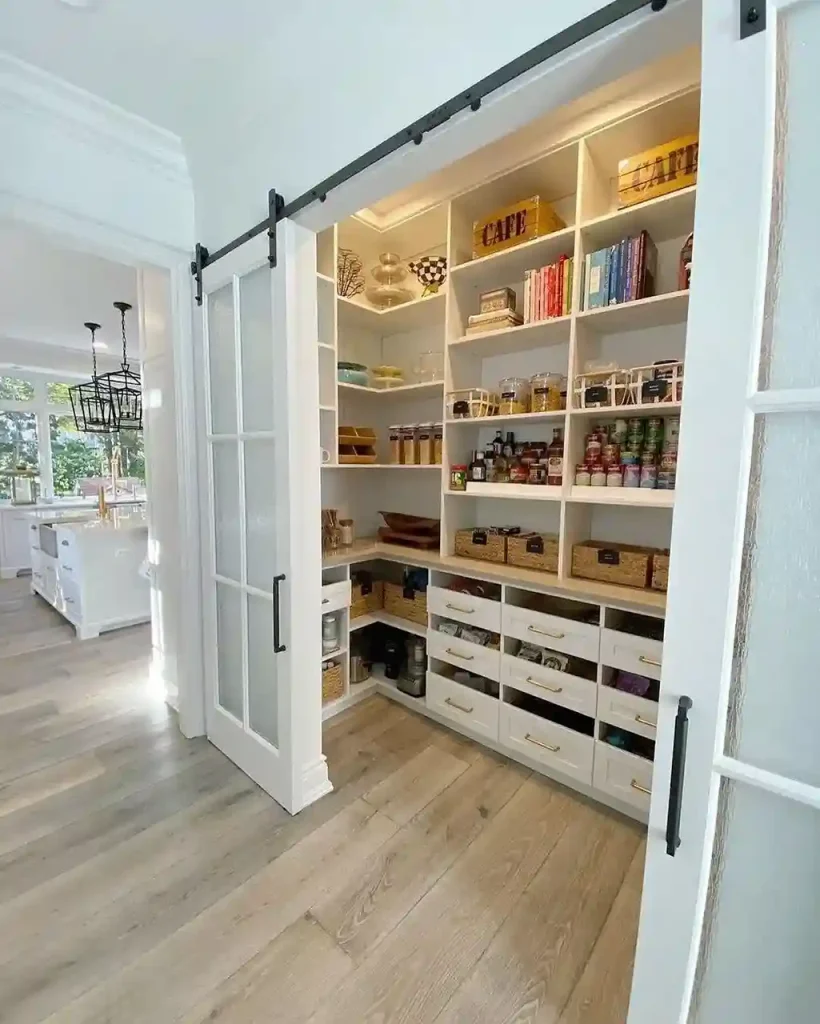
3. Install Adjustable Shelving for Maximum Flexibility
Fixed shelves limit your pantry’s potential from the very beginning. Adjustable shelving lets you customize shelf heights as your storage needs change. This single upgrade makes a pantry dramatically more functional and adaptable over time.

Replace fixed shelves with adjustable shelf pin systems mounted into the side walls. Wire shelving systems with adjustable brackets are affordable and easy to install. Allow at least 6 inches of clearance above the tallest items on each shelf level.
| Adjustable Shelving Type | Best Pantry Use |
|---|---|
| Shelf pin system | Built-in pantry, permanent shelves |
| Wire shelving with brackets | Freestanding, flexible organization |
| Track and bracket system | Wall-mounted, heavy-duty storage |
| Freestanding shelving unit | Rented home, no-install solution |
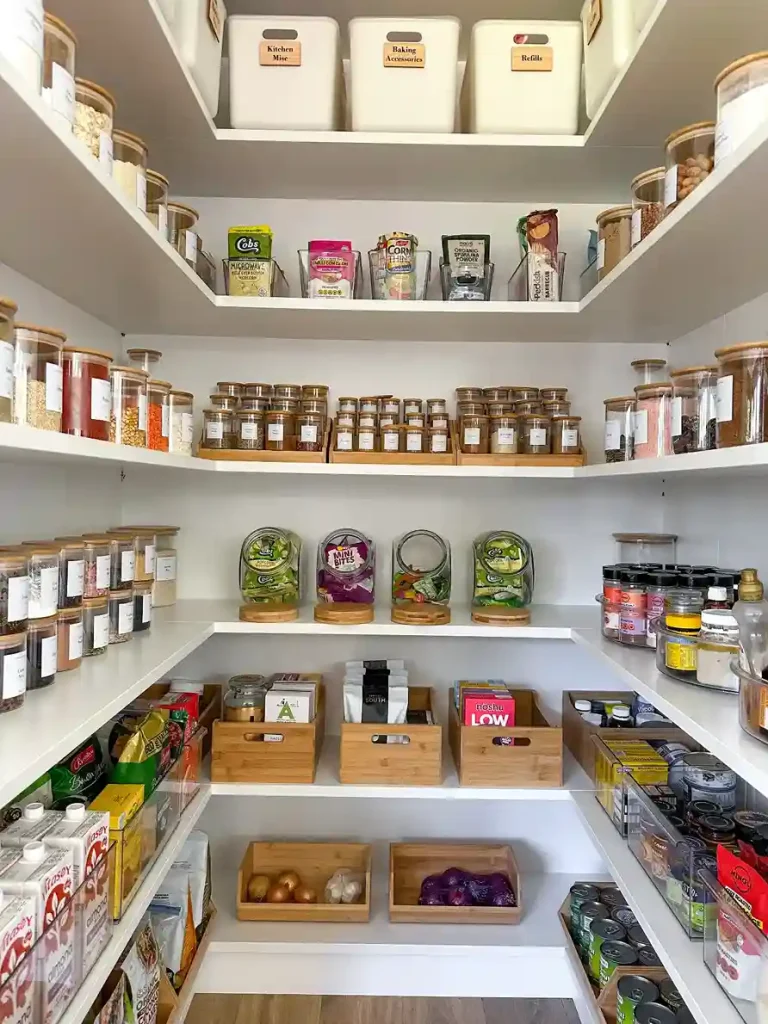
4. Use Uniform Airtight Containers for Dry Goods
Uniform airtight containers are the single most transformative pantry organization purchase. They turn chaotic open bags and boxes into a clean, cohesive system. Airtight containers also keep food fresher significantly longer than original packaging.

Choose one container style and brand and purchase enough for all your dry goods at once. Square containers use shelf space far more efficiently than round ones. Label every container clearly on the front with the contents and expiration date. Find more organization inspiration from linen closet organization for applying the same uniform container system throughout your home.
| Airtight Container Size | Best Contents |
|---|---|
| Small (16–32 oz) | Spices, baking powder, yeast |
| Medium (1–2 qt) | Pasta, rice, oats, sugar |
| Large (1–1.5 gal) | Flour, cereal, large grain portions |
| Extra large (2+ gal) | Pet food, bulk dry goods |
5. Label Everything Clearly and Consistently
Labels are the system that keeps any pantry organized long after the initial setup. Without labels, family members put things back in the wrong place constantly. A clearly labeled pantry is one that everyone in the household can use and maintain independently.

Use a label maker for the cleanest, most professional-looking pantry labels. Write the contents and the expiration date on every container and bin. Label shelves themselves so items always return to their correct designated location.
| Label Placement | What to Write |
|---|---|
| Container front face | Contents and expiration date |
| Bin or basket front | Category name clearly written |
| Shelf edge label | Category zone designation |
| Inside container lid | Quick reference for contents |
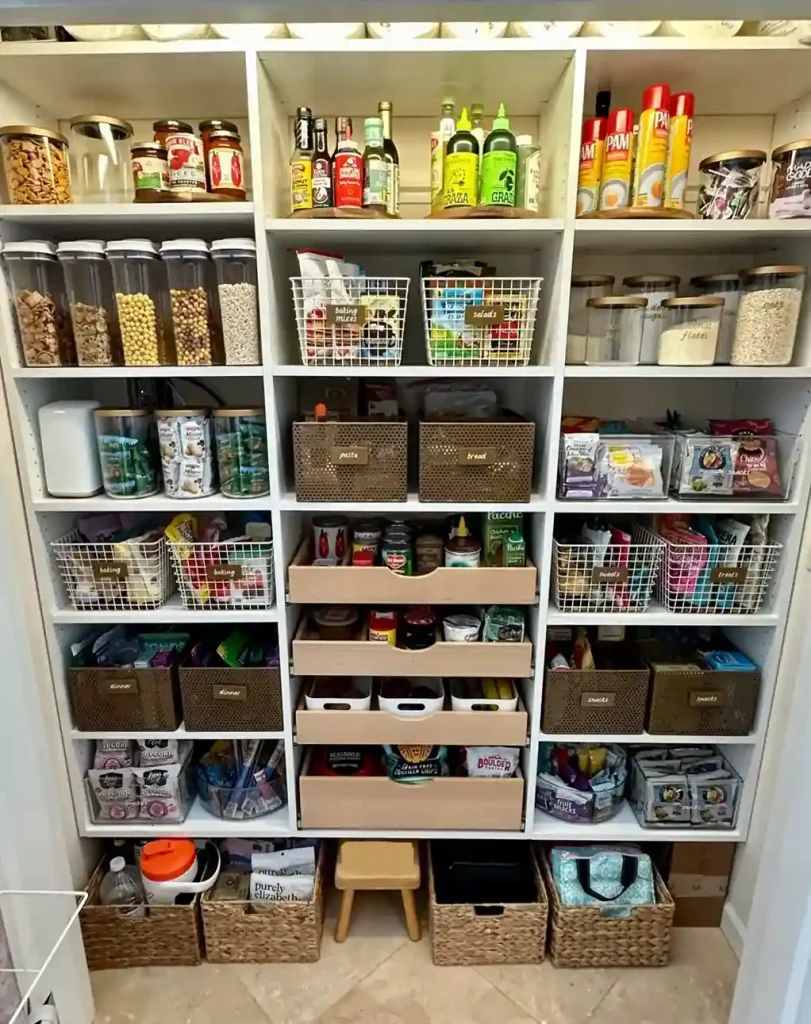
6. Categorize Foods Into Clear Zones
Zones are the organizational backbone of every functional pantry. Grouping similar items together eliminates searching and makes restocking automatic. A properly zoned pantry means everyone in the family knows exactly where every item belongs.

Create dedicated zones for baking, breakfast, canned goods, snacks, pasta, and condiments. Place most frequently used zones at eye level for the easiest daily access. Put rarely used items on the highest shelves and bulk overflow on the lowest shelves.
| Pantry Zone | Shelf Position |
|---|---|
| Daily use items | Eye level, most accessible |
| Baking supplies | Upper middle shelf |
| Canned goods | Lower middle shelf |
| Bulk and overflow | Bottom shelf or floor |
7. Add a Lazy Susan for Corner and Deep Shelf Access
Deep pantry shelves and corner spaces create frustrating dead zones where items get lost. A lazy susan solves this problem brilliantly with one simple addition. Spinning access means nothing ever gets pushed to the back and forgotten again.

Place large lazy susans on deep shelves for canned goods, condiments, and oil bottles. Use a smaller lazy susan on corner shelves for spice jars and small containers. Two-tier lazy susans double the storage capacity while maintaining full rotating access.
| Lazy Susan Size | Best Contents |
|---|---|
| Small 9-inch | Spice jars, small condiments |
| Medium 12-inch | Oils, vinegars, sauces |
| Large 18-inch | Canned goods, large jars |
| Two-tier lazy susan | Double the storage, same footprint |
8. Use Clear Bins to Group and Contain Categories
Clear bins within each pantry zone group related items together perfectly. They prevent individual items from scattering across shelves as they are used. Pull-out bins let you access the back of a shelf without removing everything in front.

Use clear bins for snack packets, sauce pouches, seasoning packets, and small loose items. Label the front of every bin so contents are identifiable without opening each one. Pull-out sliding bins are especially useful on deep shelves where back access is difficult.
| Clear Bin Style | Best Pantry Use |
|---|---|
| Open front pull-out bin | Snacks, packets, small items |
| Solid clear bin with handle | Grouping canned goods by type |
| Stackable clear bin | Vertical space maximization |
| Divided clear bin | Multiple small categories together |
9. Install a Door-Mounted Rack for Extra Storage
The inside of your pantry door is completely wasted space in most homes. A door-mounted rack adds significant extra storage without taking any shelf space. This clever addition can hold spices, small jars, foil, and wrap boxes efficiently.
Measure your door clearance carefully before purchasing any door rack system. Ensure at least 2 to 3 inches of clearance between the rack and the nearest shelf. Over-the-door organizers with multiple pockets work beautifully for spices and small condiments.
| Door Rack Type | Best Items to Store |
|---|---|
| Spice rack organizer | Spice jars, small condiments |
| Wrap and foil holder | Aluminum foil, plastic wrap, parchment |
| Pocket organizer | Sauce packets, seasoning mixes |
| Can organizer | Standard sized canned goods |
10. Create a Dedicated Snack Zone for the Whole Family
A dedicated snack zone eliminates the daily pantry rummaging that drives everyone crazy. When snacks have a clear, defined home, children can find them independently. This single zone reduces pantry disruption by family members significantly.
Designate one full shelf or one clear bin section as the snack zone only. Include only grab-and-go items that require no preparation in this zone. Position the snack zone at a height accessible to all family members including children.
| Snack Zone Item Type | Organization Method |
|---|---|
| Individual chip bags | Standing in a tall clear bin |
| Granola bars and snack bars | Stacked in an open bin |
| Fruit pouches and applesauce | Grouped together in a bin |
| Nuts and dried fruit bags | Smaller bin or clear container |
11. Use Stackable Can Organizers for Canned Goods
Canned goods are one of the most space-inefficient items to store in a pantry. Stacking them in rows means the cans at the back are invisible and forgotten. A can organizer solves this with a first-in, first-out rotation system automatically.

Use tiered can organizers that display cans in a row with easy front access. Load from the back and the oldest cans automatically roll to the front. This rotation system prevents cans from expiring unnoticed at the back of the shelf.
| Can Organizer Style | Capacity |
|---|---|
| Single tier can rack | 6–12 standard cans |
| Double tier can rack | 12–24 standard cans |
| Wall-mounted can dispenser | 36+ cans, gravity-fed |
| Stackable can shelves | Customizable capacity |
12. Add a Small Basket for Onions, Garlic, and Potatoes
Onions, garlic, and potatoes need cool, dark, ventilated storage away from each other. A dedicated ventilated basket in a lower pantry shelf is perfect for these items. Proper storage significantly extends the life of these essential cooking staples.

Use a woven or wire basket with open sides for proper ventilation around produce. Store onions and potatoes on separate shelves or in separate baskets as they cause each other to spoil faster. Check and rotate these items weekly to remove anything beginning to sprout or soften.
| Root Vegetable Storage | Why Separation Matters |
|---|---|
| Onions | Emit gas that spoils potatoes |
| Potatoes | Need dark, cool, ventilated space |
| Garlic | Needs airflow, away from moisture |
| Sweet potatoes | Separate from regular potatoes |
13. Organize Spices With a Dedicated Spice System
Disorganized spices waste enormous amounts of time and money in any kitchen. A proper spice organization system means you can find any spice in seconds. You also stop buying duplicates of spices you already have hidden at the back of a shelf.

Transfer all spices into uniform small jars for a clean, consistent look. Label the tops of jars if stored in a drawer or the fronts if stored on a rack. Organize alphabetically or by cuisine type — both systems work well depending on your cooking style. Find more small space organization strategies from small kitchen organization for a fully organized cooking space.
| Spice Organization Method | Best For |
|---|---|
| Alphabetical order | Quick finding of any spice |
| Organized by cuisine | Grouped Indian, Italian, Mexican etc |
| By frequency of use | Most used at front, rare at back |
| Tiered spice rack | Visual access to all jars at once |
14. Use Magazine Files for Baking Sheets and Cutting Boards
Flat baking sheets, cutting boards, and pan lids are notoriously difficult to store efficiently. Magazine file holders mounted vertically solve this problem completely. They keep flat items upright, separated, and fully accessible without unstacking anything.

Mount three or four magazine files side by side on a lower pantry shelf. Stand baking sheets, cutting boards, and flat pan lids vertically in each slot. Label each file holder so flat items always return to their correct designated position.
| Magazine File Storage Item | Filing Order Suggestion |
|---|---|
| Baking sheets | By size, largest at back |
| Cutting boards | By material, plastic then wood |
| Pot and pan lids | By diameter, largest at back |
| Baking pans and cake tins | By type, by frequency of use |
15. Create a Breakfast Station in the Pantry
A dedicated breakfast station makes busy morning routines dramatically faster. Everything needed for the first meal of the day lives in one accessible, clearly defined zone. Children can even prepare their own breakfast independently from this organized station.

Dedicate one full shelf to all breakfast items — cereal, oats, granola, and breakfast bars. Add a small basket for individual breakfast pouches and single-serve items. Position this zone at an accessible mid-height for all family members to reach easily.
| Breakfast Station Item | Container Style |
|---|---|
| Cereal | Large airtight container |
| Oats and granola | Medium airtight container |
| Breakfast bars | Open bin for easy grab access |
| Pancake mix and syrup | Grouped together with lazy susan |
16. Add Risers and Shelf Expanders for Double the Space
Shelf risers essentially create a second level on any existing pantry shelf. They double the storage capacity of each shelf without adding any new shelving. This affordable solution transforms underutilized shelf space into highly efficient double-decker storage.
Use adjustable shelf risers for canned goods, small containers, and spice jars. Place taller items on the actual shelf and shorter items on the riser platform above. Expandable shelf risers fit almost any shelf width making them universally useful.
| Shelf Riser Use | Items Best Stored |
|---|---|
| Back of shelf riser | Canned goods, short jars |
| Front of shelf riser | Spice containers, small tins |
| Full shelf riser | Double tier for uniform size items |
| Corner riser | Dead corner space maximization |
17. Use Chalkboard Labels for a Beautiful Farmhouse Look
Chalkboard labels add a beautiful, cohesive farmhouse aesthetic to any pantry organization. They look professional, charming, and can be wiped clean and rewritten when contents change. This styling detail turns a functional pantry into a genuinely beautiful space.

Apply chalkboard labels to the fronts of all uniform containers and bins. Use chalk pens rather than regular chalk for cleaner, more permanent writing. Coordinate with other farmhouse kitchen elements for a completely cohesive aesthetic. Get the full farmhouse pantry look by pairing with kitchen counter decor ideas for a styled, beautiful kitchen overall.
| Chalkboard Label Style | Best Application |
|---|---|
| Round chalkboard labels | Small spice and condiment jars |
| Rectangular chalkboard labels | Large airtight food containers |
| Chalkboard adhesive strips | Bin and basket fronts |
| Chalkboard painted bin | Full bin as the label itself |
18. Install Pull-Out Drawers for Deep Shelf Access
Pull-out drawers are the most effective solution for deep pantry shelves. They bring everything stored at the back fully forward with one smooth motion. This single addition eliminates the most common pantry frustration of unreachable back-shelf items.

Install roll-out drawer systems on lower pantry shelves where deep access is hardest. Use stackable pull-out baskets on upper shelves for lighter items. Wire pull-out baskets allow you to see contents from above without opening anything.
| Pull-Out Drawer Style | Best Shelf Position |
|---|---|
| Heavy-duty roll-out drawer | Lower shelves, heavy items |
| Wire pull-out basket | Middle shelves, medium items |
| Stackable pull-out bins | Any shelf, lightweight items |
| Sliding cabinet organizer | Deep narrow spaces |
19. Organize Baking Supplies in One Dedicated Zone
Baking supplies spread across multiple pantry locations cause endless frustration. Grouping every baking item together in one zone makes baking faster and more enjoyable. You can prep a recipe without hunting through three different shelves for ingredients.

Dedicate one or two full shelves to baking supplies exclusively. Include flour, sugar, baking soda, baking powder, cocoa, chocolate chips, and extracts together. Use a tiered riser inside the baking zone so smaller items are fully visible behind taller ones.
| Baking Zone Category | Container Size Needed |
|---|---|
| Flour and sugar | Extra-large airtight containers |
| Baking powder and soda | Small airtight containers |
| Chocolate chips and sprinkles | Medium airtight containers |
| Vanilla and flavor extracts | Small lazy susan for bottles |
20. Use a Pegboard Inside the Pantry for Flexible Storage
A pegboard installed inside the pantry creates endlessly customizable wall storage. Hooks, bins, shelves, and holders attach and reposition without any tools. This flexible system adapts perfectly as your pantry storage needs evolve over time.

Mount a painted pegboard on the back wall of the pantry for maximum impact. Use pegboard hooks for hanging measuring cups, spoons, and small utensils. Add pegboard shelves for spice jars and small containers that free up shelf space. Find pegboard organization inspiration from craft room ideas where pegboards are used creatively for multi-purpose storage solutions.
| Pegboard Accessory | Items to Hang or Hold |
|---|---|
| Metal hooks | Measuring cups, spoons, bags |
| Small pegboard bins | Spice jars, seasoning packets |
| Pegboard shelves | Small containers, oils |
| Clip holders | Recipe cards, shopping lists |
21. Add a Step Stool for Safe Upper Shelf Access
Upper pantry shelves go completely unused in many homes because reaching them safely is awkward. A dedicated step stool stored inside the pantry makes upper shelf access safe and convenient. This simple addition effectively increases your usable pantry space by 20 to 30 percent.
Choose a folding step stool that fits flat against the pantry wall when not in use. A non-slip surface on the step is essential for kitchen safety. Use upper shelves for seasonal items, bulk backstock, and rarely used appliances and bakeware.
| Upper Shelf Storage Strategy | Item Category |
|---|---|
| Seasonal baking supplies | Holiday cookie cutters, specialty items |
| Bulk backstock | Extra canned goods, extra dry staples |
| Large appliances | Rarely used blender, food processor |
| Holiday entertaining items | Specialty platters, serving pieces |
22. Create a Kids’ Snack Drawer or Bin at Child Height
Giving children their own accessible pantry zone dramatically reduces daily kitchen interruptions. Kids can help themselves to approved snacks without needing adult assistance. This simple organizational choice promotes independence and reduces parental stress every day.

Designate the lowest accessible shelf or a pull-out drawer as the kids-only snack zone. Stock it exclusively with healthy, pre-portioned, parent-approved snack options. Teach children that this is their zone and they may help themselves freely to anything inside.
| Kids’ Zone Snack Option | Portion Style |
|---|---|
| Granola bars | Individual wrapped bars |
| Fruit pouches | Single-serve squeeze pouches |
| Nuts or trail mix | Pre-portioned small bags |
| Crackers and rice cakes | Individual serving packs |
23. Use Vertical Dividers for Pan Lids and Trays
Pan lids are one of the most frustrating storage challenges in any kitchen. Vertical dividers allow lids to stand individually without stacking or falling. This simple solution makes finding the right lid instantaneous rather than a five-minute hunt.

Install vertical tension dividers or purchase a dedicated lid organizer for one pantry shelf. Stand each lid vertically between dividers organized by size from smallest to largest. Store matching pots and pans nearby so their lids are always in the same accessible zone.
| Vertical Divider Use | Item Organized |
|---|---|
| Pan lids | Stood vertically by size |
| Baking sheets | Stood vertically, separated |
| Cutting boards | Each board in its own slot |
| Serving trays and platters | Vertically filed by size |
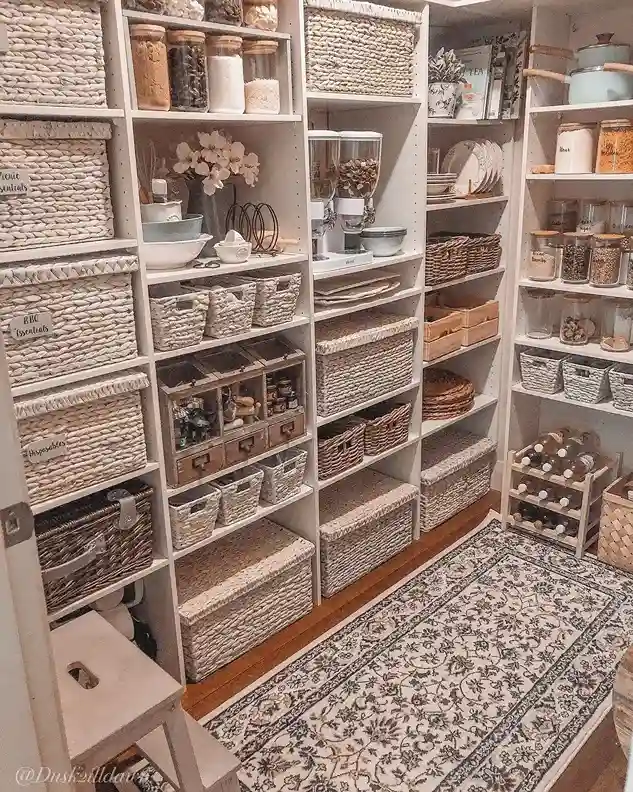
24. Add Baskets for a Beautiful Farmhouse Pantry Look
Woven baskets transform a functional pantry into a beautiful, magazine-worthy space. They contain loose items, add natural texture, and create visual warmth throughout. The right baskets make a pantry feel like a considered, styled room rather than a storage closet.

Use matching woven baskets in the same material and color for the most cohesive look. Label each basket clearly on the front with a chalkboard or printed label. Rattan, seagrass, and water hyacinth baskets all look stunning in an organized pantry. Get farmhouse pantry basket inspiration from hidden storage ideas for beautiful ways to conceal clutter with stylish baskets.
| Woven Basket Size | Best Contents |
|---|---|
| Small basket | Seasoning packets, tea bags |
| Medium basket | Snack bars, individual pouches |
| Large basket | Bread, onions, extra produce |
| Extra-large basket | Paper bags, reusable bags |
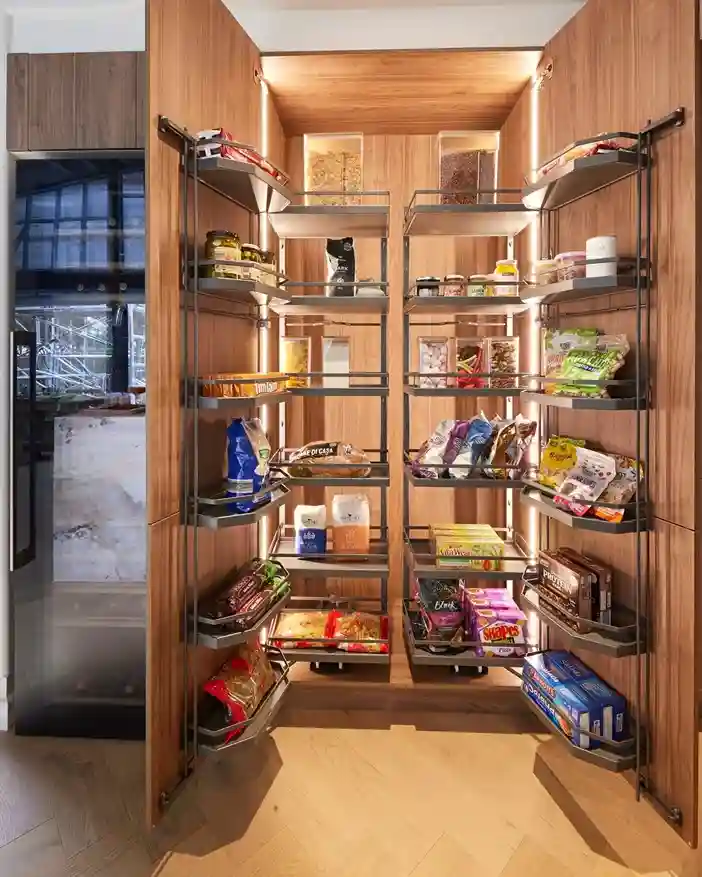
25. Organize a Small Pantry With Over-the-Door Solutions
Small pantries need every square inch of space utilized cleverly. Over-the-door organizers use the most overlooked storage surface in any small pantry. A well-equipped pantry door can hold dozens of items that previously cluttered the shelves.

Install an over-the-door organizer with multiple rows of pockets or shelves. Use the top rows for lighter items like spice packets and foil boxes. Use lower rows for heavier items like condiment bottles and sauce jars. Pair with closet shelving ideas for maximizing small vertical storage spaces throughout your home.
| Small Pantry Door Solution | Storage Capacity Added |
|---|---|
| 5-pocket over-door organizer | 20–30 small items |
| Over-door spice rack | 24–36 spice jars |
| Over-door can organizer | 12–20 standard cans |
| Over-door shelf system | Full shelf equivalent of storage |
26. Create a Dedicated Paper Goods Zone
Paper goods — napkins, paper towels, bags, and wraps — take up significant pantry space without a system. A designated paper goods zone keeps these bulky items contained and organized. This zone prevents paper goods from randomly scattering across every available shelf.

Use one lower pantry shelf or a large basket for all paper goods together. Store paper towels standing upright rather than laying them on their side to save space. Keep foil, plastic wrap, and parchment paper in a vertical magazine file for easy access.
| Paper Goods Zone Item | Storage Method |
|---|---|
| Paper towels | Standing upright in a row |
| Paper napkins | Stacked flat in a bin |
| Aluminum foil and plastic wrap | Vertical in magazine file |
| Reusable shopping bags | Folded in a large basket |
27. Install Wire Shelving for Maximum Visibility
Wire shelving allows you to see the contents of lower shelves from above without bending down. The open wire construction provides excellent airflow for fresh produce storage. Wire shelves are also easier to clean than solid shelves in a pantry environment.
Choose chrome or white epoxy-coated wire shelving for the cleanest appearance. Add wire shelf liners to prevent small items from tipping through the wire gaps. Use wire shelving specifically in produce zones where airflow matters most for freshness.
| Wire Shelf Benefit | Practical Impact |
|---|---|
| See-through visibility | Find items without removing anything |
| Air circulation | Extends freshness of produce |
| Easy cleaning | No corners for crumbs to collect |
| Flexible configuration | Adjustable to your needs |
28. Use a Freestanding Pantry Cabinet for Kitchens Without One
Many kitchens have no dedicated pantry space whatsoever. A freestanding pantry cabinet creates dedicated food storage in any kitchen layout. This furniture solution delivers full pantry functionality without any renovation or construction.

Choose a freestanding pantry cabinet with adjustable interior shelves for flexibility. Look for one with doors that close fully to keep the contents hidden and dust-free. Place it in a kitchen corner, hallway, or dining area adjacent to the kitchen for best access.
| Freestanding Pantry Type | Best Kitchen Situation |
|---|---|
| Tall single-door cabinet | Narrow kitchen with limited space |
| Double-door armoire style | Open-plan kitchen, statement piece |
| Hutch with bottom cabinets | Dining room adjacent kitchen |
| Rolling pantry cart | Apartment, small kitchen, flexible use |
29. Add a Chalkboard or Whiteboard for Tracking Inventory
A small chalkboard or whiteboard inside the pantry is a practical and charming organization tool. Write a running grocery list directly on the board as items run low. This eliminates forgotten items on grocery runs and prevents overbuying duplicates.
Mount a small chalkboard on the inside of the pantry door or on a side wall. Write the day’s grocery needs as you use the last of any item. Train all family members to write items on the board when they use the last of something.
| Pantry Board Use | Practical Benefit |
|---|---|
| Running grocery list | Never forget a needed item |
| Weekly meal plan | Guides what to use first |
| Expiration date tracker | Flag items needing use soon |
| Family food notes | Communicate preferences and needs |
30. Create a Coffee and Tea Station in the Pantry
A dedicated coffee and tea station in the pantry keeps the kitchen counter completely clear. Everything needed for hot drinks lives in one organized, beautiful zone. This themed zone makes your morning routine faster, calmer, and more enjoyable every day.

Dedicate one full pantry shelf to coffee, tea, and hot drink supplies exclusively. Use a lazy susan for coffee pods, tea bags, and sweetener packets for easy rotation. Add a small tray or basket for individual supplies that keeps the zone contained and tidy.
| Coffee Station Element | Organization Method |
|---|---|
| Coffee pods or grounds | Clear airtight container |
| Tea bags variety | Divided clear bin by type |
| Sugar and sweeteners | Small lazy susan |
| Extra mugs or cups | Stacked at edge of station |
31. Use Drawer Dividers for Pantry Drawers
If your pantry has any drawers, dividers transform them from chaotic junk zones to organized systems. Drawer dividers create defined sections for different categories of small items. Without dividers, pantry drawers become the most disorganized spot in the entire kitchen.

Use adjustable bamboo or plastic drawer dividers cut to your exact drawer dimensions. Dedicate sections to batteries, twist ties, rubber bands, small tools, and miscellaneous hardware. Label each section so items always return to the correct compartment without confusion.
| Pantry Drawer Section | Items to Store |
|---|---|
| Kitchen tools section | Peelers, openers, small gadgets |
| Hardware section | Batteries, picture hooks, tape |
| Paper section | Twist ties, rubber bands, clips |
| Miscellaneous section | Anything that defies other categories |
32. Organize Oils and Vinegars on a Dedicated Riser
Cooking oils and vinegars are used almost daily but create enormous clutter when unorganized. A dedicated shelf riser or lazy susan for bottles keeps them visible, accessible, and organized. Properly organized bottles prevent the cooking delay of searching for the right oil or vinegar.

Group all oils together on one side and all vinegars on the other side of the riser. Place most frequently used oils at the front for immediate access during cooking. Use a lazy susan if you have many bottles so every one is accessible without moving others.
| Oil and Vinegar Organization | Arrangement Method |
|---|---|
| Daily cooking oils | Front of shelf or riser |
| Specialty oils | Behind daily oils |
| Everyday vinegars | Adjacent to oils, front access |
| Specialty vinegars | Behind everyday vinegars |
33. Add Lighting to Dark Pantry Shelves
Poor lighting is one of the most overlooked pantry problems. A dark pantry makes finding items difficult and makes the space feel smaller and more claustrophobic. Good lighting transforms the pantry into a pleasant, functional space you actually enjoy using.

Install battery-powered LED strip lights or puck lights under each shelf edge. Motion-activated lights are the most convenient — they turn on automatically when you open the door. A bright white LED temperature makes identifying item labels and colors easiest in any pantry.
| Pantry Lighting Type | Best Application |
|---|---|
| Motion-sensor LED strips | Full shelf illumination, automatic |
| Battery puck lights | Individual shelf spots, no wiring |
| Plug-in LED strip lights | Outlet-accessible pantry |
| Rechargeable touch lights | Flexible placement anywhere |
34. Maintain the System With a Weekly Five-Minute Reset
The best pantry organization system fails completely without regular maintenance. A five-minute weekly reset keeps the pantry functional and beautiful indefinitely. This small time investment prevents the gradual chaos that destroys every organization effort.

Every week, spend five minutes returning misplaced items to their correct zones. Check for any items running low and add them to your grocery list immediately. Once per month, check expiration dates and rotate older items to the front of shelves.
| Maintenance Task | Frequency |
|---|---|
| Return misplaced items to zones | Weekly, 5 minutes |
| Update grocery list from pantry | Weekly when shopping |
| Expiration date check | Monthly |
| Full purge and deep clean | Every 6 months |
Frequently Asked Questions
How do I organize my pantry from scratch?
Start by removing everything, checking expiration dates, and discarding old items. Measure your shelves and then group remaining items into clear categories. Install your chosen storage solutions and label everything before putting items back in their designated zones.
What are the best containers for pantry organization?
Square airtight containers in a uniform size and brand are the most effective choice. They stack efficiently, keep food fresher longer, and create a cohesive visual system. Clear containers are always better than opaque ones because you can see contents at a glance.
How do I keep my pantry organized long-term?
The key is creating a system that every household member understands and can follow. Label every container, bin, and shelf zone clearly. Do a five-minute weekly reset to return misplaced items and check stock levels. A simple, intuitive system maintains itself far better than a complex one.
What is the best way to organize a small pantry?
Use every vertical inch with adjustable shelving and door organizers. Choose square containers over round ones to eliminate wasted corner space. Use tiered risers to double shelf capacity and pull-out bins for deep shelf access.
How should I arrange food in my pantry?
Place daily-use items at eye level for the easiest access. Store bulk and backup items on the lowest shelves. Keep the highest shelves for seasonal and rarely used items. Group all items by category in dedicated zones rather than arranging by size or container type.
Conclusion
A well-organized pantry is one of the most impactful improvements you can make to your daily home life. It saves time, reduces stress, cuts food waste, and makes cooking genuinely enjoyable. Every minute invested in your pantry organization returns itself many times over in daily convenience.
Start with the purge and the zones and build from there. You do not need to do all 34 steps at once to see dramatic results. Even five or six of these ideas implemented consistently will transform your pantry into a space you are genuinely proud to open every single day.